Netty粘包拆包、自定义Protostuff编解码器_netty protobuf粘包拆包-程序员宅基地
技术标签: 粘包 拆包 Netty protostuff netty
1、Netty粘包拆包
TCP是一个“流”协议,所谓流,就是没有界限的一长串二进制数据。TCP作为传输层协议并不了解上层业务数据的具体含义,会根据TCP缓冲区的实际情况进行数据包的划分;所以在业务上认为是一个完整的包,可能会被TCP拆分成多个包进行发送,也有可能把多个小的包封装成一个大的数据包发送,这就是所谓的TCP粘包和拆包问题。
例如,TCP缓冲区是1024个字节大小,如果应用一次请求发送的数据量比较小,没达到缓冲区大小,TCP则会将多个请求合并为同一个请求进行发送,这就形成了粘包问题;如果应用一次请求发送的数据量比较大,超过了缓冲区大小,TCP就会将其拆分为多次发送,这就是拆包,也就是将一个大的包拆分为多个小包进行发送。
半包的主要原因:
- 发送方写入数据 > 套接字缓冲区大小
- 发送的数据大于协议的 MTU(Maximum Transmission Unit,最大传输单元),必须拆包
粘包的主要原因:
- 发送方每次写入数据 < 套接字缓冲区大小
- 接收方读取套接字缓冲区数据不够及时
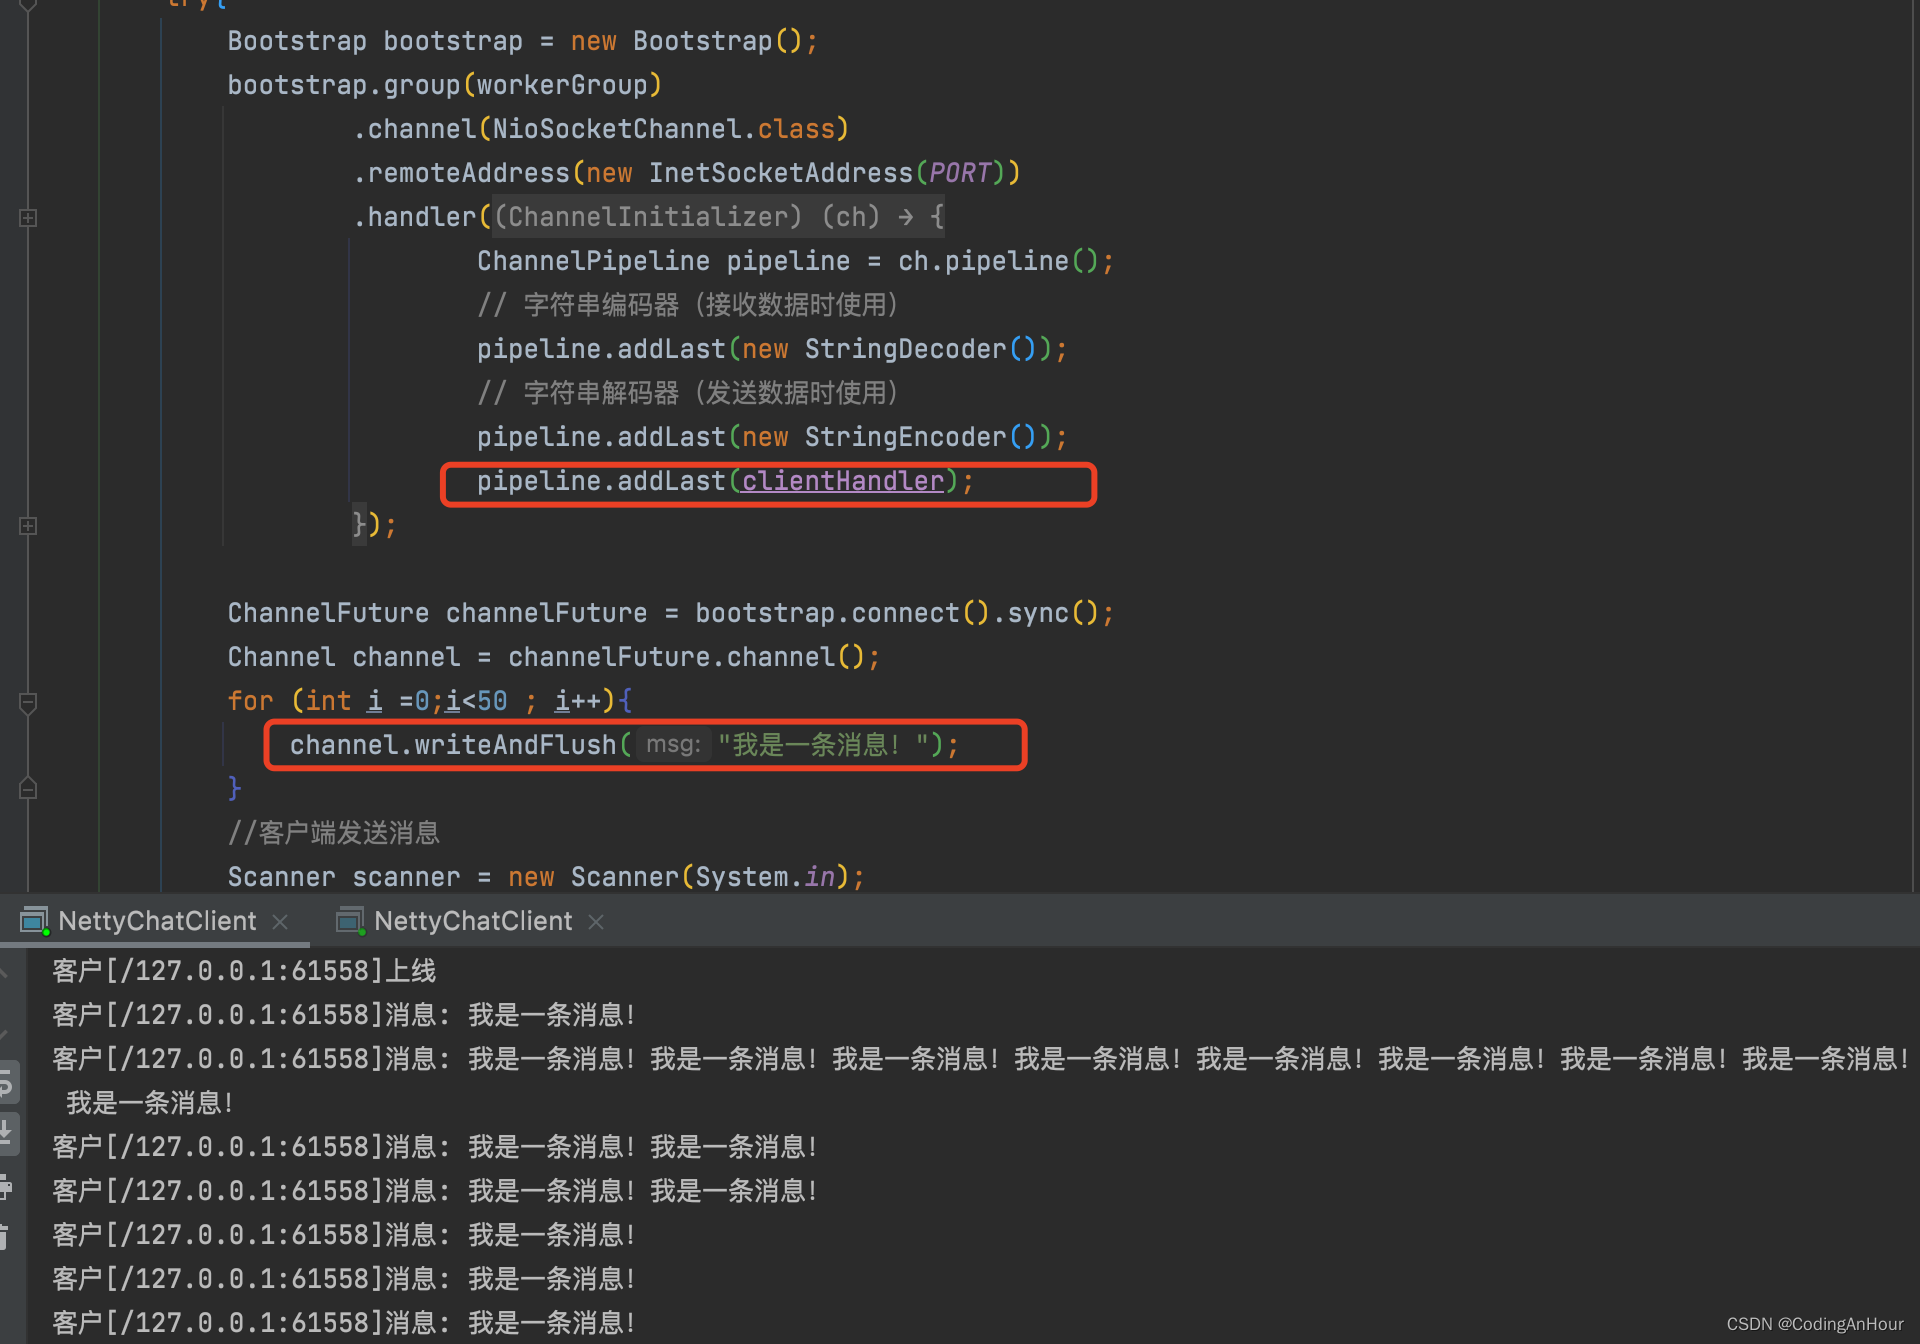
如下图所示,一次性发送服务端50条消息,客户端收到的消息
解决半包粘包问题的常用三种解码器(一次解码器:结果是字节)

二次解码器:将 Java 对象与字节流转化方便存储或传输
- 一次解码器:ByteToMessageDecoder
- io.netty.buffer.ByteBuf (原始数据流)-> io.netty.buffer.ByteBuf (用户数据)
- 二次解码器:MessageToMessageDecoder
- io.netty.buffer.ByteBuf (用户数据)-> Java Object
- 常用的二次解码器,json、Protobuf、xml等
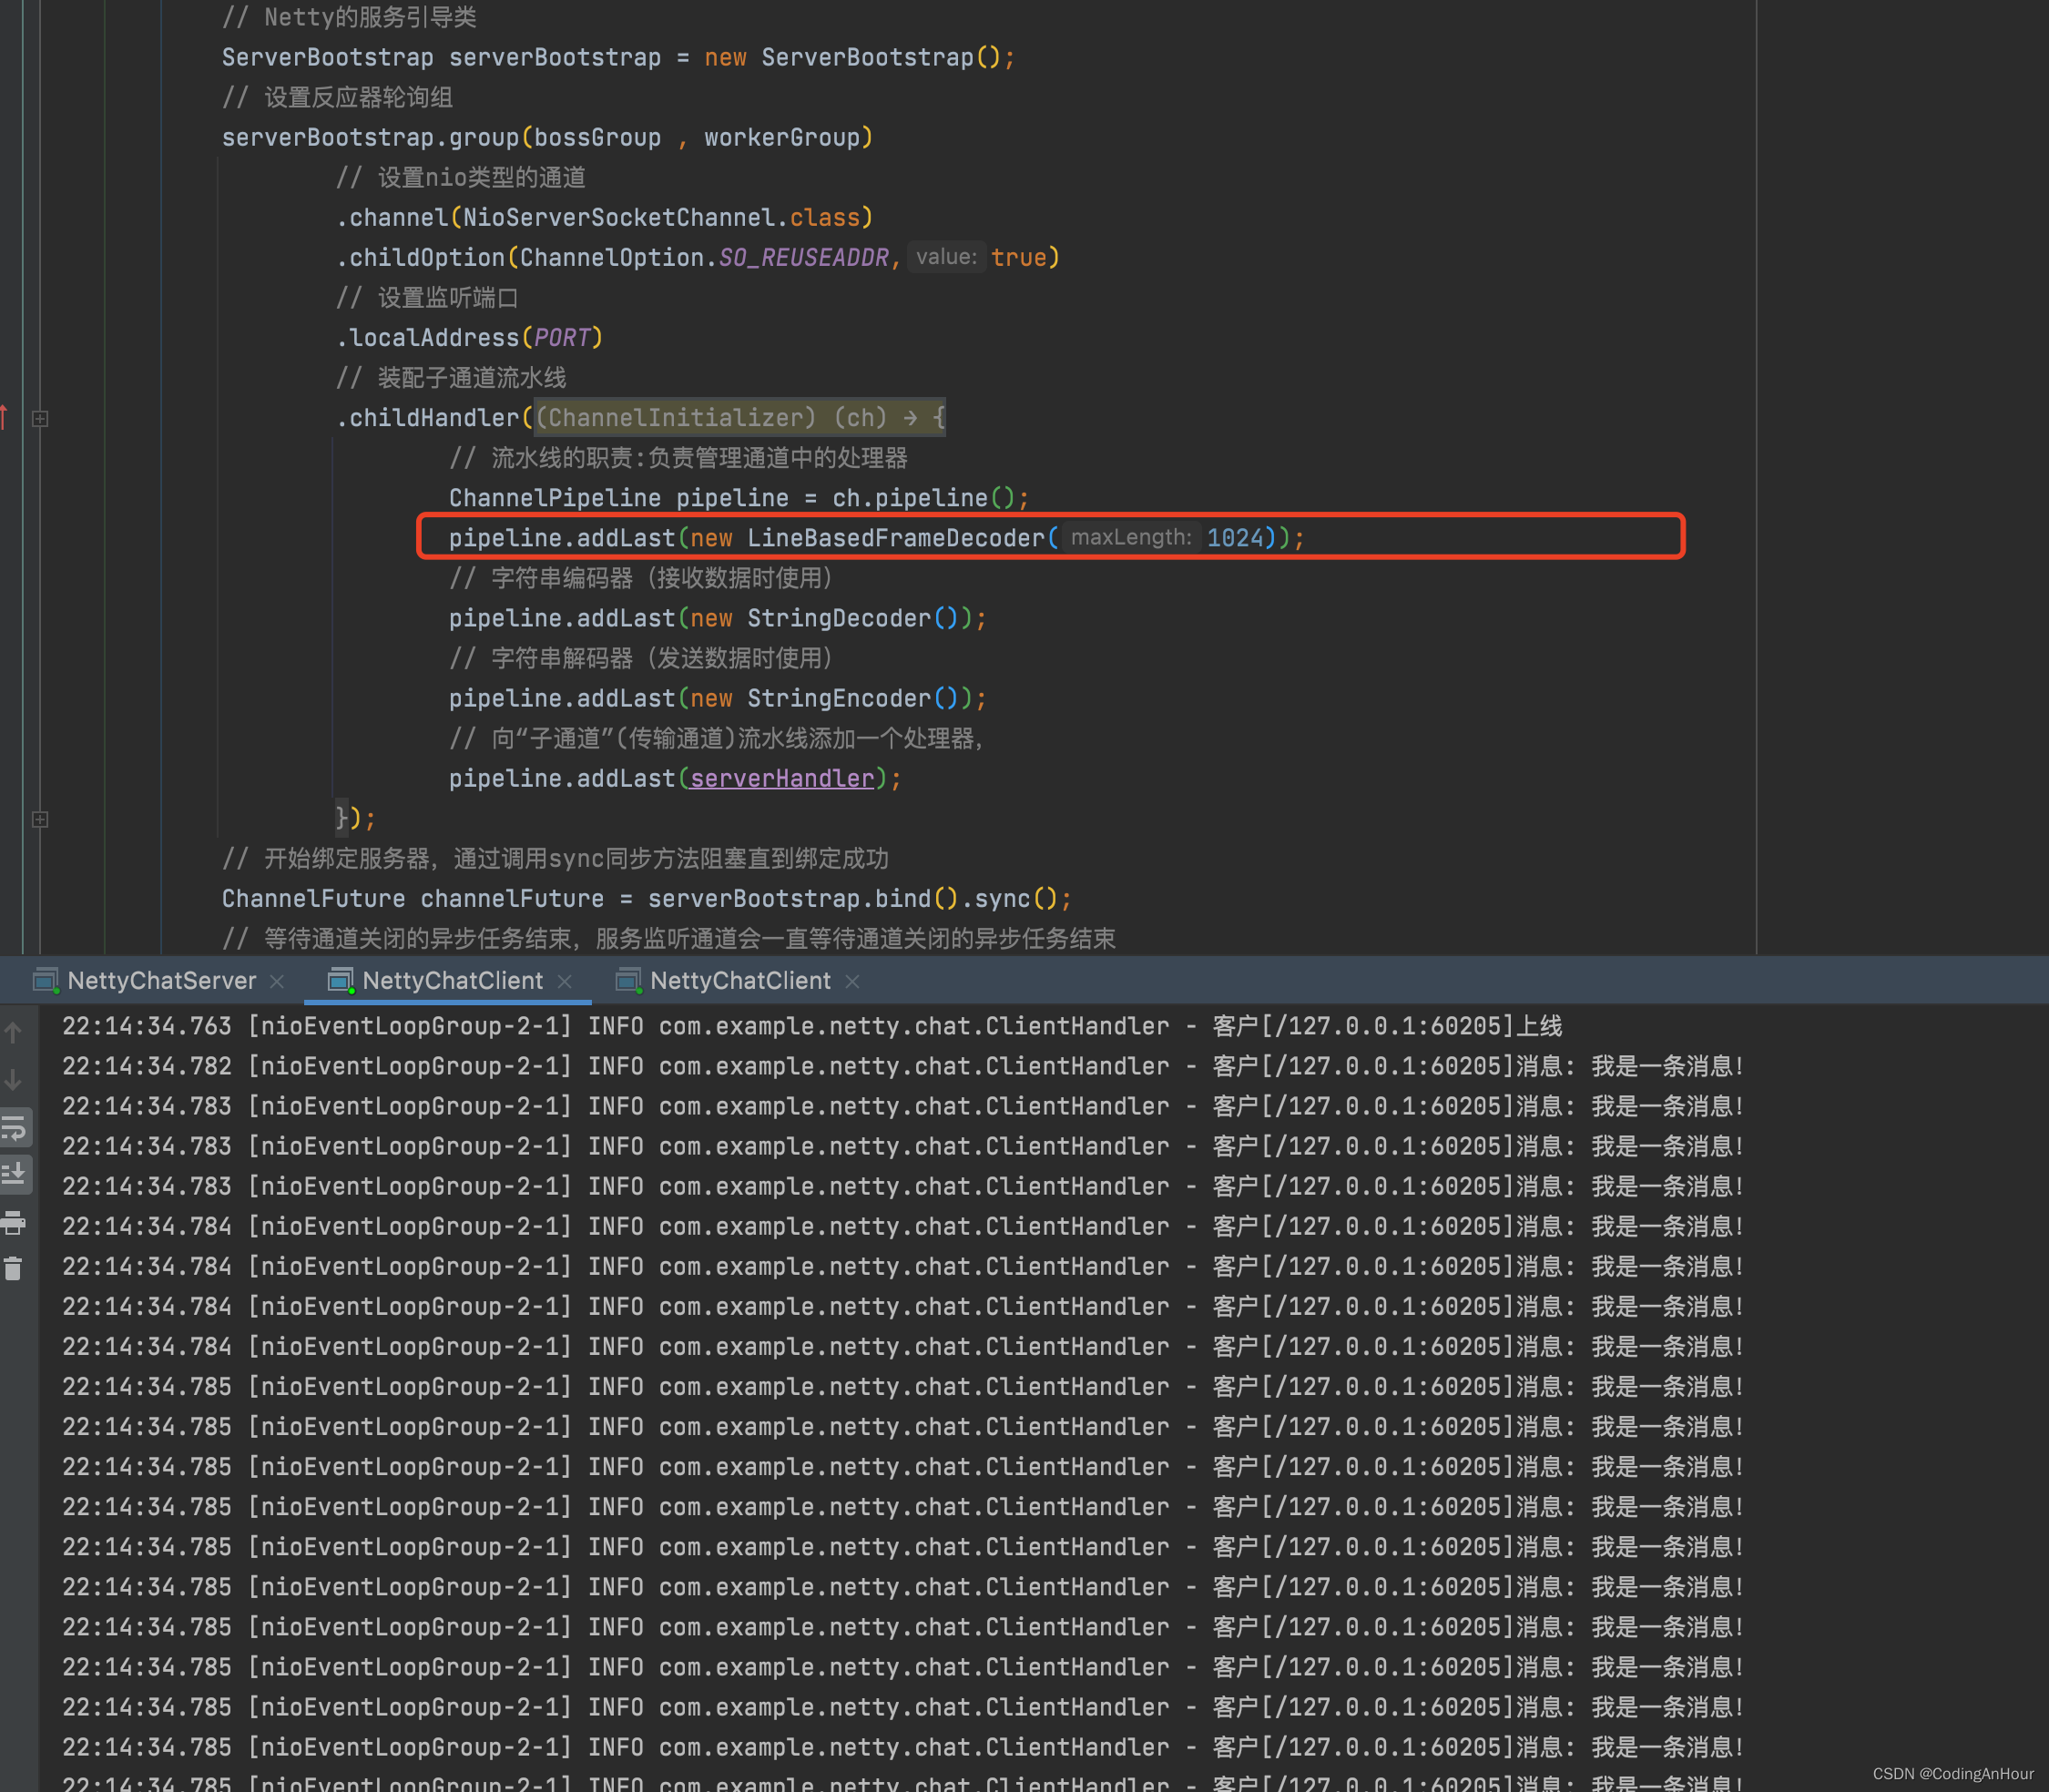
1.1、LineBasedFrameDecoder(回车换行分包)
Netty中,提供了一个开箱即用、使用换行符分割字符串的解码器——LineBasedFrameDecoder,它是一个最为基础的Netty内置解码器。这个解码器的工作原理,依次遍历ByteBuf数据包中的可读字节,判断在二进制字节流中是否存在换行符"\n"或者"\r\n"的字节码。如果有,就以此位置为结束位置,把从可读索引到结束位置之间的字节作为解码成功后的ByteBuf数据包。
LineBasedFrameDecoder支持配置一个最大长度值,表示解码出来的ByteBuf能包含的最大字节数。如果连续读取到最大长度后仍然没有发现换行符,就会抛出异常。
注意顺序
1.2、DelimiterBasedFrameDecoder(特殊分隔符分包)
DelimiterBasedFrameDecoder解码器不仅可以使用换行符,还可以使用其他特殊字符作为数据包的分隔符,例如制表符"\t"。
DelimiterBasedFrameDecoder与LineBasedFrameDecoder都支持配置一个最大长度值,同时还支持解码后的数据包是否去掉分隔符,分隔符
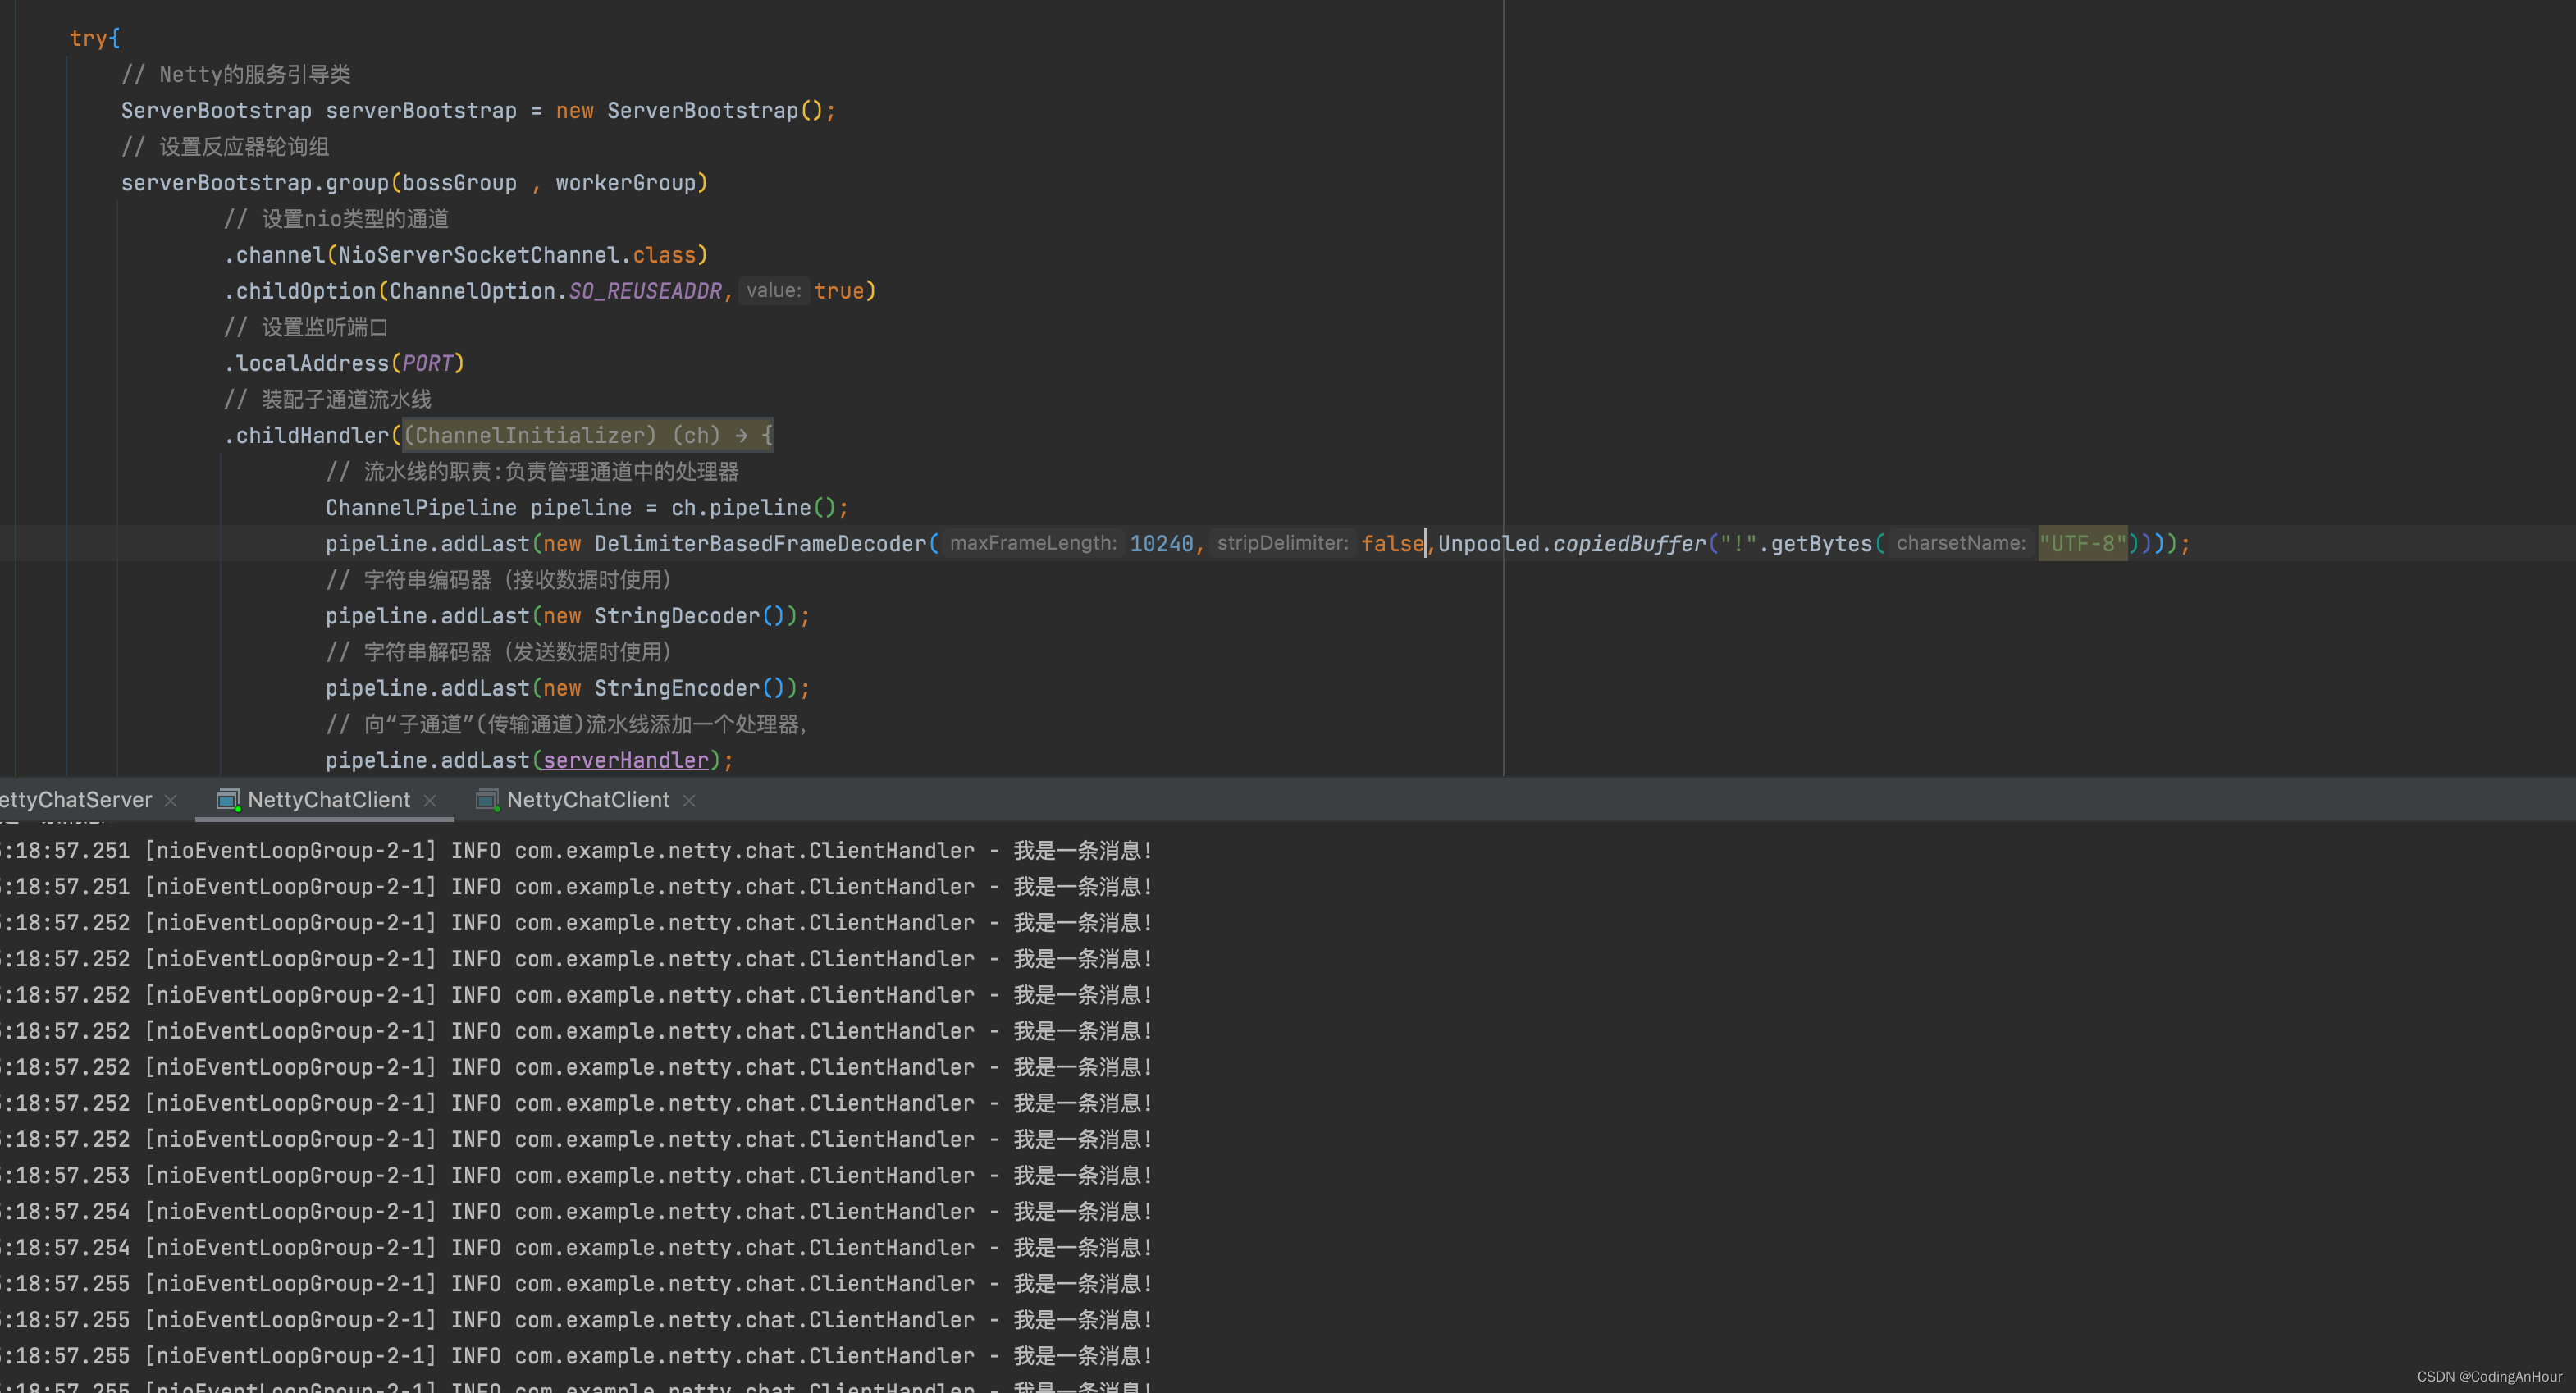
pipeline.addLast(new DelimiterBasedFrameDecoder(10240,false,Unpooled.copiedBuffer(“!”.getBytes(“UTF-8”))));
构造方法
public DelimiterBasedFrameDecoder(
	int maxFrameLength, //解码的数据包的最大长度
	Boolean stripDelimiter, //解码后的数据包是否去掉分隔符
	ByteBuf delimiter //分隔符
	)
1.3、LengthFieldBasedFrameDecoder(固定长度字段报文来分包)
LengthFieldBasedFrameDecoder可以翻译为“长度字段数据包解码器”。传输内容中的Length(长度)字段的值是指存放在数据包中要传输内容的字节数。
消息分为两部分,一部分为消息头部,一部分为实际的消息体。其中消息头部是固定长度的,消息体是可变的,且消息头部一般会包含一个Length字段
LengthFieldBasedFrameDecoder与LengthFieldPrepender需要配合起来使用,其实本质上来讲,这两者一个是解码,一个是编码的关系。
- LengthFieldPrepender(如果我们在发送消息的时候采用:消息长度字段+原始消息的形式,我们就可以使用 LengthFieldPrepender。
LengthFieldPrepender 可以将待发送消息的长度(二进制字节长度)写到 ByteBuf 的前两个字节)
原理:
-
在生成的数据包中添加一个长度字段,用于记录当前数据包的长度。
-
LengthFieldBasedFrameDecoder会按照参数指定的包长度偏移量数据对接收到的数据进行解码,从而得到目标消息体数据;
-
LengthFieldPrepender则会在响应的数据前面添加指定的字节数据,这个字节数据中保存了当前消息体的整体字节数据长度。
LengthFieldBasedFrameDecoder构造方法参数:
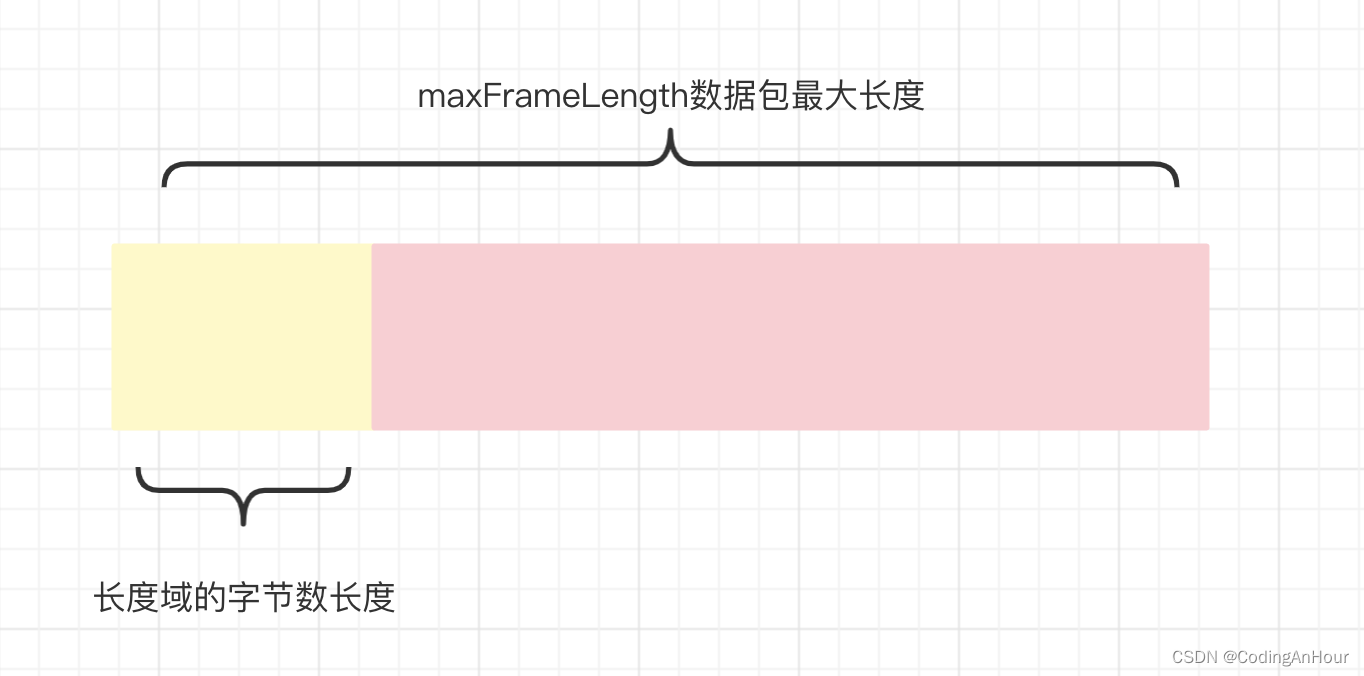
- maxFrameLength:发送数据包的最大长度
- lengthFieldOffset:长度域的偏移量。长度域位于整个数据包字节数组中的开始下标。
- lengthFieldLength:长度域的字节数长度。
- lengthAdjustment:长度域的偏移量矫正。如果长度域的值,除了包含有效数据域的长度外,还包含了其他域(如长度域自身)长度,那么,就需要进行矫正。矫正的值为:包长 - 长度域的值 – 长度域偏移 – 长度域长。
- initialBytesToStrip:丢弃的起始字节数。丢弃处于此索引值前面的字节。
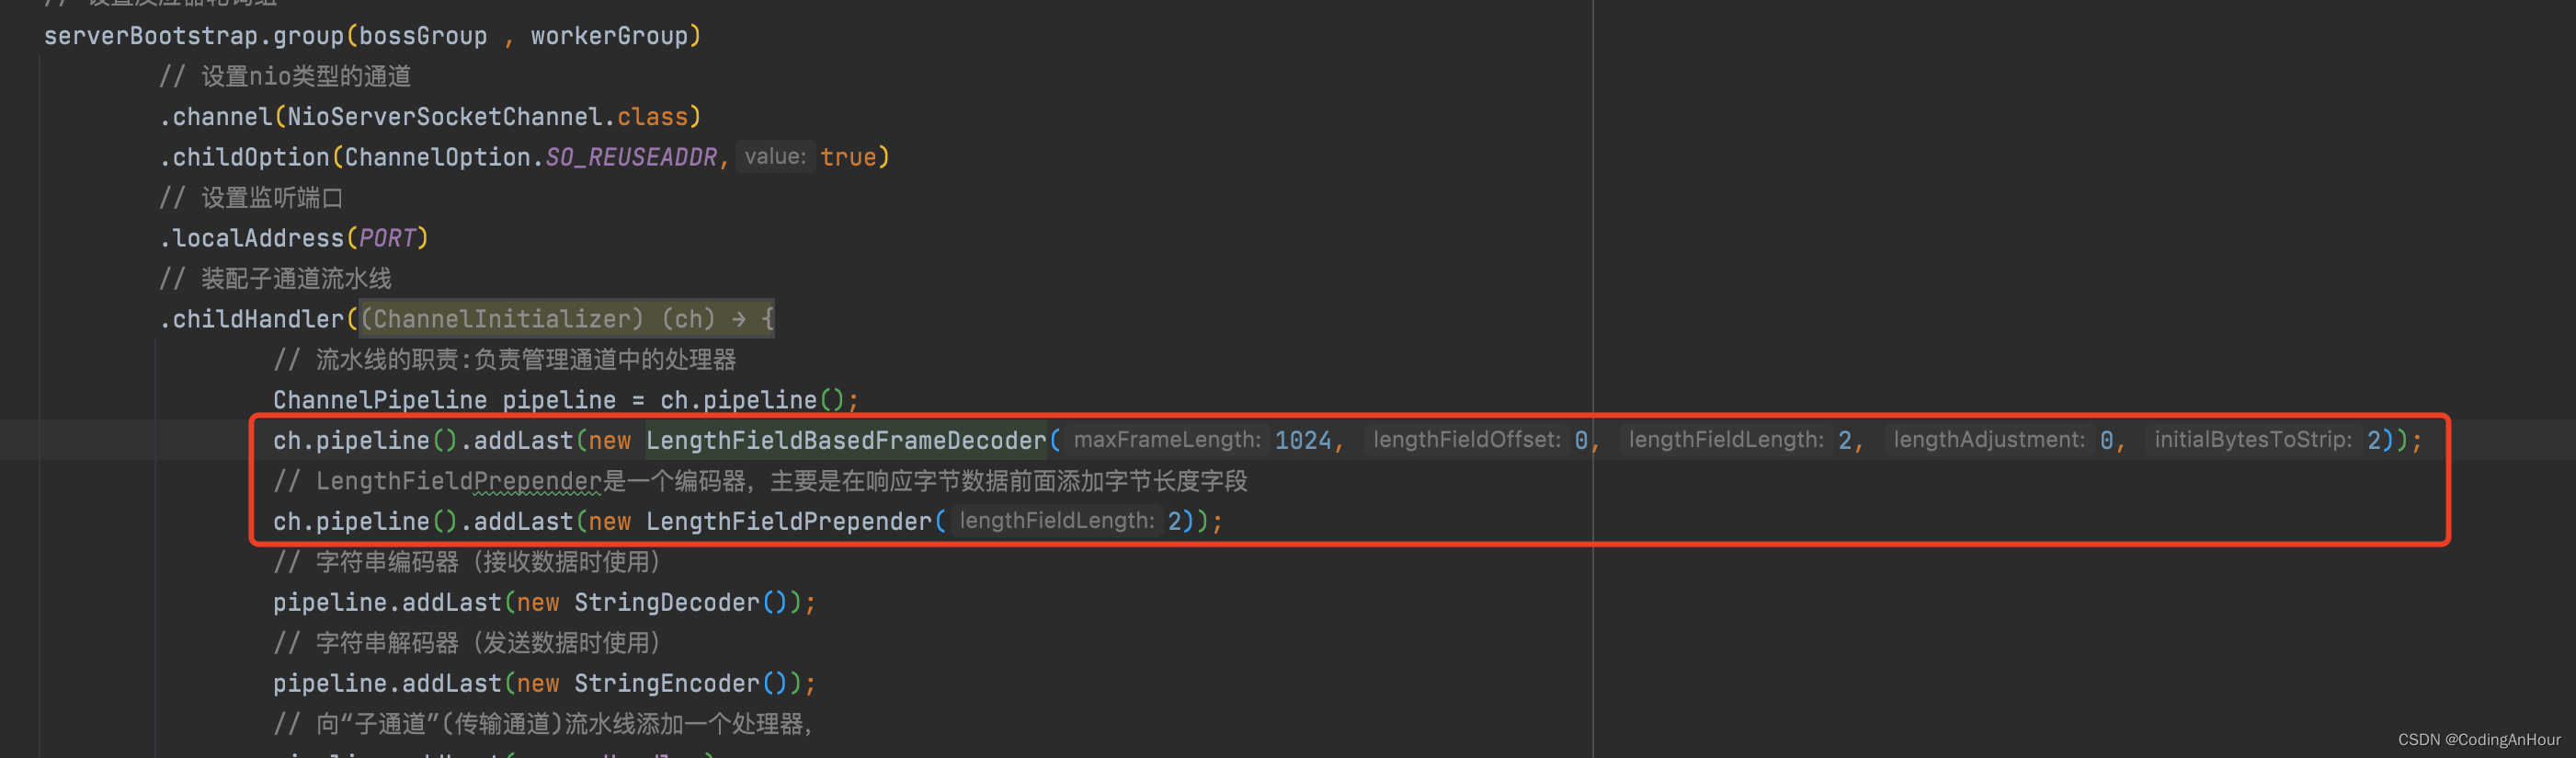
ch.pipeline().addLast(new LengthFieldBasedFrameDecoder(1024, 0, 2, 0, 2));
// LengthFieldPrepender是一个编码器,主要是在响应字节数据前面添加字节长度字段
ch.pipeline().addLast(new LengthFieldPrepender(2));
2、自定义Protostuff编解码器
protostuff是一个开箱即用的序列化库,使用非常简单。protostuff基于Google Protobuf,不需要自己写.proto文件即可实现对象的序列化与反序列化。
相对json等文本序列化库,protostuff是二进制的,因此性能比json等方式高
2.1、pom
 <!-- protostuff-->
 <dependency>
     <groupId>com.dyuproject.protostuff</groupId>
     <artifactId>protostuff-api</artifactId>
     <version>1.0.10</version>
 </dependency>
 <dependency>
     <groupId>com.dyuproject.protostuff</groupId>
     <artifactId>protostuff-core</artifactId>
     <version>1.0.10</version>
 </dependency>
 <dependency>
     <groupId>com.dyuproject.protostuff</groupId>
     <artifactId>protostuff-runtime</artifactId>
     <version>1.0.10</version>
 </dependency>
2.2、protostuff 序列化工具类,基于protobuf封装
import com.dyuproject.protostuff.LinkedBuffer;
import com.dyuproject.protostuff.ProtostuffIOUtil;
import com.dyuproject.protostuff.Schema;
import com.dyuproject.protostuff.runtime.RuntimeSchema;
import java.util.Map;
import java.util.concurrent.ConcurrentHashMap;

/**
 * protostuff 序列化工具类,基于protobuf封装
 */
public class ProtostuffUtil {


    private static Map<Class<?>, Schema<?>> cachedSchema = new ConcurrentHashMap<Class<?>, Schema<?>>();

    private static <T> Schema<T> getSchema(Class<T> clazz) {

        @SuppressWarnings("unchecked")
        Schema<T> schema = (Schema<T>) cachedSchema.get(clazz);
        if (schema == null) {

            schema = RuntimeSchema.getSchema(clazz);
            if (schema != null) {

                cachedSchema.put(clazz, schema);
            }
        }
        return schema;
    }

    /**
     * 序列化
     *
     * @param obj
     * @return
     */
    public static <T> byte[] serializer(T obj) {

        @SuppressWarnings("unchecked")
        Class<T> clazz = (Class<T>) obj.getClass();
        LinkedBuffer buffer = LinkedBuffer.allocate(LinkedBuffer.DEFAULT_BUFFER_SIZE);
        try {

            Schema<T> schema = getSchema(clazz);
            return ProtostuffIOUtil.toByteArray(obj, schema, buffer);
        } catch (Exception e) {

            throw new IllegalStateException(e.getMessage(), e);
        } finally {

            buffer.clear();
        }
    }

    /**
     * 反序列化
     *
     * @param data
     * @param clazz
     * @return
     */
    public static <T> T deserializer(byte[] data, Class<T> clazz) {

        try {

            T obj = clazz.newInstance();
            Schema<T> schema = getSchema(clazz);
            ProtostuffIOUtil.mergeFrom(data, obj, schema);
            return obj;
        } catch (Exception e) {

            throw new IllegalStateException(e.getMessage(), e);
        }
    }

    public static void main(String[] args) {

        byte[] userBytes = ProtostuffUtil.serializer(new User(1, "zhangsan"));
        User user1 = ProtostuffUtil.deserializer(userBytes, User.class);
        System.out.println(user1);
    }
}
2.3、EchoResponse
@Data
public class EchoResponse {

    private String responseId;
    private Object responseObj;
    private Class<?> responseObjClass;
}
2.4、EchoRequest
@Data
public class EchoRequest {

    private String requestId;
    private Object requestObj;
    private Class<?> requestObjClass;
}
User
@Data
public class User implements Serializable {

    private Integer age;

    private String name;

    public User(){


    }
    public User(Integer age, String name) {

        this.age = age;
        this.name = name;
    }
}
2.5、ProtostuffEncoder
import com.example.netty.protostuff.ProtostuffUtil;
import io.netty.buffer.ByteBuf;
import io.netty.channel.ChannelHandlerContext;
import io.netty.handler.codec.MessageToByteEncoder;

/**
 * @author
 */
public class ProtostuffEncoder extends MessageToByteEncoder<Object> {


    @Override
    protected void encode(ChannelHandlerContext ctx, Object msg, ByteBuf out) throws Exception {

        // 直接生成序列化对象
        // 需要注意的是,使用protostuff序列化时,不需要知道pojo对象的具体类型也可以进行序列化时
        // 在反序列化时,只要提供序列化后的字节数组和原来pojo对象的类型即可完成反序列化
        byte[] array = ProtostuffUtil.serializer(msg);
        out.writeBytes(array);
    }
}
2.6、ProtostuffDecoder
import com.example.netty.protostuff.ProtostuffUtil;
import io.netty.buffer.ByteBuf;
import io.netty.channel.ChannelHandlerContext;
import io.netty.handler.codec.MessageToMessageDecoder;

/**
 * PojoDecoder继承自Netty中的MessageToMessageDecoder类,
 * 并重写抽象方法decode(ChannelHandlerContext ctx, ByteBuf msg, List<Object> out)
 * 首先从数据报msg(数据类型取决于继承MessageToMessageDecoder时填写的泛型类型)中获取需要解码的byte数组
 * 然后调用使用序列化工具类将其反序列化(解码)为Object对象 将解码后的对象加入到解码列表out中,这样就完成了解码操作
 * @author
 */
public class ProtostuffDecoder extends MessageToMessageDecoder<ByteBuf> {


    /**
     * 需要反序列对象所属的类型
     */
    private Class<?> genericClass;

    /**
     * 构造方法,传入需要反序列化对象的类型
     * @param genericClass
     */
    public ProtostuffDecoder(Class<?> genericClass) {

        this.genericClass = genericClass;
    }

    @Override
    protected void decode(ChannelHandlerContext ctx, ByteBuf msg, List<Object> out) throws Exception {

        // ByteBuf的长度
        int length = msg.readableBytes();
        // 构建length长度的字节数组
        byte[] array = new byte[length];
        // 将ByteBuf数据复制到字节数组中
        msg.readBytes(array);
        // 反序列化对象
        Object obj = ProtostuffUtil.deserializer(array, this.genericClass);
        // 添加到反序列化对象结果列表
        out.add(obj);
    }

}
2.7、NettyChatServer
import com.example.netty.decode.ProtostuffDecoder;
import com.example.netty.encode.ProtostuffEncoder;
import com.example.netty.protostuff.EchoRequest;
import io.netty.bootstrap.ServerBootstrap;
import io.netty.channel.*;
import io.netty.channel.nio.NioEventLoopGroup;
import io.netty.channel.socket.SocketChannel;
import io.netty.channel.socket.nio.NioServerSocketChannel;
import io.netty.handler.codec.LengthFieldBasedFrameDecoder;
import io.netty.handler.codec.LengthFieldPrepender;

import java.io.UnsupportedEncodingException;

public class NettyChatServer {


    private static final int PORT = 8080;

    public static void main(String[] args) throws InterruptedException, UnsupportedEncodingException {

        final ServerHandler serverHandler = new ServerHandler();
        // 负责服务器通道新连接的IO事件的监听,但是不做任何处理
        EventLoopGroup bossGroup = new NioEventLoopGroup();
        // 负责传输通道的IO事件的处理和数据传输(真正干活的)
        EventLoopGroup workerGroup = new NioEventLoopGroup();

        try{

            // Netty的服务引导类
            ServerBootstrap serverBootstrap = new ServerBootstrap();
            // 设置反应器轮询组
            serverBootstrap.group(bossGroup , workerGroup)
                    // 设置nio类型的通道
                    .channel(NioServerSocketChannel.class)
                    .childOption(ChannelOption.SO_REUSEADDR,true)
                    // 设置监听端口
                    .localAddress(PORT)
                    // 装配子通道流水线
                    .childHandler(new ChannelInitializer<SocketChannel>() {

                        /**
                         * 有连接到达时会创建一个通道
                         * @param ch 通道
                         * @throws Exception
                         */
                        @Override
                        protected void initChannel(SocketChannel ch) throws UnsupportedEncodingException {

                            // 流水线的职责:负责管理通道中的处理器
                            ChannelPipeline pipeline = ch.pipeline();
                            // 发送数据包的最大长度
                            int maxFrameLength = 1024*1024;
                            // 长度域的偏移量
                            int lengthFieldOffset = 0;
                            // 长度域的字节数长度
                            int lengthFieldLength = 2;
                            // 长度域的偏移量矫正
                            int lengthAdjustment = 0;
                            // 丢弃的起始字节数
                            int initialBytesToStrip =2;
                            // 固定长度字段报文来分包
                            ch.pipeline().addLast(new LengthFieldBasedFrameDecoder(maxFrameLength, lengthFieldOffset,
                                    lengthFieldLength, lengthAdjustment, initialBytesToStrip));
                            // LengthFieldPrepender是一个编码器,主要是在响应字节数据前面添加字节长度字段
                            ch.pipeline().addLast(new LengthFieldPrepender(2));
                            // 自定义解码器
                            pipeline.addLast(new ProtostuffDecoder(EchoRequest.class));
                            // 自定义编码器
                            pipeline.addLast(new ProtostuffEncoder());
                            // 向“子通道”(传输通道)流水线添加一个处理器,
                            pipeline.addLast(serverHandler);
                        }
                    });
            // 开始绑定服务器,通过调用sync同步方法阻塞直到绑定成功
            ChannelFuture channelFuture = serverBootstrap.bind().sync();
            // 等待通道关闭的异步任务结束,服务监听通道会一直等待通道关闭的异步任务结束
            channelFuture.channel().closeFuture().sync();
        } finally {

            // 优雅关闭EventLoopGroup
            // 释放掉所有资源,包括创建的线程
            bossGroup.shutdownGracefully();
            workerGroup.shutdownGracefully();
        }
    }
}
2.8、ServerHandler
import com.example.netty.protostuff.EchoRequest;
import com.example.netty.protostuff.EchoResponse;
import com.example.netty.protostuff.User;
import io.netty.channel.Channel;
import io.netty.channel.ChannelHandler;
import io.netty.channel.ChannelHandlerContext;
import io.netty.channel.ChannelInboundHandlerAdapter;
import io.netty.channel.group.ChannelGroup;
import io.netty.channel.group.DefaultChannelGroup;
import io.netty.util.concurrent.GlobalEventExecutor;
import java.util.UUID;

/**
 * @author
 */
@ChannelHandler.Sharable
public class ServerHandler  extends ChannelInboundHandlerAdapter {


    private static ChannelGroup clientChannels = new DefaultChannelGroup(GlobalEventExecutor.INSTANCE);

    @Override
    public void channelActive(ChannelHandlerContext ctx) throws Exception {

        Channel channel = ctx.channel();
        clientChannels.add(channel);

        String sendMsg = "客户[" + channel.remoteAddress() + "]上线\n";
        System.out.print(sendMsg);
        clientChannels.forEach(clientChannel -> {

            if(clientChannel != channel) {

                clientChannel.writeAndFlush(sendMsg);
            }
        });
    }

    @Override
    public void channelInactive(ChannelHandlerContext ctx) throws Exception {

        Channel channel = ctx.channel();
        if(clientChannels.contains(channel)) {

            clientChannels.remove(channel);

            String sendMsg = "客户[" + channel.remoteAddress() + "]异常下线\n";
            System.out.print(sendMsg);
            clientChannels.forEach(clientChannel -> clientChannel.writeAndFlush(sendMsg));
        }
    }

    @Override
    public void channelRead(ChannelHandlerContext ctx, Object msg) throws Exception {

        // 接收到的对象的类型为EchoRequest
        for (int i = 0; i < 50; i++) {

            EchoRequest req = (EchoRequest) msg;
            System.out.println(req.getRequestId() + " : " + req.getRequestObj());
            // 创建需要传输的user对象
            User user = new User();
            user.setName("server");
            user.setAge(i);
            // 创建传输的user对象载体EchoRequest对象
            EchoResponse resp = new EchoResponse();
            // 设置responseId
            resp.setResponseId(UUID.randomUUID().toString());
            // 设置需要传输的对象
            resp.setResponseObj(user);
            // 设置需要传输的对象的类型
            resp.setResponseObjClass(resp.getResponseObj().getClass());
            // 调用writeAndFlush将数据发送到socketChannel
            ctx.writeAndFlush(resp);
        }

    }

    @Override
    public void exceptionCaught(ChannelHandlerContext ctx, Throwable cause) throws Exception {

        Channel channel = ctx.channel();
        clientChannels.remove(channel);

        String msg = cause.getMessage();
        String sendMsg = "客户[" + channel.remoteAddress() + "]异常: " + msg + "\n";
        System.out.print(sendMsg);
        clientChannels.forEach(clientChannel -> clientChannel.writeAndFlush(sendMsg));
    }
}
2.9、NettyChatClient
import com.example.netty.decode.ProtostuffDecoder;
import com.example.netty.encode.ProtostuffEncoder;
import com.example.netty.protostuff.EchoResponse;
import io.netty.bootstrap.Bootstrap;
import io.netty.channel.ChannelFuture;
import io.netty.channel.ChannelInitializer;
import io.netty.channel.ChannelPipeline;
import io.netty.channel.EventLoopGroup;
import io.netty.channel.nio.NioEventLoopGroup;
import io.netty.channel.socket.SocketChannel;
import io.netty.channel.socket.nio.NioSocketChannel;
import io.netty.handler.codec.LengthFieldBasedFrameDecoder;
import io.netty.handler.codec.LengthFieldPrepender;
import java.io.UnsupportedEncodingException;
import java.net.InetSocketAddress;

public class NettyChatClient {


    private static final int PORT = 8080;

    public static void main(String[] args) throws InterruptedException, UnsupportedEncodingException {


        final ClientHandler clientHandler = new ClientHandler();
        EventLoopGroup workerGroup = new NioEventLoopGroup();

        try{

            Bootstrap bootstrap = new Bootstrap();
            bootstrap.group(workerGroup)
                    .channel(NioSocketChannel.class)
                    .remoteAddress(new InetSocketAddress(PORT))
                    .handler(new ChannelInitializer<SocketChannel>() {

                        @Override
                        protected void initChannel(SocketChannel ch) throws Exception {

                            ChannelPipeline pipeline = ch.pipeline();
                            // 发送数据包的最大长度
                            int maxFrameLength = 1024*1024;
                            // 长度域的偏移量
                            int lengthFieldOffset = 0;
                            // 长度域的字节数长度
                            int lengthFieldLength = 2;
                            // 长度域的偏移量矫正
                            int lengthAdjustment = 0;
                            // 丢弃的起始字节数
                            int initialBytesToStrip =2;
                            // 固定长度字段报文来分包
                            ch.pipeline().addLast(new LengthFieldBasedFrameDecoder(maxFrameLength, lengthFieldOffset,
                                    lengthFieldLength, lengthAdjustment, initialBytesToStrip));
                            // LengthFieldPrepender是一个编码器,主要是在响应字节数据前面添加字节长度字段
                            ch.pipeline().addLast(new LengthFieldPrepender(2));
                            // 自定义解码器
                            pipeline.addLast(new ProtostuffDecoder(EchoResponse.class));
                            // 自定义编码器
                            pipeline.addLast(new ProtostuffEncoder());
                            pipeline.addLast(clientHandler);
                        }
                    });

            ChannelFuture channelFuture = bootstrap.connect().sync();
            channelFuture.channel().closeFuture().sync();
        } finally {

            workerGroup.shutdownGracefully();
        }
    }

}
2.10、ClientHandler
import com.example.netty.protostuff.EchoRequest;
import com.example.netty.protostuff.EchoResponse;
import com.example.netty.protostuff.User;
import io.netty.channel.*;
import lombok.extern.slf4j.Slf4j;
import java.util.UUID;
/**
* @author
*/
@Slf4j
@ChannelHandler.Sharable
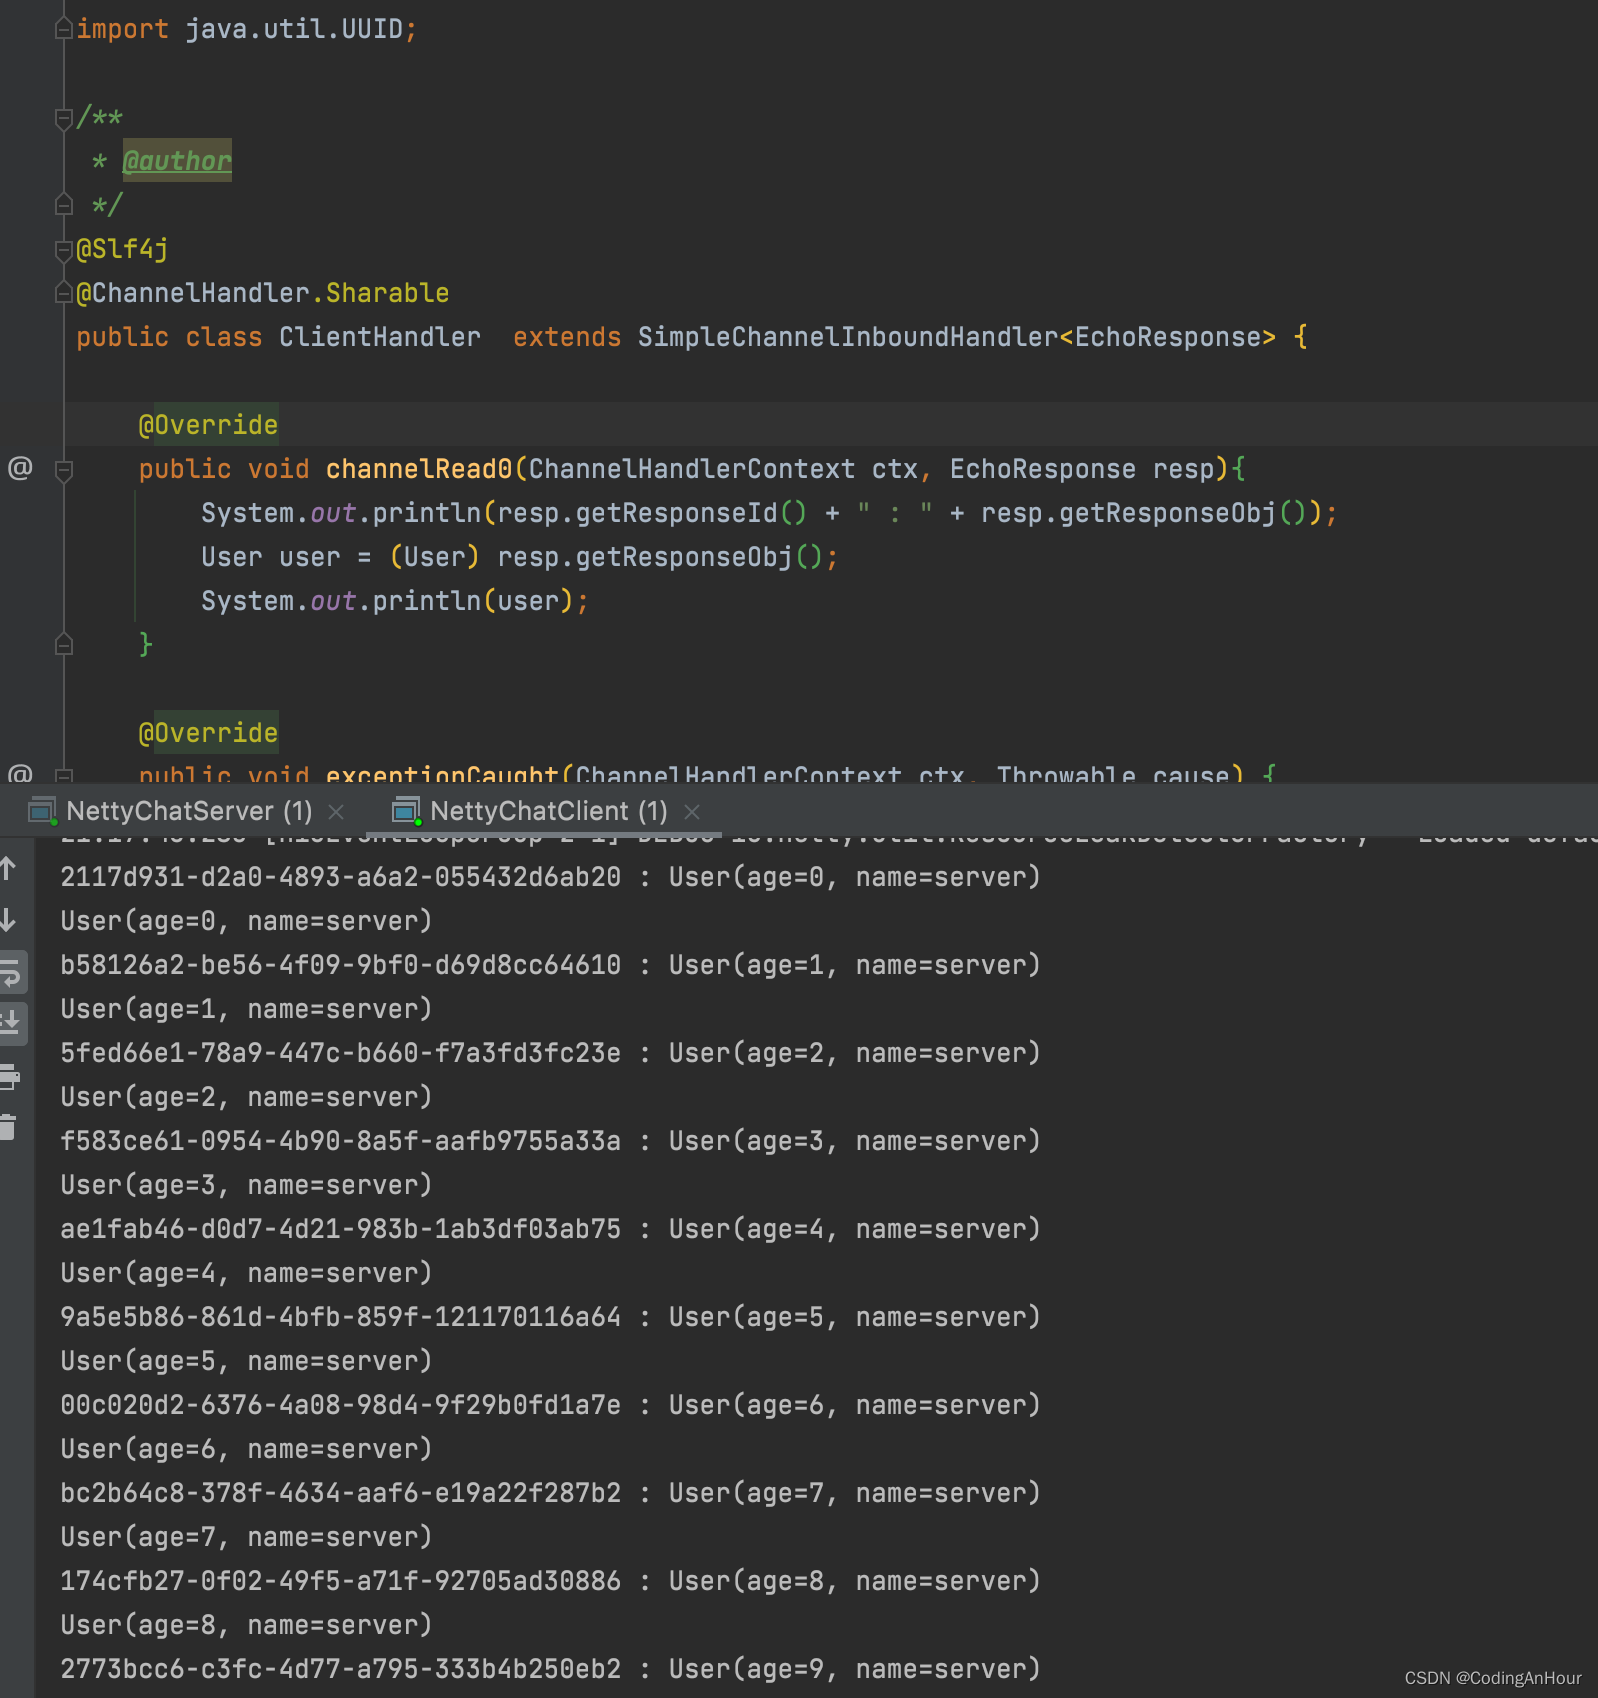
public class ClientHandler extends SimpleChannelInboundHandler<EchoResponse> {
@Override
public void channelRead0(ChannelHandlerContext ctx, EchoResponse resp){
System.out.println(resp.getResponseId() + " : " + resp.getResponseObj());
User user = (User) resp.getResponseObj();
System.out.println(user);
}
@Override
public void exceptionCaught(ChannelHandlerContext ctx, Throwable cause) {
Channel channel = ctx.channel();
String msg = cause.getMessage();
System.out.print("群聊[" + channel.remoteAddress() + "]异常: " + msg);
}
@Override
public void channelActive(ChannelHandlerContext ctx) {
// 创建需要传输的user对象
User user = new User();
user.setName("client");
user.setAge(11);
// 创建传输的user对象载体EchoRequest对象
EchoRequest req = new EchoRequest();
// 设置requestId
req.setRequestId(UUID.randomUUID().toString());
// 设置需要传输的对象
req.setRequestObj(user);
// 设置需要传输的对象的类型
req.setRequestObjClass(req.getRequestObj().getClass());
// 调用writeAndFlush将数据发送到socketChannel
ctx.writeAndFlush(req);
}
}
智能推荐
没有U盘Win10电脑下如何使用本地硬盘安装Ubuntu20.04(单双硬盘都行)_没有u盘怎么装ubuntu-程序员宅基地
文章浏览阅读3.6k次,点赞2次,收藏2次。DELL7080台式机两块硬盘。_没有u盘怎么装ubuntu
【POJ 3401】Asteroids-程序员宅基地
文章浏览阅读32次。题面Bessie wants to navigate her spaceship through a dangerous asteroid field in the shape of an N x N grid (1 <= N <= 500). The grid contains K asteroids (1 <= K <= 10,000), which are conv...
工业机器视觉系统的构成与开发过程(理论篇—1)_工业机器视觉系统的构成与开发过程(理论篇—1-程序员宅基地
文章浏览阅读2.6w次,点赞21次,收藏112次。机器视觉则主要是指工业领域视觉的应用研究,例如自主机器人的视觉,用于检测和测量的视觉系统等。它通过在工业领域将图像感知、图像处理、控制理论与软件、硬件紧密结合,并研究解决图像处理和计算机视觉理论在实际应用过程中的问题,以实现高效的运动控制或各种实时操作。_工业机器视觉系统的构成与开发过程(理论篇—1
plt.legend的用法-程序员宅基地
文章浏览阅读5.9w次,点赞32次,收藏58次。legend 传奇、图例。plt.legend()的作用:在plt.plot() 定义后plt.legend() 会显示该 label 的内容,否则会报error: No handles with labels found to put in legend.plt.plot(result_price, color = 'red', label = 'Training Loss') legend作用位置:下图红圈处。..._plt.legend
深入理解 C# .NET Core 中 async await 异步编程思想_netcore async await-程序员宅基地
文章浏览阅读2.2k次,点赞3次,收藏11次。深入理解 C# .NET Core 中 async await 异步编程思想引言一、什么是异步?1.1 简单实例(WatchTV并行CookCoffee)二、深入理解(异步)2.1 当我需要异步返回值时,怎么处理?2.2 充分利用异步并行的高效性async await的秘密引言很久没来CSDN了,快小半年了一直在闲置,也写不出一些带有思想和深度的文章;之前就写过一篇关于async await 的异步理解 ,现在回顾,真的不要太浅和太陋,让人不忍直视!好了,废话不再啰嗦,直入主题:一、什么是异步?_netcore async await
IntelliJ IDEA设置类注释和方法注释带作者和日期_idea作者和日期等注释-程序员宅基地
文章浏览阅读6.5w次,点赞166次,收藏309次。当我看到别人的类上面的多行注释是是这样的:这样的:这样的:好装X啊!我也想要!怎么办呢?往下瞅:跟着我左手右手一个慢动作~~~File--->Settings---->Editor---->File and Code Templates --->Includes--->File Header:之后点applay--..._idea作者和日期等注释
随便推点
发行版Linux和麒麟操作系统下netperf 网络性能测试-程序员宅基地
文章浏览阅读175次。Netperf是一种网络性能的测量工具,主要针对基于TCP或UDP的传输。Netperf根据应用的不同,可以进行不同模式的网络性能测试,即批量数据传输(bulk data transfer)模式和请求/应答(request/reponse)模式。工作原理Netperf工具以client/server方式工作。server端是netserver,用来侦听来自client端的连接,c..._netperf 麒麟
万字长文详解 Go 程序是怎样跑起来的?| CSDN 博文精选-程序员宅基地
文章浏览阅读1.1k次,点赞2次,收藏3次。作者| qcrao责编 | 屠敏出品 | 程序员宅基地刚开始写这篇文章的时候,目标非常大,想要探索 Go 程序的一生:编码、编译、汇编、链接、运行、退出。它的每一步具体如何进行,力图弄清 Go 程序的这一生。在这个过程中,我又复习了一遍《程序员的自我修养》。这是一本讲编译、链接的书,非常详细,值得一看!数年前,我第一次看到这本书的书名,就非常喜欢。因为它模仿了周星驰喜剧..._go run 每次都要编译吗
C++之istringstream、ostringstream、stringstream 类详解_c++ istringstream a >> string-程序员宅基地
文章浏览阅读1.4k次,点赞4次,收藏2次。0、C++的输入输出分为三种:(1)基于控制台的I/O (2)基于文件的I/O (3)基于字符串的I/O 1、头文件[cpp] view plaincopyprint?#include 2、作用istringstream类用于执行C++风格的字符串流的输入操作。 ostringstream类用_c++ istringstream a >> string
MySQL 的 binglog、redolog、undolog-程序员宅基地
文章浏览阅读2k次,点赞3次,收藏14次。我们在每个修改的地方都记录一条对应的 redo 日志显然是不现实的,因此实现方式是用时间换空间,我们在数据库崩了之后用日志还原数据时,在执行这条日志之前,数据库应该是一个一致性状态,我们用对应的参数,执行固定的步骤,修改对应的数据。1,MySQL 就是通过 undolog 回滚日志来保证事务原子性的,在异常发生时,对已经执行的操作进行回滚,回滚日志会先于数据持久化到磁盘上(因为它记录的数据比较少,所以持久化的速度快),当用户再次启动数据库的时候,数据库能够通过查询回滚日志来回滚将之前未完成的事务。_binglog
我的第一个Chrome小插件-基于vue开发的flexbox布局CSS拷贝工具_chrome css布局插件-程序员宅基地
文章浏览阅读3k次。概述之前介绍过 移动Web开发基础-flex弹性布局(兼容写法) 里面有提到过想做一个Chrome插件,来生成flexbox布局的css代码直接拷贝出来用。最近把这个想法实现了,给大家分享下。play-flexbox插件介绍play-flexbox一秒搞定flexbox布局,可直接预览效果,拷贝CSS代码快速用于页面重构。 你也可以通过点击以下链接(codepen示例)查_chrome css布局插件
win10下安装TensorFlow-gpu的流程(包括cuda、cuDnn下载以及安装问题)-程序员宅基地
文章浏览阅读308次。我自己的配置是GeForce GTX 1660 +CUDA10.0+CUDNN7.6.0 + TensorFlow-GPU 1.14.0Win10系统安装tensorflow-gpu(按照步骤一次成功)https://blog.csdn.net/zqxdsy/article/details/103152190环境配置——win10下TensorFlow-GPU安装(GTX1660 SUPER+CUDA10+CUDNN7.4)https://blog.csdn.net/jiDxiaohuo/arti