树莓派运行ROS实现face++人脸识别_请简要描述ros中实现人脸识别算法的主要操作流程。-程序员宅基地
技术标签: 机器人 树莓派运行ROS实现face++人脸识别 ros 人脸识别
摘要
Face++是北京旷视科技有限公司旗下的新型视觉服务平台,Face++平台通过提供云端API、离线SDK、以及面向用户的自主研发产品形式,将人脸识别技术广泛应用到互联网及移动应用场景中,非常重要的是它对于非商业用户提供免费试用帐号注册。对于开发者来说自己开发高效准确的算法并不是一件容易的事情,所以我们利用face++在线人脸识别平台,结合ros系统,搭建一套性价比比较高的门禁系统。通过这一过程能够更加深刻的理解嵌入式、ros以及云服务的广泛应用,为使用其他的云服务API接口打下良好的基础。
将树莓派作为硬件载体,编写ros节点实现摄像头自动拍照,拍完后调用opencv进行人脸识别,如果存在人脸,便同时与本地权限人照片(拥有开门权限的人)一起上传至face++云平台,利用face++的API对两张照片进行识别和比较,从而返回消息提示是否为拥有开门权限的人,继电器做出相应动作。
准备工作
1、 在树莓派编译好ros系统。
2、 登入Face++的官方网站https://www.faceplusplus.com.cn/完成注册。
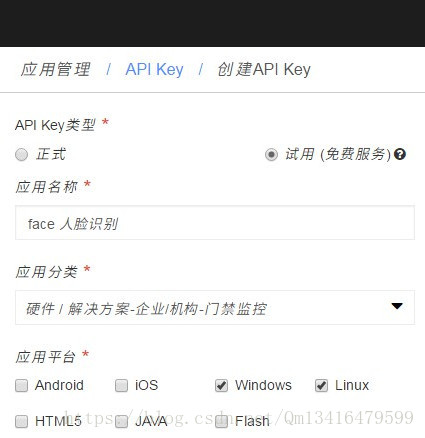
创建API Key
在应用管理-API Key界面就可以看到两个非常关键的参数,API Key和API Secret,在所有的POST调用当中均需要这两个参数。
3、 调试摄像头
(1) 插入USB摄像头,运行lsusb命令,查看是否被树莓派识别,一般插入第一个USB摄像头,会被加载为/dev/video0
(2)安装拍照软件fswebcam


sudo apt-get install fswebcam
(3)试拍一张看看
sudo fswebcam -d /dev/video0 -r 320x240 home/pi/0.jpg
4、 用命令行安装opencv相关库,在此之前请务必更新一下系统。
sudo apt-get update         #更新源
sudo apt-get upgrade         #更新系统
sudo apt-get install libopencv-dev
sudo apt-get install python-opencv
(1)检查opencv是否安装成功,请尝试以下命令
$ python
>>> from cv2 import cv
>>> quit()
没有收到导入错误(ImportError: No module named cv2),安装成功
收到导入错误 ①opencv没有正确安装
②Python路径没有设置正确
(2)OpenCV Python库存储在cv2.so文件中,运行命令验证是否已安装
$ locate cv2.so | grep python
得到cv2.so的路径:/usr/lib/python2.7/dist-packages/cv2.so
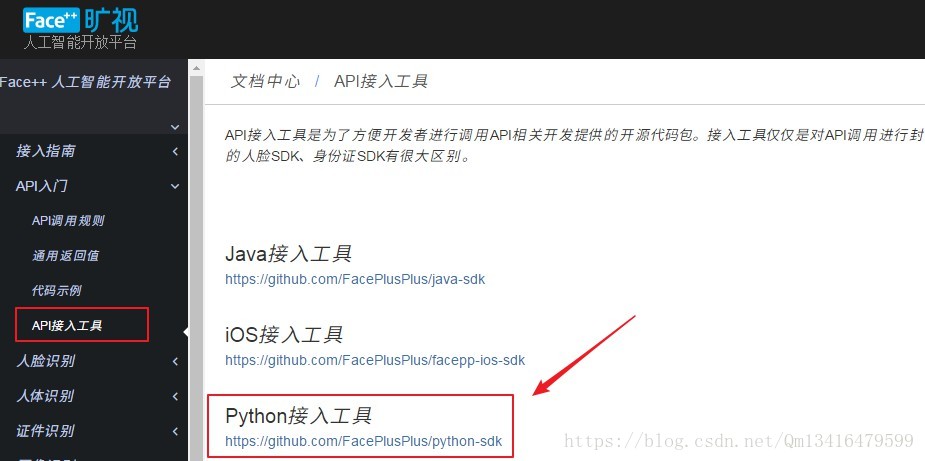
5、 下载Face++的官网API的python的接口SDK,作为参考api调用。
https://github.com/FacePlusPlus/python-sdk
实践流程
1、 摄像头拍照并调用opencv进行人脸识别
(1)在主循环内间隔2秒调用摄像头拍照
import os				#导入python的os模块
import time				#导入python的time模块
command="fswebcam -d /dev/video0 -r 600*600 /home/pi/Desktop/photo.jpeg"
os.system(command)		#执行command所代表的指令,即拍照
time.sleep(2)			#等待2s
但不能每次拍完照都与本地权限者照片比较一下,那样调用face++的API过于频繁,一来造成累积的网络延时过大,二来正式API应用以调用次数收费(试用API也不能无限次调用,且网络不稳定,容易出问题),因此每次拍完照都要识别一下照片中有没有人脸,如果有人脸再调用face++进行人脸比较。但同样的道理也不能用face++进行人脸识别,综上考虑,用opencv进行识别。
(2)拍好照片,并调用opencv进行人脸识别
import numpy as np		#导入python的numpy模块并更名为np
import cv2				#导入python的opencv模块
#用opencv进行人脸识别,识别出有人脸才进行下一步人脸比较,否则一直拍照
face_cascade = cv2.CascadeClassifier(haarcascade_frontalface_alt2.xml)	#read image读取图像
img = cv2.imread(photo)
gray = cv2.cvtColor(img, cv2.COLOR_BGR2GRAY)		#Convert to grayscale转换为灰度图
faces = face_cascade.detectMultiScale(gray, 1.3, 5)
若faces返回不为空,则识别出了人脸,接下来调用Face++人脸对比API,进行比对。
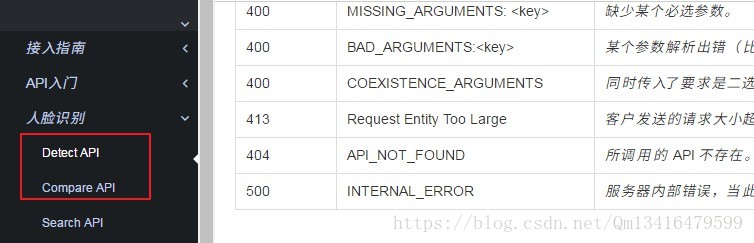
2、Face++人脸对比
通过参考Face++的官方SDK函数,结合官网的API说明,选定Detect API与Compare API实现所需功能。
#利用face++的detectAPI识别opencv识别到的人脸照片
detectresult=api.detect(api_key=API_KEY,api_secret=API_SECRET,image_file=File(photo))
print_result('Detect result:', detectresult)		#将结果输出到打印到命令行界面上
#调用face++的compareAPI将拍到的照片与两张本地权限者照片做比较,confidence表示拍到的照片与本地权限者照片是同一人的置信度
comparation=api.compare(api_key=API_KEY,api_secret=API_SECRET,image_file1=File(compare_photo),image_file2=File(photo))
confidence=comparation['confidence']
(1)detectAPI主要是对识别的照片进行处理,并将结果通过调用print_result函数输出到命令行界面
(2)compareAPI将拍到的照片与本地权限者照片做比较,将结果赋给confidence
(3)confidence是对比结果置信度”,经过测试,本地权限者去拍照进行比对confidence值一般在90以上,而非本地权限者拍照比对结果在60以下,所以我们将判断的阀值定为70。
3、将Face++官网的SDK修改为ros的节点。
(1)下面是修改为ros节点,SDK所需要的文件。
(2)创建face_node功能包。

$ cd ~/catkin_ws/src
$ catkin_create_pkg face_node std_msgs rospy roscpp
$ cd face_node
$ mkdir -p nodes launch photo
①haarcascade_frontalface_alt2.xml下载
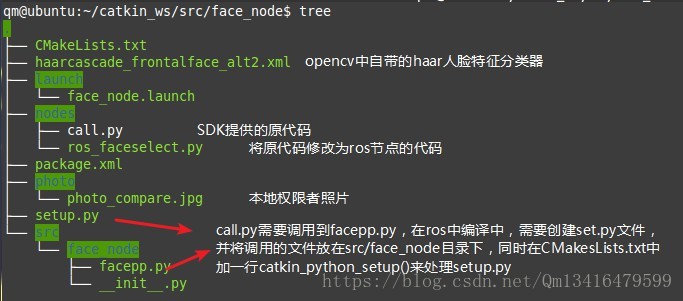
人脸的Haar特征分类器就是一个XML文件,该文件中会描述人脸的Haar特征值。当然Haar特征的用途可不止可以用来描述人脸这一种,用来描述眼睛,嘴唇或是其它物体也是可以的,OpenCV有已经自带了人脸的Haar特征分类器。
下载地址:
在GitHub上找到opencv软件包,并在其中找到haarcascade_frontalface_alt2.xml
https://github.com/opencv/opencv/tree/master/data/haarcascades
②在photo的目录下放入本地权限者的照片
③ ros下python函数调用
call.py需要调用到facepp.py文件,ros不能像python一样,直接用from facepp import API, File包含,并把facepp.py和call.py放在同一个目录,.py并不是可编译的脚本文件,为了适应ros统一的编译体系,使ros识别出你写的python node,所以也加入了Python的编译流程,主要目的就是让ros和系统找到你的python程序。
1. 在face_node/src目录下建立face_node,将facepp.py复制到该目录下,并且创建_init_.py
$ cd ~/catkin_ws/src/face_node/src
$ mkdir face_node
$ touch _init_.py
2. 在~/catkin_ws/src/face_node下建立setup.py文件, 另外还需要在CMakesLists.txt中加一行catkin_python_setup()来处理setup.py,这一行应该在find_package()之后。
$vim setup.py
#!/usr/bin/env python

from distutils.core import setup
from catkin_pkg.python_setup import generate_distutils_setup

d = generate_distutils_setup(
    packages=['face_node'],
    package_dir={'': 'src'},
    )

setup(**d)
$vim CMakesLists.txt
cmake_minimum_required(VERSION 2.8.3)
project(face_node)

find_package(catkin REQUIRED COMPONENTS
  roscpp
  rospy
  std_msgs
)
catkin_package(DEPENDS)
catkin_python_setup()
可以参考以下两个博客修改:
https://blog.csdn.net/Cyril__Li/article/details/78979253
https://blog.csdn.net/light_jiang2016/article/details/55505627
(3)将call.py修改为ros节点,下面将两个代码贴出来,可以参照修改。
call.py:
#-*- coding: utf-8 -*-


# 您需要先注册一个App,并将得到的API key和API secret写在这里。
# You need to register your App first, and enter you API key/secret.
API_KEY = "<YOUR_API_KEY>"
API_SECRET = "<YOUR_API_SECRETַ>"

# 网络图片的URL地址,调用demo前请填上内容
# The url of network picture, please fill in the contents before calling demo
face_one = 'http://bj-mc-prod-asset.oss-cn-beijing.aliyuncs.com/mc-official/images/face/demo-pic11.jpg'
# 本地图片的地址,调用demo前请填上内容
# Local picture location, please fill in the contents before calling demo
face_two = './demo.jpeg'
# 本地图片的地址,调用demo前请填上内容
# Local picture location, please fill in the contents before calling demo
face_search = './demo.jpeg'

#国际版的服务器地址
#the server of international version
api_server_international = 'https://api-us.faceplusplus.com/facepp/v3/'

# Import system libraries and define helper functions
# 导入系统库并定义辅助函数
from pprint import pformat


def print_result(hit, result):
    def encode(obj):
        if type(obj) is unicode:
            return obj.encode('utf-8')
        if type(obj) is dict:
            return {encode(v): encode(k) for (v, k) in obj.iteritems()}
        if type(obj) is list:
            return [encode(i) for i in obj]
        return obj
    print hit
    result = encode(result)
    print '\n'.join("  " + i for i in pformat(result, width=75).split('\n'))


# First import the API class from the SDK
# 首先,导入SDK中的API类
from facepp import API, File


#创建一个API对象,如果你是国际版用户,代码为:api = API(API_KEY, API_SECRET, srv=api_server_international)
#Create a API object, if you are an international user,code: api = API(API_KEY, API_SECRET, srv=api_server_international)
api = API(API_KEY, API_SECRET)

# 创建一个Faceset用来存储FaceToken
# create a Faceset to save FaceToken
ret = api.faceset.create(outer_id='test')
print_result("faceset create", ret)

# 对图片进行检测
# detect image
Face = {}
res = api.detect(image_url=face_one)
print_result("person_one", res)
Face['person_one'] = res["faces"][0]["face_token"]

res = api.detect(image_file=File(face_two))
print_result("person_two", res)
Face['person_two'] = res["faces"][0]["face_token"]

# 将得到的FaceToken存进Faceset里面
# save FaceToken in Faceset
api.faceset.addface(outer_id='test', face_tokens=Face.itervalues())

# 对待比对的图片进行检测,再搜索相似脸
# detect image and search same face
ret = api.detect(image_file=File(face_search))
print_result("detect", ret)
search_result = api.search(face_token=ret["faces"][0]["face_token"], outer_id='test')

# 输出结果
# print result
print_result('search', search_result)
print '=' * 60
for k, v in Face.iteritems():
    if v == search_result['results'][0]['face_token']:
        print 'The person with highest confidence:', k
        break


# 删除无用的人脸库
# delect faceset because it is no longer needed
api.faceset.delete(outer_id='test', check_empty=0)

# 恭喜!您已经完成了本教程,可以继续阅读我们的API文档并利用Face++ API开始写您自
# 己的App了!
# 旅途愉快 :)
# Congratulations! You have finished this tutorial, and you can continue
# reading our API document and start writing your own App using Face++ API!
# Enjoy :)
ros_faceselect.py:
#!/usr/bin/env python
#-*- coding: utf-8 -*-
import rospy
from std_msgs.msg import Int32

import time		#导入python的time模块

import numpy as np  #导入python的numpy模块并更名为np
import cv2  #导入python的opencv模块

import os	#导入python的os模块
command="fswebcam -d /dev/video0 -r 600*600 /home/pi/Desktop/photo.jpeg"
photo = "/home/pi/Desktop/photo.jpeg"
compare_photo =  "/home/pi/catkin_ws/src/face_node/photo/photo_compare.jpeg"
hf_alt2_xml = "/home/pi/catkin_ws/src/face_node/haarcascade_frontalface_alt2.xml"

# 您需要先注册一个App,并将得到的API key和API secret写在这里。
# You need to register your App first, and enter you API key/secret.
API_KEY = "yJL5Mw02ZohjfElqG9BUXVDftC2AS8lw"
API_SECRET = "whXnDdVyiu0V6hL3lgWJfw0nFDiADLRX"
# Import system libraries and define helper functions
# 导入系统库并定义辅助函数
from pprint import pformat

def print_result(hit, result):
    def encode(obj):
        if type(obj) is unicode:
            return obj.encode('utf-8')
        if type(obj) is dict:
            return {encode(v): encode(k) for (v, k) in obj.iteritems()}
        if type(obj) is list:
            return [encode(i) for i in obj]
        return obj
    print hit
    result = encode(result)
    print '\n'.join("  " + i for i in pformat(result, width=75).split('\n'))

# First import the API class from the SDK
# 首先,导入SDK中的API类
from face_node.facepp import API, File
#创建一个API对象,如果你是国际版用户,代码为:api = API(API_KEY, API_SECRET, srv=api_server_international)
#Create a API object, if you are an international user,code: api = API(API_KEY, API_SECRET, srv=api_server_international)
api = API(API_KEY, API_SECRET)

rospy.init_node('opencv_face_node')

pub = rospy.Publisher('topic_face', Int32, queue_size=3)

#下面进入拍照循环
while not rospy.is_shutdown():
    os.system(command)#执行command所代表的指令,即拍照
    time.sleep(2)#等待2s
	#下面是用opencv进行人脸识别,识别出有人脸才进行下一步人脸比较,否则一直拍照
    face_cascade = cv2.CascadeClassifier(hf_alt2_xml)
    #read image读取图像
    img = cv2.imread(photo)
    #Convert to grayscale转换为灰度图
    gray = cv2.cvtColor(img, cv2.COLOR_BGR2GRAY)
    #detect face Multiscale 检测面尺度
    faces = face_cascade.detectMultiScale(gray, 1.3, 5)

    if faces!=():
        #利用face++的detectAPI识别刚刚拍摄的照片中的人脸,其实这句调试时能看到不少信息,方便些,可以省略
        detectresult=api.detect(api_key=API_KEY,api_secret=API_SECRET,image_file=File(photo))
        print_result('Detect result:', detectresult)		#将结果输出到打印到命令行界面上
		#调用face++的compareAPI将拍到的照片与本地权限者照片做比较,confidence表示拍到的照片与本地权限者照片是同一人的置信度
        comparation=api.compare(api_key=API_KEY,api_secret=API_SECRET,image_file1=File(compare_photo),image_file2=File(photo))
        confidence=comparation['confidence']
        if confidence >= 70:
            pub.publish(1)
        else:
            pub.publish(2)
    else:
        print "No one"
代码下载地址:https://github.com/qmros/ros_facenode
4、将Face++官网的SDK修改为ros的节点。
(1)将继电器的正、负、in端分别接树莓派GPIO的5V引脚、地引脚与11引脚,在程序中导入python的GPIO库,写入简单的GPIO引脚高低电平控制程序,观察继电器的状态。
import RPi.GPIO as GPIO#导入库
GPIO.setmode(GPIO.BOARD)  # BOARD编号方式,基于插座引脚编号
GPIO.setup(11, GPIO.OUT)#将GPIO的11引脚设为输出
GPIO.output(11, 1)# 让GPIO的11引脚为高电平
GPIO.output(11, 0) # 让GPIO的11引脚为低电平
(2)通过连接arduino来控制继电器,参考网址创客智造
https://www.ncnynl.com/archives/201610/917.html
运行结果
$cd ~/catkin_ws/
$catkin_make
编译通过之后,插上USB摄像头,运行
$roslaunch face_node face_node.launch
屏幕输出打印的信息,但识别到有人,它会将结果发布到topic_face的主题,没人的时候打印No one,我们打开另外一个命令窗口运行
$rostopic echo /topic_face
查看/topic_face发布的消息,如果是1,说明拍照的人和本地权限者照片相同,2的话,说明不是本地权限者。
参考文献
[1] 在树莓派上实现face++人脸识别 - oBuZuoPiQi的博客
https://blog.csdn.net/obuzuopiqi/article/details/54428433
[2] 基于opencv与face++人脸识别+树莓派的门禁管理系统设计报告
http://www.51hei.com/bbs/dpj-103117-1.html
[3] ROS Package中的Python使用规范 - Cyril__Li的博客
https://blog.csdn.net/Cyril__Li/article/details/78979253
[4] ros 编译 Python 文件 - 蒋亮亮的博客
https://blog.csdn.net/light_jiang2016/article/details/55505627
智能推荐
【论文汇总】2D目标检测文章汇总,持续更新_target-aware dual adversarial learning-程序员宅基地
文章浏览阅读1.8k次,点赞12次,收藏51次。记录自己比较感兴趣的2D目标检测文章。_target-aware dual adversarial learning
Java中的栈Stack、Deque、ArrayDeque、LinkedList_java中的栈类-程序员宅基地
文章浏览阅读1.1w次,点赞66次,收藏151次。文章目录先来说说Java中的Stack类不用Stack至少有以下两点原因该用ArrayDeque还是LinkedList?结论先来说说Java中的Stack类Java中Stack类从Vector类继承,底层是用数组实现的线程安全的栈。栈是一种后进先出(LIFO)的容器,常用的操作push/pop/peek。不过Java中用来表达栈的功能(push/pop/peek),更适用的是适用双端队列接口Deque,并用ArrayDeque/LinkedList来进行初始化。Deque<Integer&g_java中的栈类
Navicat 连接数据库出现1251_navicat11 1251-程序员宅基地
文章浏览阅读179次。MySql】Navicat 连接数据库出现1251。– 修改远程连接权限 % 可换为自己的电脑ip。_navicat11 1251
python3使用pymysql返回字典-程序员宅基地
文章浏览阅读872次。python3使用pymysql返回字典_pymysql返回字典
Shell脚本学习-阶段二十七-命令解释二_shell shuf-程序员宅基地
文章浏览阅读1.8k次。文章目录-命令解释二前言emacsjedjoenano================picosed===================vi,vim============mtype=============rgrep==========excmpbzcmpcommdiff===========bzdiffdiffstatdiff3find==============locate/slocate=========whereis==========updatedbwhich=========basena.._shell shuf
citespace使用流程(自用)_手把手教你用citespace-程序员宅基地
文章浏览阅读413次,点赞9次,收藏7次。然后再新建项目,选好data和project就可以了。四个文件夹建好,将下载好的Refworks数据。download_xxxx(这个自己定),放到文件夹input中,进行格式转化。然后将处理好的数据放到data中。_手把手教你用citespace
随便推点
域账户信息导出脚本_Facebook OAuth漏洞导致的Facebook账户劫持-程序员宅基地
文章浏览阅读2k次。平时在用“Login with Facebook”功能进行跳转登录时,因为其用到了多个URL重定向跳转,所以总会给我有一种不安全的感觉。但是,要想发现Facebook漏洞,并非易事,需要莫大的功夫和精力,更别说涉及登录的Facebook OAuth了,这更是难上加难。然而,我就发现了Facebook OAuth这么一个漏洞,获得了Facebook官方$55,000的奖励。就是这么一个漏洞...
docker中容器和镜像的关系_docker镜像和容器的关系-程序员宅基地
文章浏览阅读5.7k次,点赞4次,收藏27次。docker中容器和镜像的关系_docker镜像和容器的关系
idea运行java报错:找不到或无法加载主类_idea找不到或无法加载java主类-程序员宅基地
文章浏览阅读4.3k次。idea运行java时报错 错误: 找不到或无法加载主类 _idea找不到或无法加载java主类
java scriptengine,使用Java ScriptEngine(Groovy),如何使它更具性能?-程序员宅基地
文章浏览阅读1.2k次。I am using ScriptEngine in my app to evaluate some client code in my application.The problem is it's not performant enough and I need to take measures to improve the time of execution.Currently, it ca..._scriptenginemanager 性能优化
docker项目运行环境搭建(JDK8、mysql8、tomcat9、redis5、nginx1.14)_docker jdk8-程序员宅基地
文章浏览阅读436次。1、在/home/mysql目录下新建两个文件夹,一个叫data另一个叫conf。_docker jdk8
临床试验中edc录入_一文了解EDC临床试验数据采集系统-程序员宅基地
文章浏览阅读7.1k次。不知道大家是不是和我一样,初入行业的时候并不懂啥是EDC。后来我觉得,当时不懂也正常,毕竟EDC这种东西在国内出现也没多久。说起EDC要先从CRF(Case Report Form),即临床试验病例报告表说起。啥是CRF呢?在药物的临床试验项目中,不管你protocol写得多牛比,总得需要一项一项地去收集受试者的试验信息,比如受试者今天吃了多少药?有没有不良反应? 血液中各项指标是多少?因此我们需..._edc录入