机器学习KNN-应用:手写数字识别(手撕+sklearn实现)_手写数字模型sklearn显示模型一百张数字-程序员宅基地
技术标签: 机器学习 python数据分析总结
参考链接
导入数据集
import pandas as pd
import numpy as np
import matplotlib.pyplot as plt
# 数据集的导入
from sklearn.datasets import load_digits
load_digits()
{'data': array([[ 0.,  0.,  5., ...,  0.,  0.,  0.],
        [ 0.,  0.,  0., ..., 10.,  0.,  0.],
        [ 0.,  0.,  0., ..., 16.,  9.,  0.],
        ...,
        [ 0.,  0.,  1., ...,  6.,  0.,  0.],
        [ 0.,  0.,  2., ..., 12.,  0.,  0.],
        [ 0.,  0., 10., ..., 12.,  1.,  0.]]),
 'target': array([0, 1, 2, ..., 8, 9, 8]),
 'frame': None,
 'feature_names': ['pixel_0_0',
  'pixel_0_1',
  'pixel_0_2',
  'pixel_0_3',
  'pixel_0_4',
  'pixel_0_5',
  'pixel_0_6',
  'pixel_0_7',
  'pixel_1_0',
  'pixel_1_1',
  'pixel_1_2',
  'pixel_1_3',
  'pixel_1_4',
  'pixel_1_5',
  'pixel_1_6',
  'pixel_1_7',
  'pixel_2_0',
  'pixel_2_1',
  'pixel_2_2',
  'pixel_2_3',
  'pixel_2_4',
  'pixel_2_5',
  'pixel_2_6',
  'pixel_2_7',
  'pixel_3_0',
  'pixel_3_1',
  'pixel_3_2',
  'pixel_3_3',
  'pixel_3_4',
  'pixel_3_5',
  'pixel_3_6',
  'pixel_3_7',
  'pixel_4_0',
  'pixel_4_1',
  'pixel_4_2',
  'pixel_4_3',
  'pixel_4_4',
  'pixel_4_5',
  'pixel_4_6',
  'pixel_4_7',
  'pixel_5_0',
  'pixel_5_1',
  'pixel_5_2',
  'pixel_5_3',
  'pixel_5_4',
  'pixel_5_5',
  'pixel_5_6',
  'pixel_5_7',
  'pixel_6_0',
  'pixel_6_1',
  'pixel_6_2',
  'pixel_6_3',
  'pixel_6_4',
  'pixel_6_5',
  'pixel_6_6',
  'pixel_6_7',
  'pixel_7_0',
  'pixel_7_1',
  'pixel_7_2',
  'pixel_7_3',
  'pixel_7_4',
  'pixel_7_5',
  'pixel_7_6',
  'pixel_7_7'],
 'target_names': array([0, 1, 2, 3, 4, 5, 6, 7, 8, 9]),
 'images': array([[[ 0.,  0.,  5., ...,  1.,  0.,  0.],
         [ 0.,  0., 13., ..., 15.,  5.,  0.],
         [ 0.,  3., 15., ..., 11.,  8.,  0.],
         ...,
         [ 0.,  4., 11., ..., 12.,  7.,  0.],
         [ 0.,  2., 14., ..., 12.,  0.,  0.],
         [ 0.,  0.,  6., ...,  0.,  0.,  0.]],

        [[ 0.,  0.,  0., ...,  5.,  0.,  0.],
         [ 0.,  0.,  0., ...,  9.,  0.,  0.],
         [ 0.,  0.,  3., ...,  6.,  0.,  0.],
         ...,
         [ 0.,  0.,  1., ...,  6.,  0.,  0.],
         [ 0.,  0.,  1., ...,  6.,  0.,  0.],
         [ 0.,  0.,  0., ..., 10.,  0.,  0.]],

        [[ 0.,  0.,  0., ..., 12.,  0.,  0.],
         [ 0.,  0.,  3., ..., 14.,  0.,  0.],
         [ 0.,  0.,  8., ..., 16.,  0.,  0.],
         ...,
         [ 0.,  9., 16., ...,  0.,  0.,  0.],
         [ 0.,  3., 13., ..., 11.,  5.,  0.],
         [ 0.,  0.,  0., ..., 16.,  9.,  0.]],

        ...,

        [[ 0.,  0.,  1., ...,  1.,  0.,  0.],
         [ 0.,  0., 13., ...,  2.,  1.,  0.],
         [ 0.,  0., 16., ..., 16.,  5.,  0.],
         ...,
         [ 0.,  0., 16., ..., 15.,  0.,  0.],
         [ 0.,  0., 15., ..., 16.,  0.,  0.],
         [ 0.,  0.,  2., ...,  6.,  0.,  0.]],

        [[ 0.,  0.,  2., ...,  0.,  0.,  0.],
         [ 0.,  0., 14., ..., 15.,  1.,  0.],
         [ 0.,  4., 16., ..., 16.,  7.,  0.],
         ...,
         [ 0.,  0.,  0., ..., 16.,  2.,  0.],
         [ 0.,  0.,  4., ..., 16.,  2.,  0.],
         [ 0.,  0.,  5., ..., 12.,  0.,  0.]],

        [[ 0.,  0., 10., ...,  1.,  0.,  0.],
         [ 0.,  2., 16., ...,  1.,  0.,  0.],
         [ 0.,  0., 15., ..., 15.,  0.,  0.],
         ...,
         [ 0.,  4., 16., ..., 16.,  6.,  0.],
         [ 0.,  8., 16., ..., 16.,  8.,  0.],
         [ 0.,  1.,  8., ..., 12.,  1.,  0.]]]),
 'DESCR': ".. _digits_dataset:\n\nOptical recognition of handwritten digits dataset\n--------------------------------------------------\n\n**Data Set Characteristics:**\n\n    :Number of Instances: 1797\n    :Number of Attributes: 64\n    :Attribute Information: 8x8 image of integer pixels in the range 0..16.\n    :Missing Attribute Values: None\n    :Creator: E. Alpaydin (alpaydin '@' boun.edu.tr)\n    :Date: July; 1998\n\nThis is a copy of the test set of the UCI ML hand-written digits datasets\nhttps://archive.ics.uci.edu/ml/datasets/Optical+Recognition+of+Handwritten+Digits\n\nThe data set contains images of hand-written digits: 10 classes where\neach class refers to a digit.\n\nPreprocessing programs made available by NIST were used to extract\nnormalized bitmaps of handwritten digits from a preprinted form. From a\ntotal of 43 people, 30 contributed to the training set and different 13\nto the test set. 32x32 bitmaps are divided into nonoverlapping blocks of\n4x4 and the number of on pixels are counted in each block. This generates\nan input matrix of 8x8 where each element is an integer in the range\n0..16. This reduces dimensionality and gives invariance to small\ndistortions.\n\nFor info on NIST preprocessing routines, see M. D. Garris, J. L. Blue, G.\nT. Candela, D. L. Dimmick, J. Geist, P. J. Grother, S. A. Janet, and C.\nL. Wilson, NIST Form-Based Handprint Recognition System, NISTIR 5469,\n1994.\n\n.. topic:: References\n\n  - C. Kaynak (1995) Methods of Combining Multiple Classifiers and Their\n    Applications to Handwritten Digit Recognition, MSc Thesis, Institute of\n    Graduate Studies in Science and Engineering, Bogazici University.\n  - E. Alpaydin, C. Kaynak (1998) Cascading Classifiers, Kybernetika.\n  - Ken Tang and Ponnuthurai N. Suganthan and Xi Yao and A. Kai Qin.\n    Linear dimensionalityreduction using relevance weighted LDA. School of\n    Electrical and Electronic Engineering Nanyang Technological University.\n    2005.\n  - Claudio Gentile. A New Approximate Maximal Margin Classification\n    Algorithm. NIPS. 2000.\n"}
X = load_digits().data
y = load_digits().target
pics = load_digits().images
X[0].shape
(64,)
y.shape
(1797,)
pd.Series(y).value_counts()
3    183
5    182
1    182
6    181
4    181
9    180
7    179
0    178
2    177
8    174
dtype: int64
pics[7]
array([[ 0.,  0.,  7.,  8., 13., 16., 15.,  1.],
       [ 0.,  0.,  7.,  7.,  4., 11., 12.,  0.],
       [ 0.,  0.,  0.,  0.,  8., 13.,  1.,  0.],
       [ 0.,  4.,  8.,  8., 15., 15.,  6.,  0.],
       [ 0.,  2., 11., 15., 15.,  4.,  0.,  0.],
       [ 0.,  0.,  0., 16.,  5.,  0.,  0.,  0.],
       [ 0.,  0.,  9., 15.,  1.,  0.,  0.,  0.],
       [ 0.,  0., 13.,  5.,  0.,  0.,  0.,  0.]])
X[7]
array([ 0.,  0.,  7.,  8., 13., 16., 15.,  1.,  0.,  0.,  7.,  7.,  4.,
       11., 12.,  0.,  0.,  0.,  0.,  0.,  8., 13.,  1.,  0.,  0.,  4.,
        8.,  8., 15., 15.,  6.,  0.,  0.,  2., 11., 15., 15.,  4.,  0.,
        0.,  0.,  0.,  0., 16.,  5.,  0.,  0.,  0.,  0.,  0.,  9., 15.,
        1.,  0.,  0.,  0.,  0.,  0., 13.,  5.,  0.,  0.,  0.,  0.])
plt.imshow(pics[7],cmap='gray')
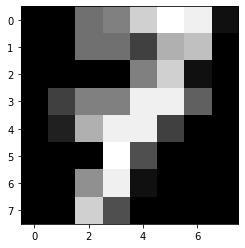
y[7]
7
划分数据集
# 划分数据集
from sklearn.model_selection import train_test_split
xtrain,xtest,ytrain,ytest = train_test_split(X,y,random_state=5)
xtrain.shape,ytrain.shape,xtest.shape,ytest.shape
((1347, 64), (1347,), (450, 64), (450,))
使用sklearn库中的KNN 模型解决问题
# 使用sklearn库中的KNN 模型解决问题
from sklearn.neighbors import KNeighborsClassifier
knn1 = KNeighborsClassifier(n_neighbors=5).fit(xtrain,ytrain)
%%time
# 预测
res = knn1.predict(xtest)
res
Wall time: 82 ms


array([5, 2, 5, 5, 5, 3, 2, 2, 3, 5, 9, 8, 7, 7, 1, 1, 5, 7, 0, 4, 5, 9,
       0, 2, 1, 3, 4, 7, 5, 2, 1, 1, 2, 9, 8, 1, 4, 5, 7, 9, 5, 5, 6, 0,
       1, 7, 2, 9, 7, 7, 3, 9, 5, 1, 8, 6, 7, 7, 8, 1, 6, 1, 3, 6, 1, 3,
       2, 6, 8, 1, 4, 7, 1, 6, 0, 0, 5, 1, 3, 5, 1, 6, 4, 0, 4, 7, 5, 7,
       8, 3, 7, 8, 5, 1, 1, 7, 5, 9, 7, 9, 3, 0, 7, 8, 7, 4, 8, 3, 2, 8,
       5, 2, 7, 4, 4, 8, 9, 7, 4, 5, 0, 5, 9, 8, 2, 3, 2, 4, 4, 8, 0, 5,
       2, 9, 4, 8, 6, 5, 9, 9, 8, 0, 9, 4, 3, 8, 7, 5, 5, 3, 3, 5, 1, 0,
       8, 7, 2, 8, 4, 1, 0, 0, 3, 6, 4, 7, 7, 0, 4, 9, 2, 8, 7, 9, 7, 2,
       0, 3, 3, 8, 5, 7, 5, 6, 8, 4, 1, 5, 1, 1, 6, 9, 9, 9, 8, 6, 4, 6,
       0, 1, 6, 5, 3, 5, 0, 2, 7, 8, 8, 7, 3, 8, 3, 9, 3, 0, 9, 6, 0, 4,
       0, 3, 5, 0, 4, 3, 5, 8, 8, 9, 2, 5, 0, 8, 3, 7, 4, 3, 7, 9, 2, 6,
       1, 2, 1, 7, 0, 7, 5, 0, 6, 4, 1, 8, 3, 0, 8, 9, 2, 2, 5, 2, 6, 6,
       3, 4, 0, 7, 1, 5, 3, 8, 7, 3, 4, 2, 5, 1, 3, 0, 0, 9, 3, 8, 8, 3,
       5, 8, 6, 6, 2, 6, 7, 5, 3, 1, 5, 7, 5, 4, 5, 2, 6, 2, 0, 6, 0, 7,
       2, 5, 8, 8, 7, 1, 4, 7, 2, 0, 0, 3, 7, 4, 2, 5, 2, 6, 1, 0, 5, 7,
       2, 9, 1, 6, 9, 6, 5, 4, 8, 8, 0, 9, 3, 5, 7, 1, 2, 4, 1, 6, 6, 2,
       1, 5, 8, 0, 3, 2, 4, 3, 9, 0, 0, 3, 2, 8, 9, 0, 2, 5, 2, 2, 5, 8,
       3, 6, 7, 2, 5, 9, 0, 5, 9, 0, 1, 3, 9, 1, 4, 9, 2, 1, 5, 6, 0, 0,
       9, 6, 7, 9, 9, 3, 1, 4, 3, 4, 7, 2, 5, 2, 6, 0, 3, 4, 9, 3, 1, 0,
       3, 7, 6, 0, 7, 1, 0, 5, 1, 3, 5, 7, 7, 0, 1, 1, 5, 1, 1, 1, 6, 7,
       7, 2, 2, 2, 7, 1, 3, 6, 9, 1])
(ytest == res).mean()
0.9822222222222222
knn1.score(xtest,ytest)
0.9822222222222222
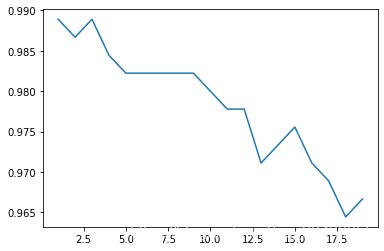
# 学习曲线
def learning_curve():
    krange = range(1,20)
    score = []
    for i in krange:
        clf = KNeighborsClassifier(n_neighbors = i)
        clf = clf.fit(xtrain,ytrain)
        score.append(clf.score(xtest,ytest))
    print(score.index(max(score))+1) # 打印最佳k值
    plt.plot(krange,score)
    plt.show()
learning_curve()
1
knn1_1 = KNeighborsClassifier(n_neighbors = 3).fit(xtrain,ytrain)
knn1_1.score(xtest,ytest)
0.9888888888888889
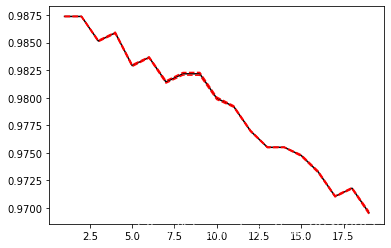
# 此时的k只是在某一特定数据集下的最优,随着测试集的变动,最优的k也会变,所以需要寻找更加稳定最优k:交叉验证法
K折交叉验证:模型稳定性
# K折交叉验证:模型稳定性
from sklearn.model_selection import cross_val_score as CVS

def cross_validation():
    clf = KNeighborsClassifier(n_neighbors = 3)
    cvresult = CVS(clf,X,y,cv=10) # cv折数
    c_mean = cvresult.mean()
    c_std = cvresult.std()
    print('cvresult:',cvresult,'cvresult.mean():',c_mean,'cvresult.std():',c_std)

    # 绘制K折交叉验证曲线
    score = []
    var_ = []
    krange = range(1,20)
    for i in krange:
        clf = KNeighborsClassifier(n_neighbors = i)
        cvresult = CVS(clf,xtrain,ytrain,cv = 5)
        score.append(cvresult.mean())
        var_.append(cvresult.var())
    best_k = score.index(max(score))+1
    print('best_k:',best_k)
    plt.plot(krange,score,color = 'k')
    plt.plot(krange,score,np.array(score)+np.array(var_)*2,c='red',linestyle = '--')
    plt.plot(krange,score,np.array(score)-np.array(var_)*2,c='red',linestyle = '--')
cross_validation()
cvresult: [0.93888889 1.         0.98888889 0.97222222 0.96666667 0.97777778
 0.98333333 0.98324022 0.98324022 0.97206704] cvresult.mean(): 0.9766325263811299 cvresult.std(): 0.015472517471692416
best_k: 1

归一化
# 归一化

x_train = xtrain/255
x_test = xtest/255

score=[]
var_=[]
krange = range(1,20)

for i in krange:
    clf=KNeighborsClassifier(n_neighbors=i,weights = 'distance')
    cvresult = CVS(clf,x_train,ytrain,cv=5)
    score.append(cvresult.mean())
    var_.append(cvresult.var())
plt.plot(krange,score,color='k')
plt.plot(krange,np.array(score)+np.array(var_)*2,c='red',linestyle='--')
plt.plot(krange,np.array(score)-np.array(var_)*2,c='red',linestyle='--')
[<matplotlib.lines.Line2D at 0x295e6cb0e50>]
# 归一化后返回最优的k
best_index = krange[score.index(max(score))]-1
print('best_index',best_index)
print(score[best_index])
best_index 0
0.9873798705768966
使用自己写的KNN模型解决问题
# 使用自己写的KNN模型解决问题
def Knn_C(X,y,X_sample,k):

    d = np.sqrt(np.sum((X-X_sample)**2,axis = 1))
    knn = [*zip(d,y)]
    knn.sort()
    # 少数服从多数,X1的类型与最多的邻居的类型一致,取排序后的前k个值,的第二列(标签值),取第一个众数作为测试数据的预测值
    Y_sample =  pd.Series(np.array(knn[:k])[:,1]).mode()[0]
    return Y_sample
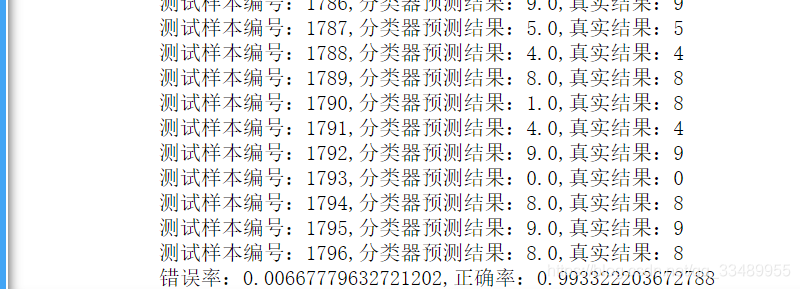
def handwtitingClassTest():
    errorCount = 0.0
    lenth = float(*y.shape)
    for i,item in enumerate(X):
        # 预测
        classifierResult = Knn_C(X,y,item,3)
        # 打印结果
        print(f'测试样本编号:{
      i},分类器预测结果:{
      classifierResult},真实结果:{
      y[i]}')
        # 判断结果是否正确
        if(classifierResult!=y[i]):
            errorCount +=1.0
    # print(y.shape)#(1797,)
    # 打印错误率
    print(f'错误率:{
      errorCount/lenth},正确率:{
      1-errorCount/lenth}')
handwtitingClassTest()
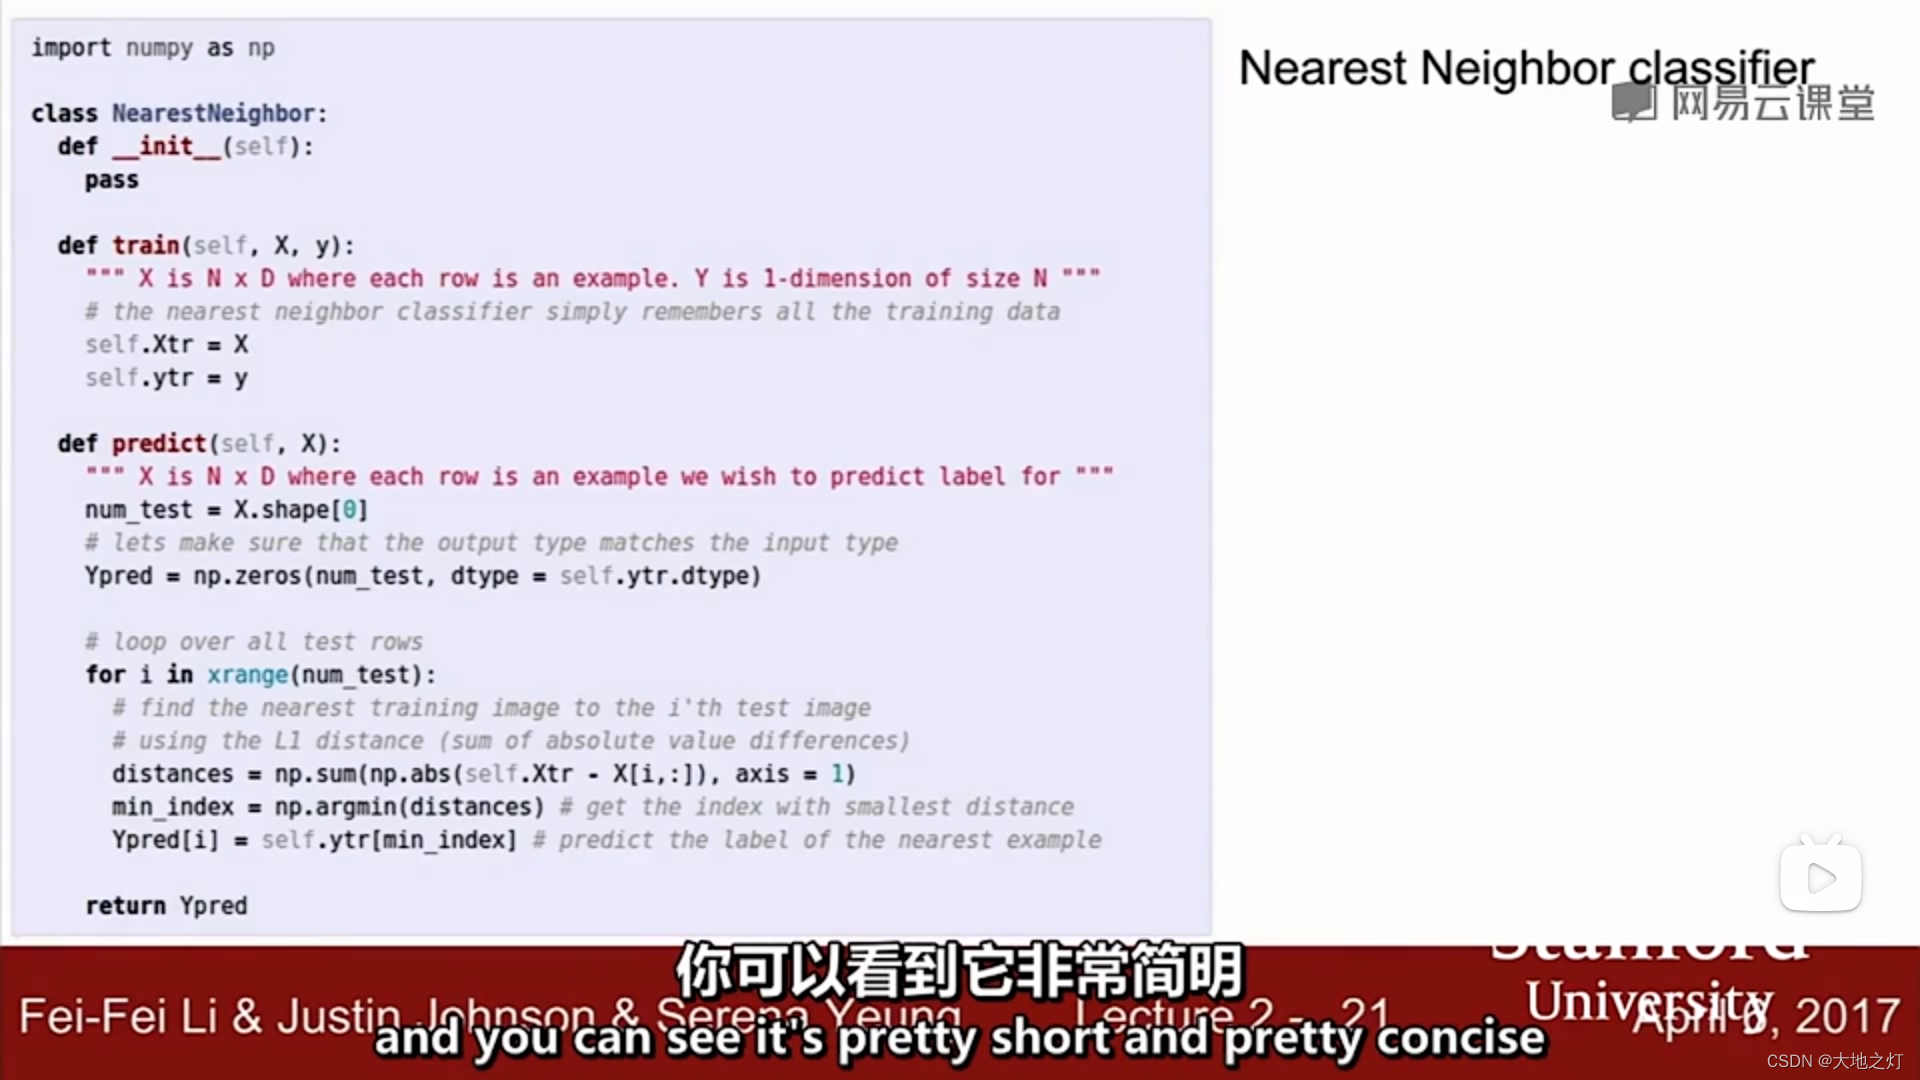
补充:(from cs231n)
视频中给出的knn代码实现
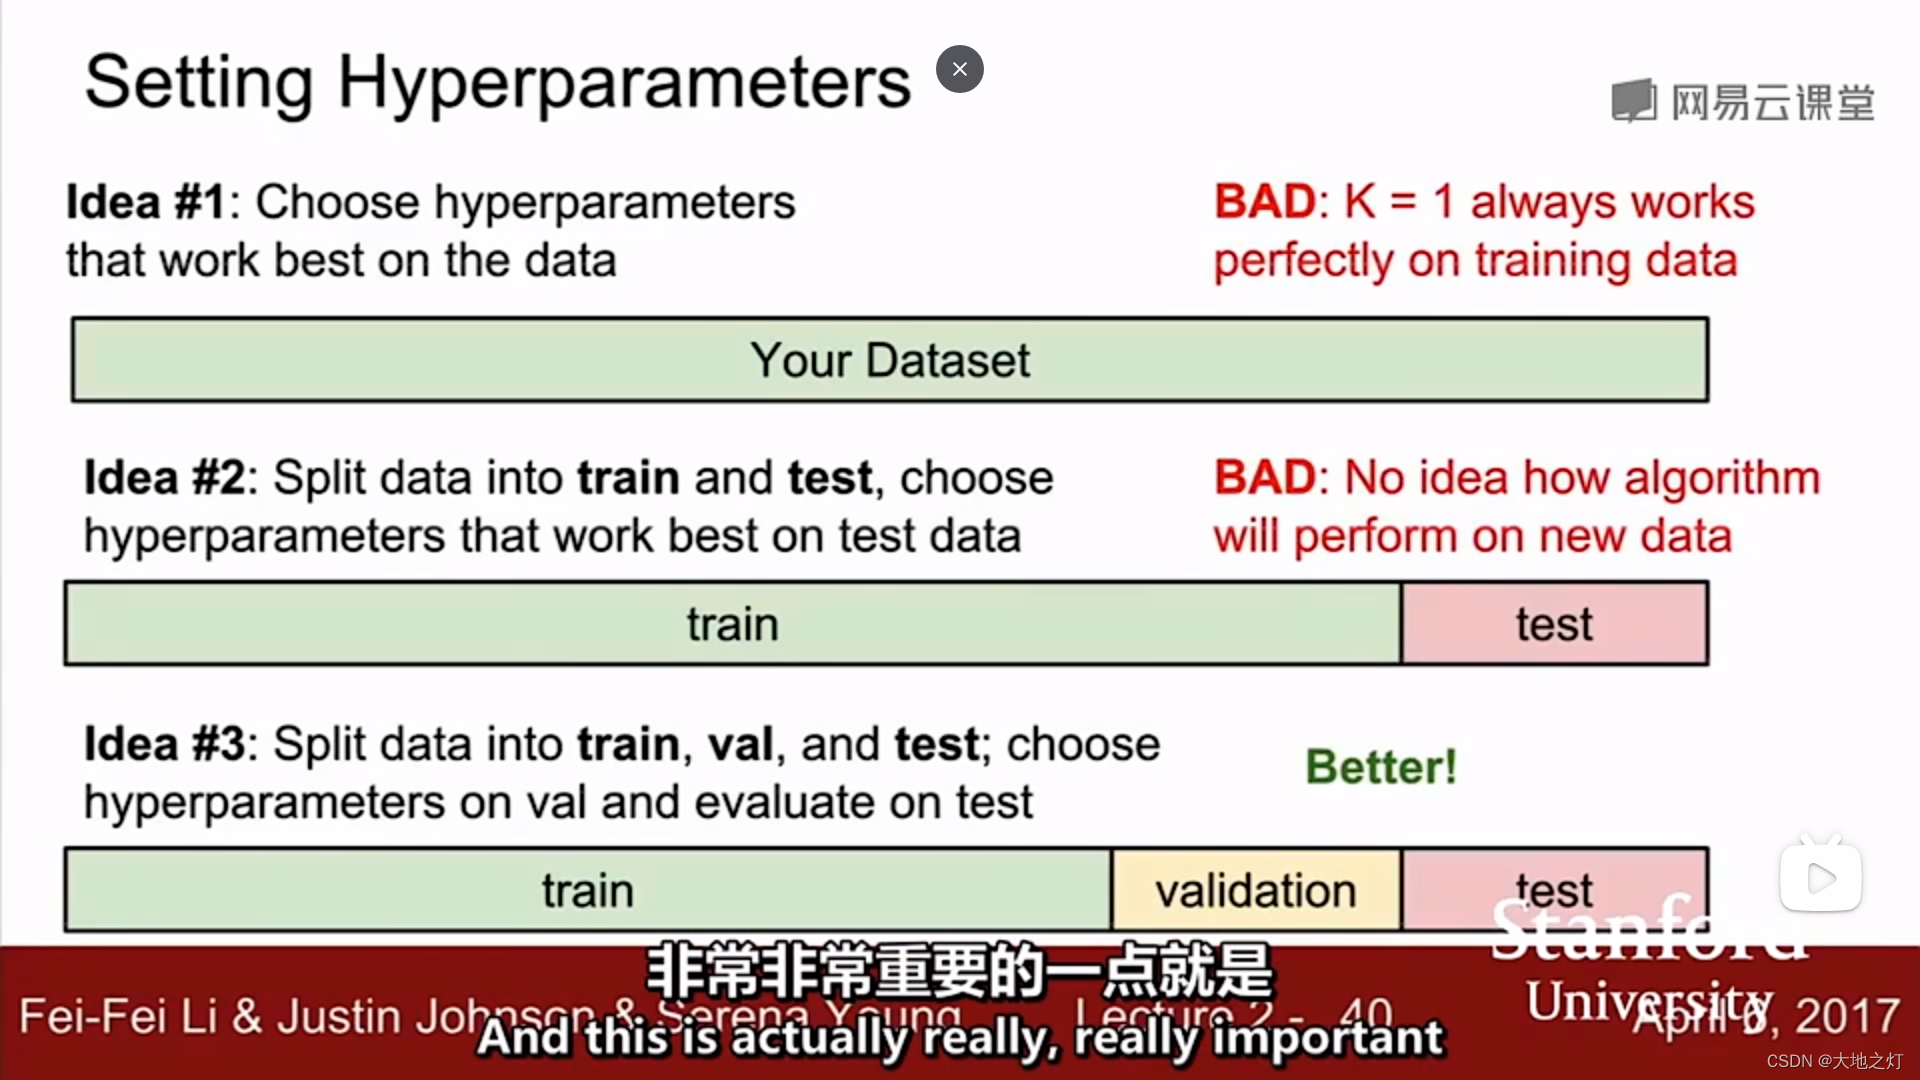
在调整超参数的时候,你不能只选择对于整个数据集有最好效果的那个参数,对于knn来说就是k=1时准确率高,但是不具备泛化性。
在调整超参数的时候,你同样不能选择在测试集上效果最好的超参数,因为这个超参数只对这个测试集有泛化性,想要得到比较准确的结果,可以进行k折交叉验证得到一个均值作为最终结果。
此外,为了避免第二种情况的发生,可以设置验证集,测试集在最终结果(确定好超参数)出来前不参与预测,保证研究的可靠性。
智能推荐
linux里面ping www.baidu.com ping不通的问题_linux桥接ping不通baidu-程序员宅基地
文章浏览阅读3.2w次,点赞16次,收藏90次。对于这个问题我也是从网上找了很久,终于解决了这个问题。首先遇到这个问题,应该确认虚拟机能不能正常的上网,就需要ping 网关,如果能ping通说明能正常上网,不过首先要用命令route -n来查看自己的网关,如下图:第一行就是默认网关。现在用命令ping 192.168.1.1来看一下结果:然后可以看一下电脑上面百度的ip是多少可以在linux里面ping 这个IP,结果如下:..._linux桥接ping不通baidu
android 横幅弹出权限,有关 android studio notification 横幅弹出的功能没有反应-程序员宅基地
文章浏览阅读512次。小妹在这里已经卡了2-3天了,研究了很多人的文章,除了低版本api 17有成功外,其他的不是channel null 就是没反应 (channel null已解决)拜托各位大大,帮小妹一下,以下是我的程式跟 gradle, 我在这里卡好久又没有人可问(哭)public class MainActivity extends AppCompatActivit..._android 权限申请弹窗 横屏
CNN中padding参数分类_cnn “相同填充”(same padding)-程序员宅基地
文章浏览阅读1.4k次,点赞4次,收藏6次。valid padding(有效填充):完全不使用填充。half/same padding(半填充/相同填充):保证输入和输出的feature map尺寸相同。full padding(全填充):在卷积操作过程中,每个像素在每个方向上被访问的次数相同。arbitrary padding(任意填充):人为设定填充。..._cnn “相同填充”(same padding)
Maven的基础知识,java技术栈-程序员宅基地
文章浏览阅读790次,点赞29次,收藏28次。手绘了下图所示的kafka知识大纲流程图(xmind文件不能上传,导出图片展现),但都可提供源文件给每位爱学习的朋友一个人可以走的很快,但一群人才能走的更远。不论你是正从事IT行业的老鸟或是对IT行业感兴趣的新人,都欢迎扫码加入我们的的圈子(技术交流、学习资源、职场吐槽、大厂内推、面试辅导),让我们一起学习成长![外链图片转存中…(img-Qpoc4gOu-1712656009273)][外链图片转存中…(img-bSWbNeGN-1712656009274)]
getFullYear()和getYear()有什么区别_getyear和getfullyear-程序员宅基地
文章浏览阅读469次。Date对象取得年份有getYear和getFullYear两种方法经 测试var d=new Date;alert(d.getYear())在IE中返回 2009,在Firefox中会返回109。经查询手册,getYear在Firefox下返回的是距1900年1月1日的年份,这是一个过时而不被推荐的方法。而alert(d.getFullYear())在IE和FF中都会返回2009。因此,无论何时都应使用getFullYear来替代getYear方法。例如:2016年用 getFullYea_getyear和getfullyear
Unix传奇 (上篇)_unix传奇pdf-程序员宅基地
文章浏览阅读182次。Unix传奇(上篇) 陈皓 了解过去,我们才能知其然,更知所以然。总结过去,我们才会知道我们明天该如何去规划,该如何去走。在时间的滚轮中,许许多的东西就像流星一样一闪而逝,而有些东西却能经受着时间的考验散发着经久的魅力,让人津津乐道,流传至今。要知道明天怎么去选择,怎么去做,不是盲目地跟从今天各种各样琳琅满目前沿技术,而应该是去 —— 认认真真地了解和回顾历史。 Unix是目前还在存活的操作系_unix传奇pdf
随便推点
在VSCode中运行Jupyter Notebook_vscode jupyter notebook-程序员宅基地
文章浏览阅读7.8k次。在VSCode中运行Jupyter Notebook_vscode jupyter notebook
老赵书托(2):计算机程序的构造与解释-程序员宅基地
文章浏览阅读122次。我要推荐的第一本书便是大名鼎鼎的《Structure and Interpretation of Computer Programs》,在国内可以买到中译版,即机械工业出版社的《计算机程序的构造与解释》。 抽象豪不夸张地说,这是一本影响了好几代程序员的书。自从上世纪80年代MIT开始使用这本书作为教材开始,它使用Lisp语言——直到前两年才被Python取代,但是使用哪本教材不得而知,由这..._老赵书拖
图像处理之常见二值化方法汇总-程序员宅基地
文章浏览阅读6.1k次,点赞5次,收藏53次。图像处理之常见二值化方法汇总图像二值化是图像分析与处理中最常见最重要的处理手段,二值处理方法也非常多。越精准的方法计算量也越大。本文主要介绍四种常见的二值处理方法,通常情况下可以满足大多数图像处理的需要。主要本文讨论的方法仅针对RGB色彩空间。方法一:该方法非常简单,对RGB彩色图像灰度化以后,扫描图像的每个像素值,值小于127的将像素值设为0(黑色),值大于等于127..._web 图像二值画
基于springboot实现社区团购系统项目【项目源码+论文说明】计算机毕业设计-程序员宅基地
文章浏览阅读502次,点赞23次,收藏16次。在网站的整个开发过程中,首先对系统进行了需求分析,设计出系统的主要功能模块,其次对网站进行总体规划和详细设计,最后对基于Spring Boot的社区团购系统进行了系统测试,包括测试概述,测试方法,测试方案等,并对测试结果进行了分析和总结,进而得出系统的不足及需要改进的地方,为以后的系统维护和扩展提供了方便。现在的时代科技飞速地发展,网络交易已经深入大众的生活。项目开发的过程中,要按照规划、分期实施,特别是要注意在项目开发过程中要有条理,从点到面,一步步完善,不要贪图进度,要循环渐进的对项目进行开发。
ACwing 哈希算法入门:_ac算法 哈希-程序员宅基地
文章浏览阅读308次。哈希算法:将字符串映射为数字形式,十分巧妙,一般运用为进制数,进制据前人经验,一般为131,1331时重复率很低,由于字符串的数字和会很大,所以一般为了方便,一般定义为unsigned long long,爆掉时,即为对 2^64 取模,可以对于任意子序列的值进行映射为数字进而进行判断入门题目链接:AC代码:#include<bits/stdc++.h>using na..._ac算法 哈希
VS配置Qt和MySQL_在vs中 如何装qt5sqlmysql模块-程序员宅基地
文章浏览阅读952次,点赞13次,收藏27次。由于觉得Qt的编辑界面比较丑,所以想用vs2022的编辑器写Qt加MySQL的项目。_在vs中 如何装qt5sqlmysql模块