rp原型中鼠标悬停显示图片
There are tons of options available for UX designers to prototype a user experience and you may not know what are the pros and cons of each tool just yet. The main goal of this post is to give you a taste of each tool’s prototyping workflow by taking you through the process of building a simple hover state example. By the end of these exercises, you should have a high-level idea of the jobs that are suitable for each of the tools.
Ť这里可供UX设计师为原型用户体验选项吨,你可能不知道什么是每个工具的利弊,只是还没有。 这篇文章的主要目的是通过引导您完成一个简单的悬停状态示例的过程,使您领略每种工具的原型工作流程。 在这些练习结束之前,您应该对适用于每种工具的工作有一个较高的了解。
我们在建什么? (What are we building?)
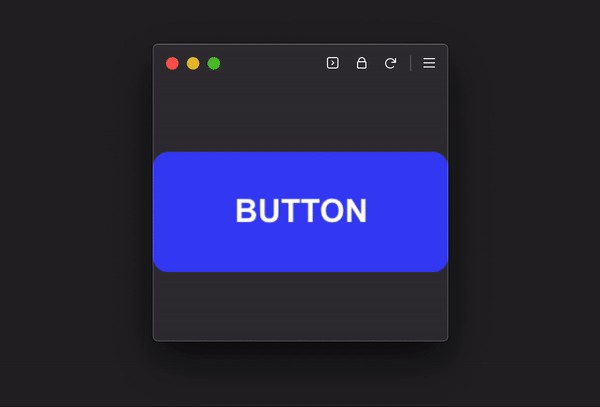
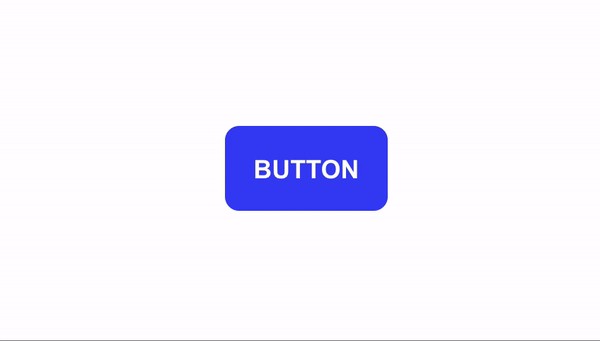
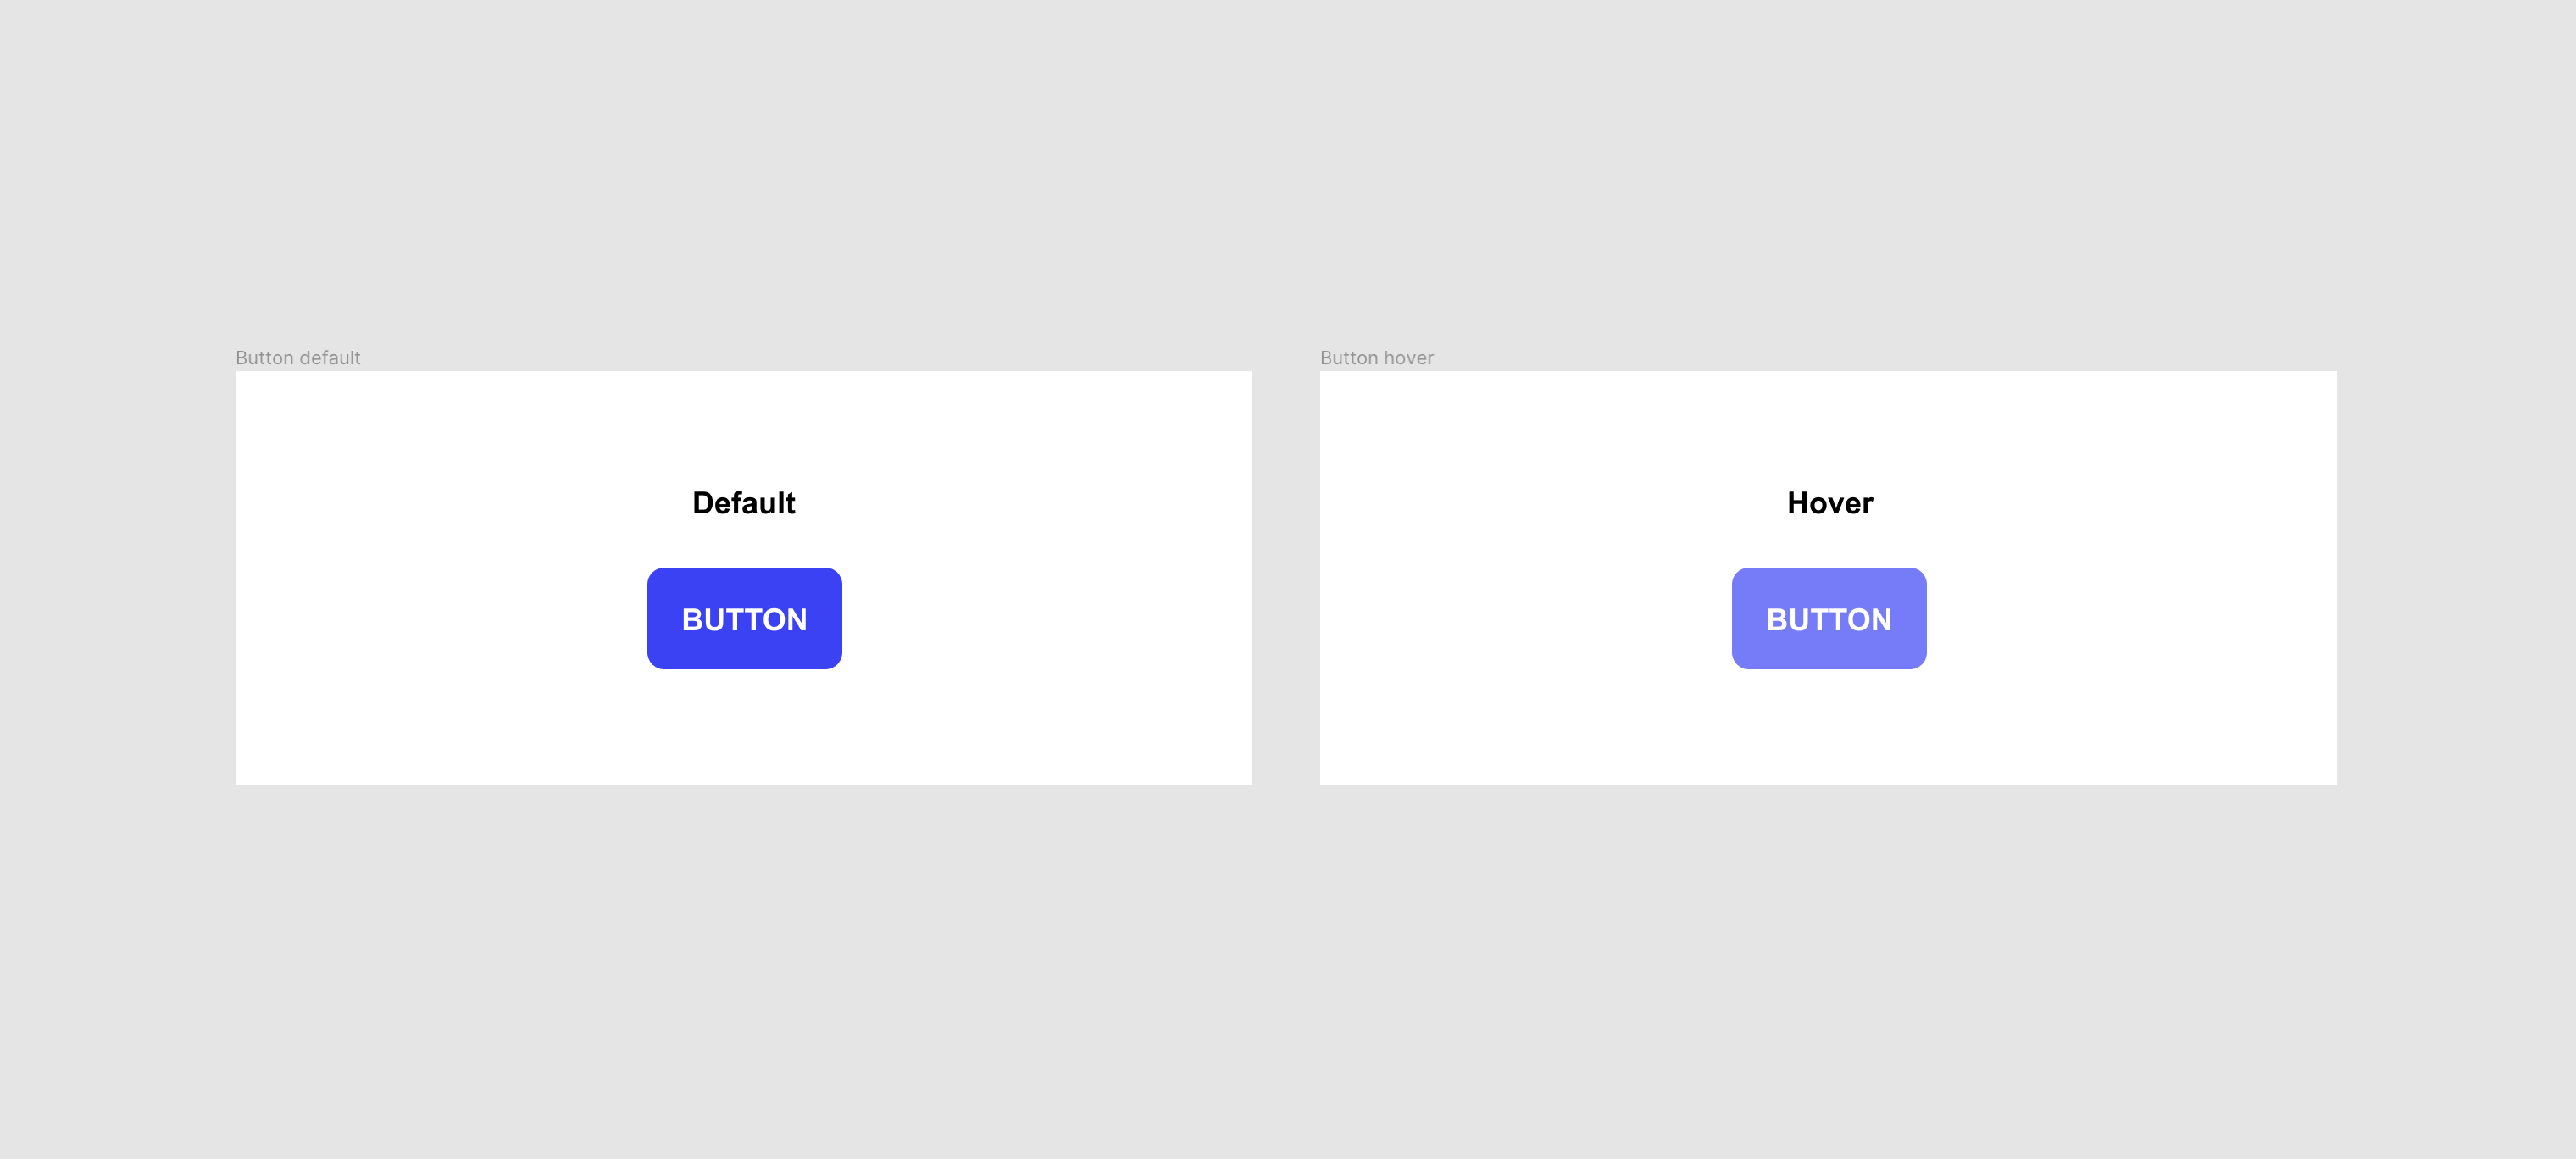
Since the goal is to get a quick understanding of the prototyping tool’s workflow, we don’t need to be too fancy. A simple button hover prototype that alters the button background color should do the job. Below are the two component states we will be animating between.
由于目标是快速了解原型工具的工作流程,因此我们不必太花哨。 一个简单的按钮悬停原型可以改变按钮的背景颜色。 以下是我们将在其中进行动画处理的两个组件状态。

Here is a quick spec of the button background style:
以下是按钮背景样式的快速说明:
- Default background color: #3B42F4 默认背景色:#3B42F4
- Hover background color: #767BF8 (or 70% opacity of the default) 悬停背景颜色:#767BF8(或默认值的70%不透明度)
视力 (Invision)
Instead of Invision Studio, we’ll do an Invision web example because it is the most popular prototyping tool based on 2018 Design Tools Survey. Since this is a screen linking tool, the only way to prototype the hover state is to build a hover link hotspot.
我们将代替Invision Studio,而是做一个Invision Web示例,因为它是基于2018 Design Tools Survey的最受欢迎的原型工具。 由于这是一个屏幕链接工具,因此原型化悬停状态的唯一方法是构建悬停链接热点。
Step 1: Start by setting up two screens with each of the button states. You will need to design the buttons in another design tool of your choosing then upload the two states to Invision.
步骤1:首先使用每个按钮状态设置两个屏幕。 您将需要在您选择的另一个设计工具中设计按钮,然后将这两种状态上载到Invision。

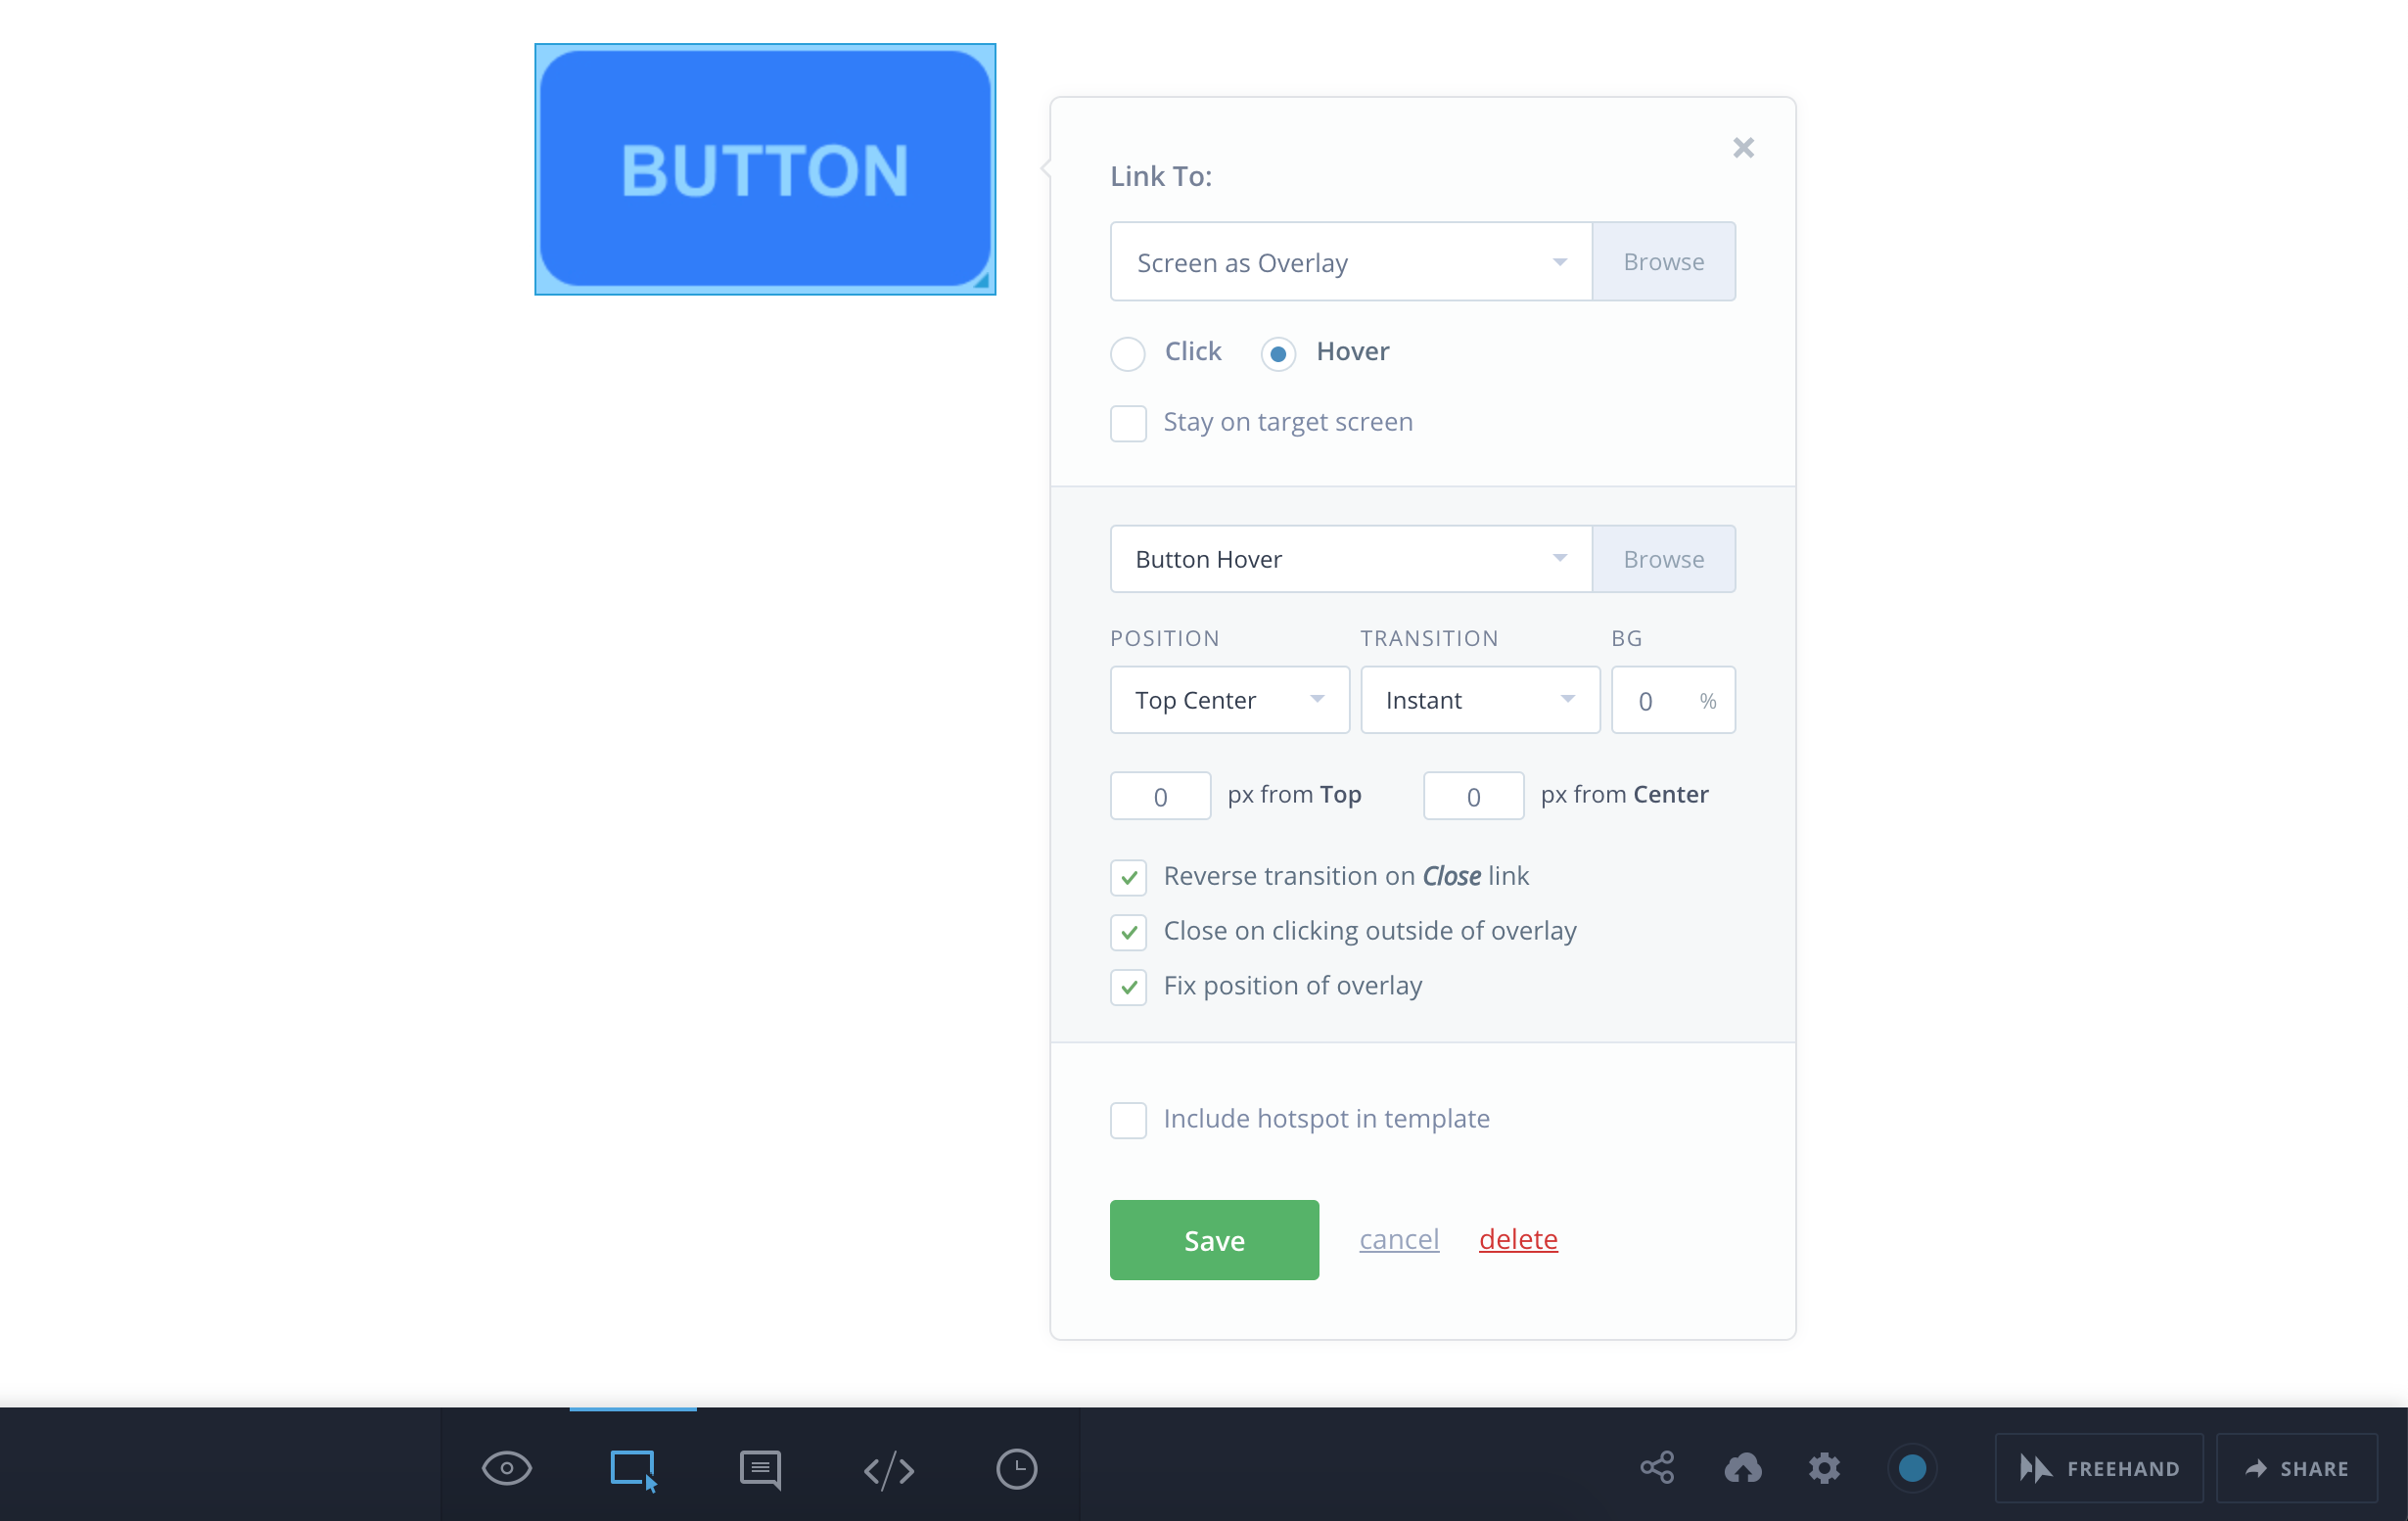
Step 2: Setup a hotspot over the default button with ‘Screen as Overlay’ link to the hover screen. Make sure to un-check the ‘Stay on target screen’ to allow the hover out.
第2步:在默认按钮上设置一个热点,并使用“ Screen as Overlay”链接到悬停屏幕。 确保取消选中“停留在目标屏幕上”以允许鼠标悬停。
Result: You should now have a functioning button hover state.
结果:您现在应该具有正常的按钮悬停状态。

优点: (Pros:)
Invision is fairly straightforward and that’s its advantage. You can essentially prototype hover states between any two static screens. Updating design is as easy as uploading a new mockup.
Invision非常简单,这就是它的优势。 实际上,您可以在任何两个静态屏幕之间原型化悬停状态。 更新设计就像上传新模型一样容易。
缺点: (Cons:)
The transition animation is limited and lacking sequence. Therefore if you require elements to transition one after another with fancier effects then this may not be the right tool of choice.
过渡动画是有限的,缺少序列。 因此,如果您需要元素以更高的效果一个接一个地过渡,那么这可能不是正确的选择。
成帧器X (Framer X)
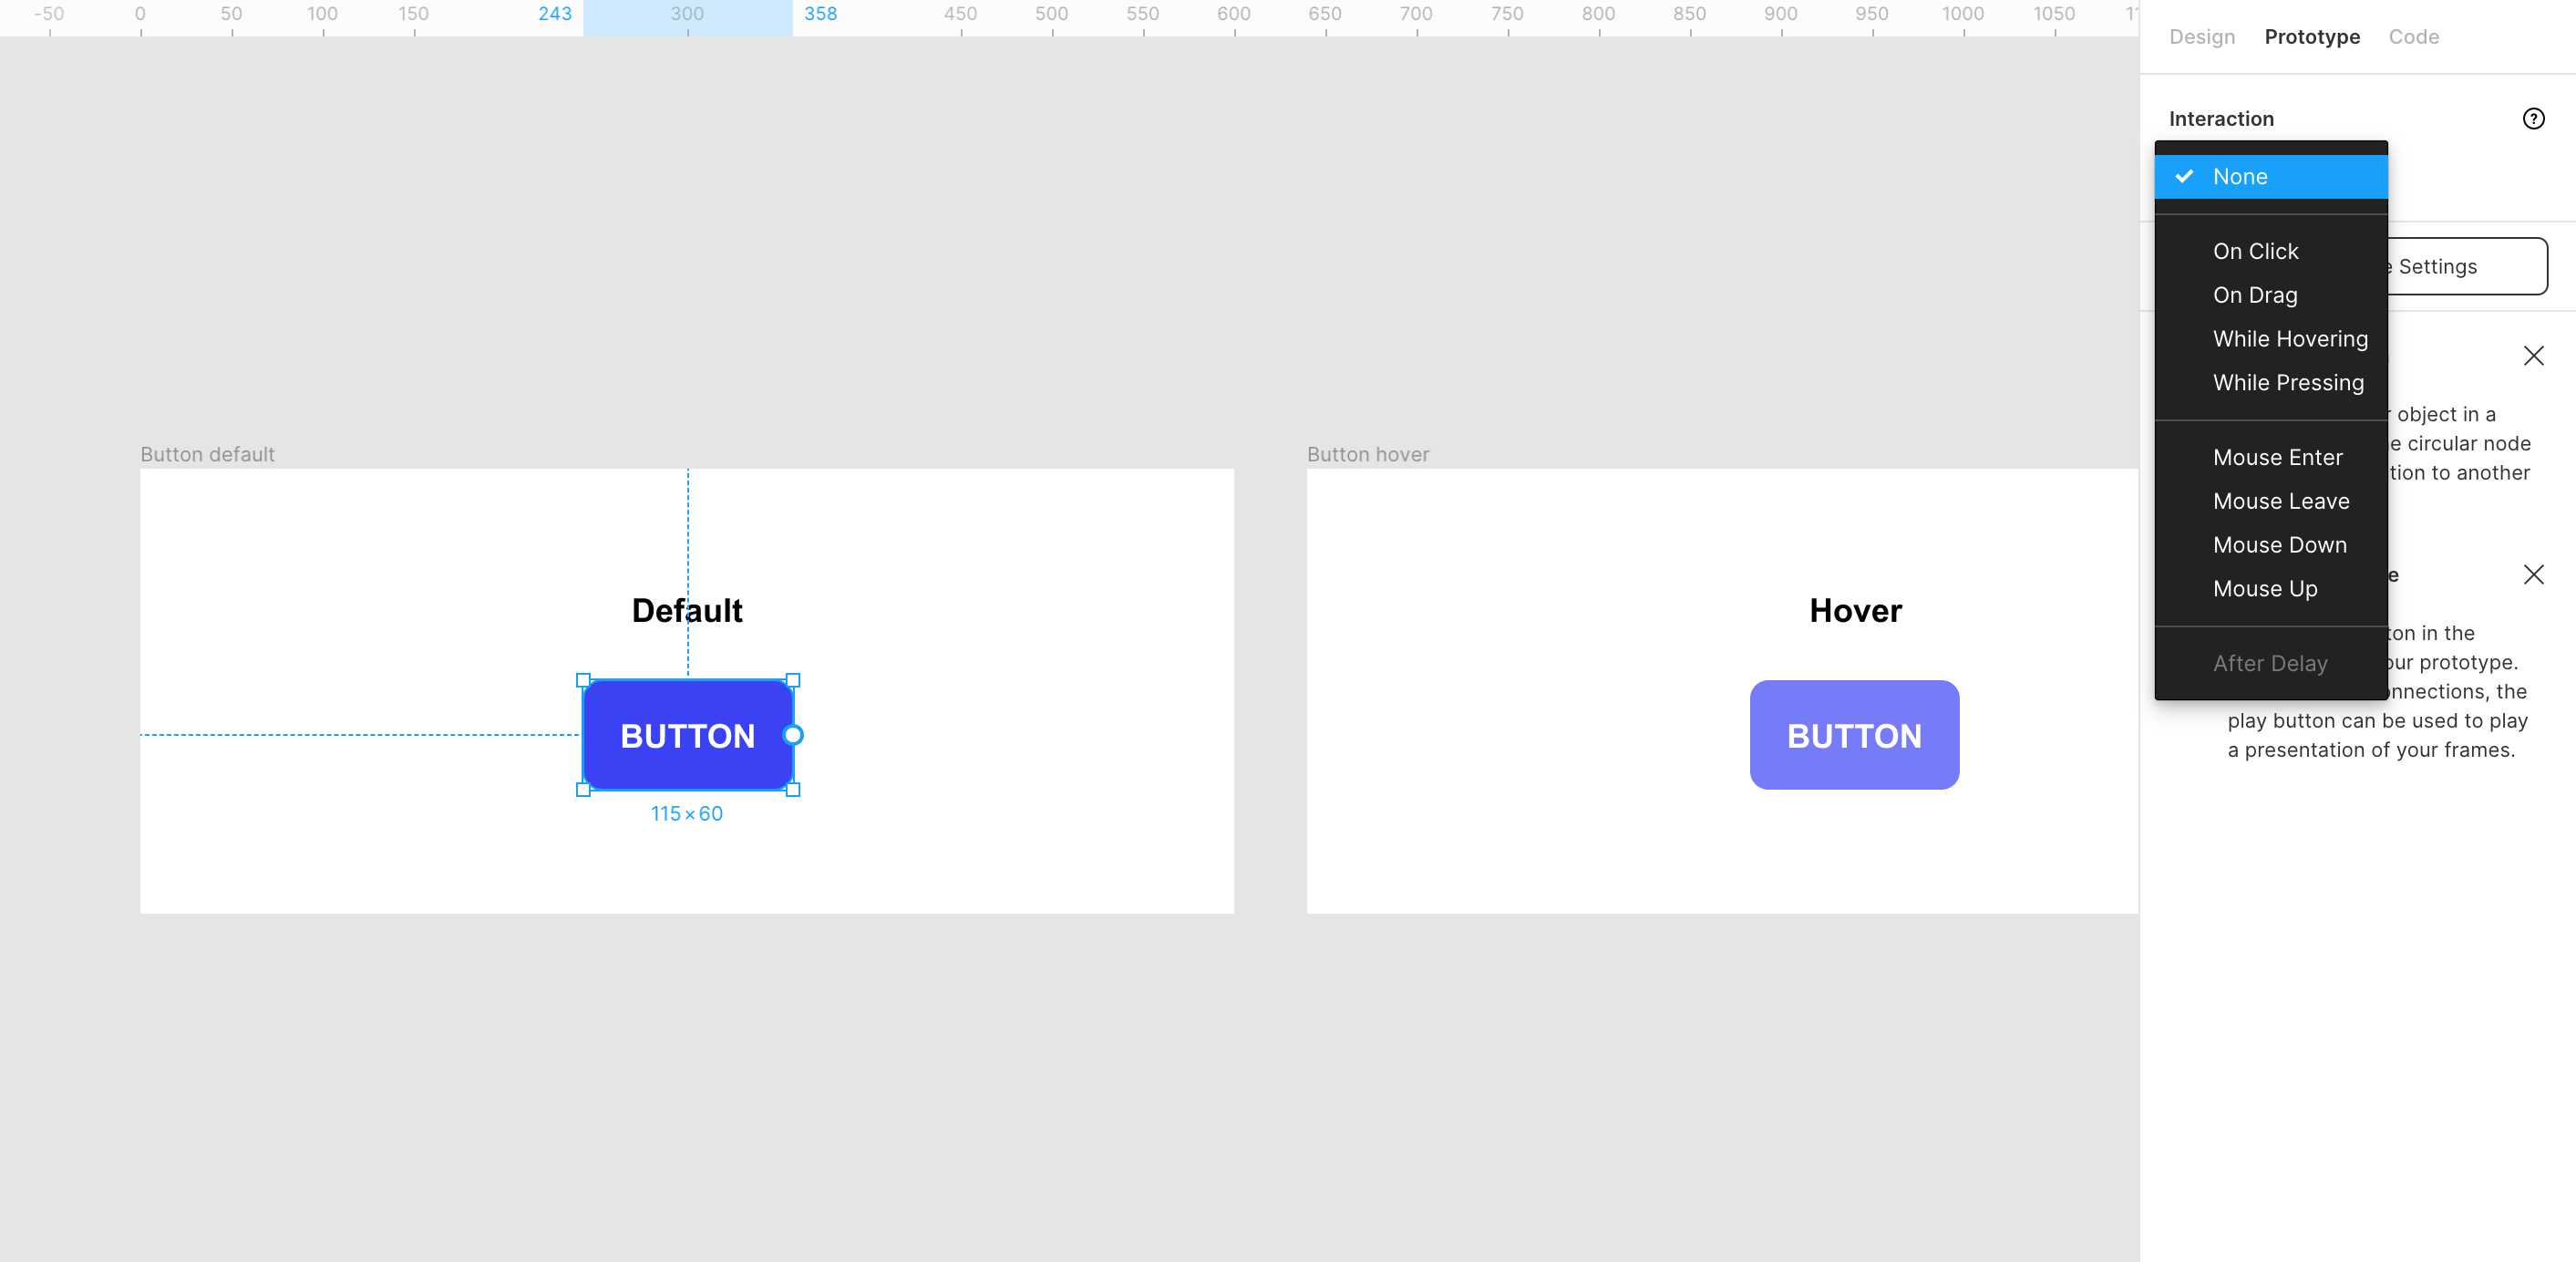
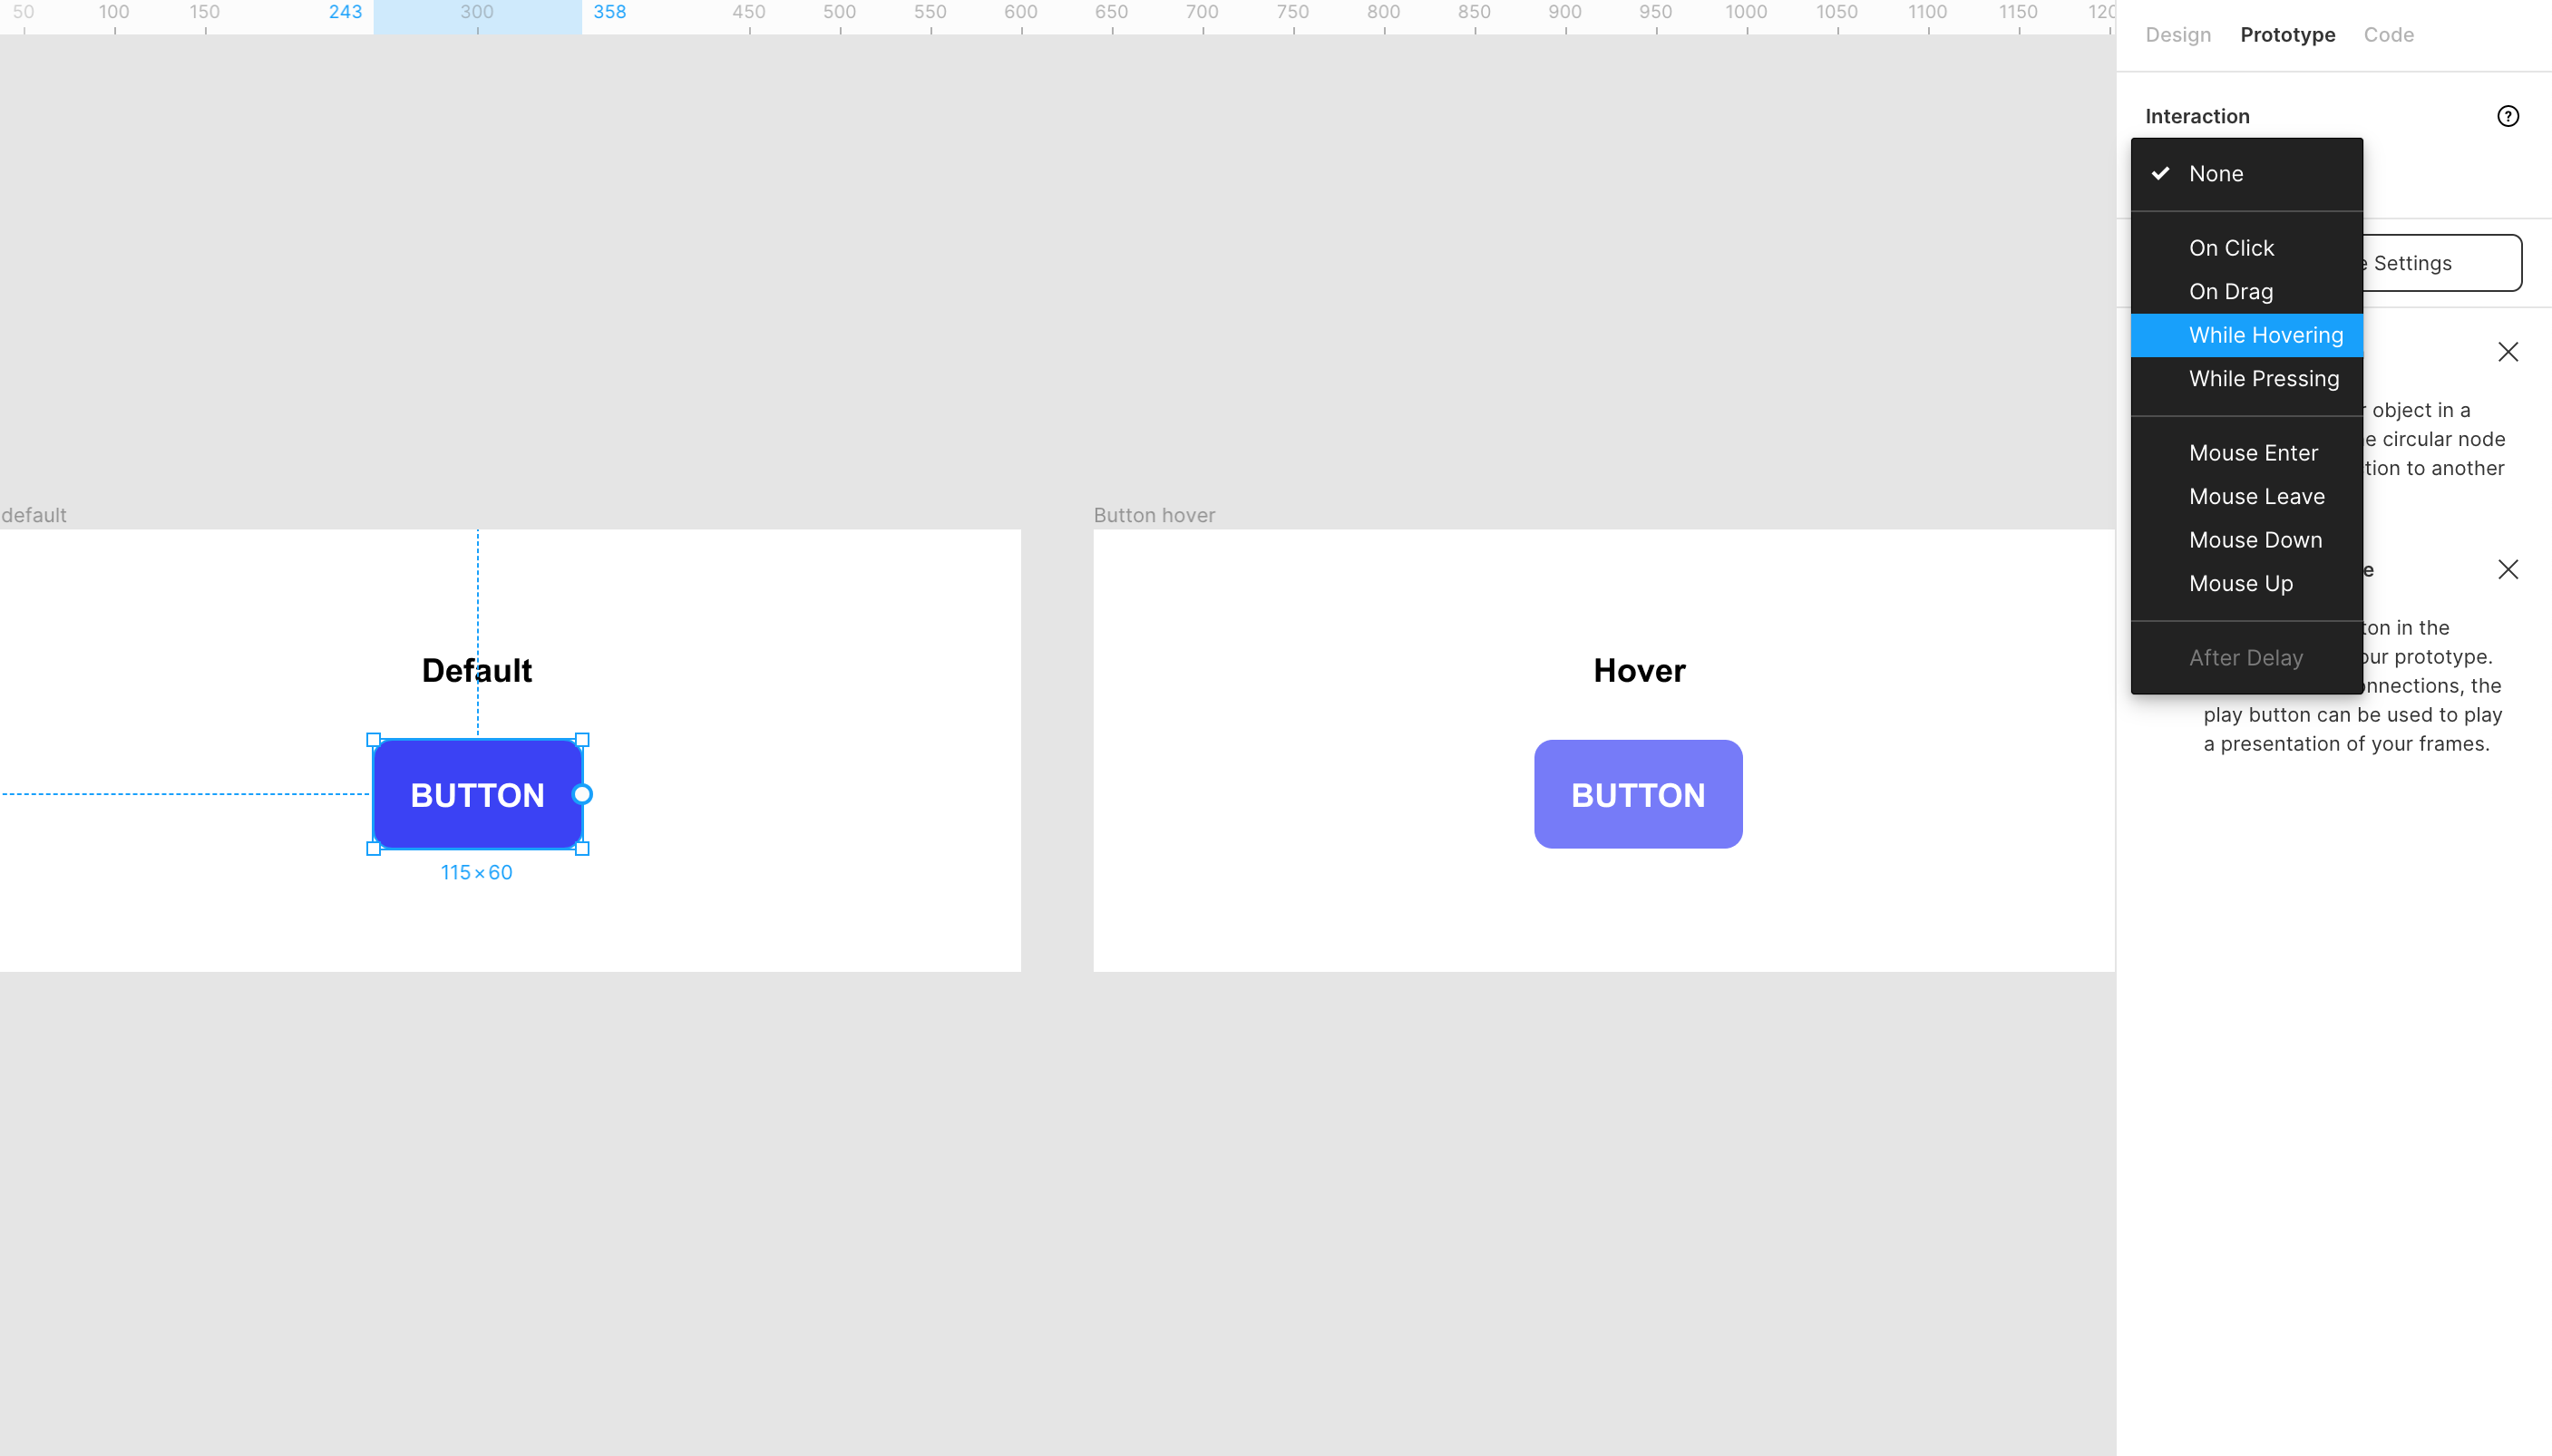
Framer has come a long way from being viewed as a super-advanced prototyping with code tool to now a design tool with prototyping capabilities. There are a couple of ways you can prototype a hover state in Framer X. We are going to go over the code override method because that's more unique to Framer and it’s not too complex.
从被视为具有代码工具的超高级原型到如今具有原型功能的设计工具,Framer已有了很长的路要走。 您可以通过两种方法在Framer X中为悬停状态建立原型。我们将介绍代码替代方法,因为它对于Framer来说更独特,并且不太复杂。
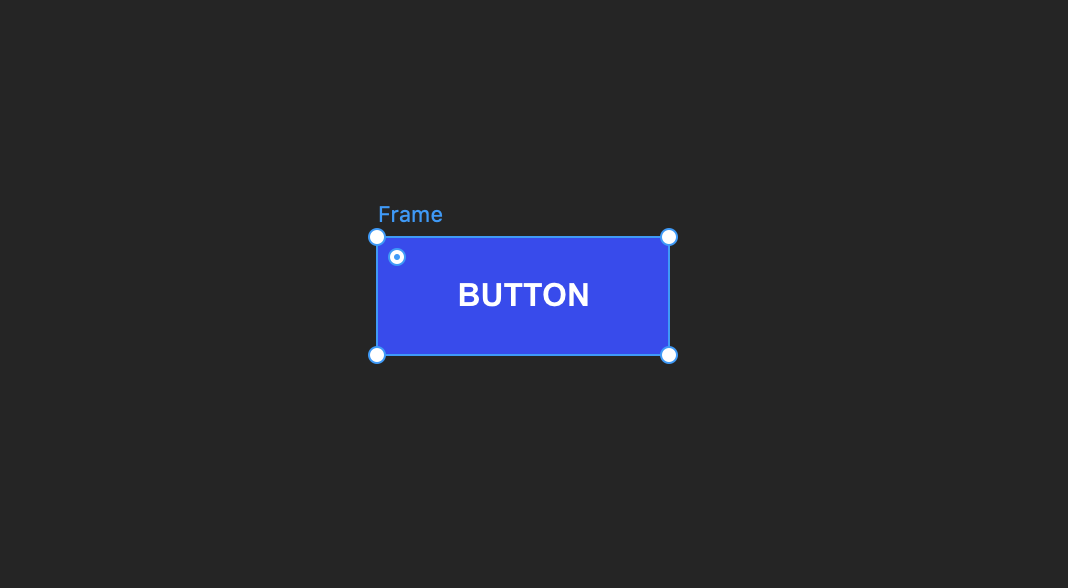
Step 1: Create the button designs as a Frame (Need to be in a frame to attach override to). We only need the default button here as we can apply the hover state as an override.
步骤1:将按钮设计创建为框架(需要在框架中附加替代)。 我们这里只需要默认按钮,因为我们可以将悬停状态用作替代。
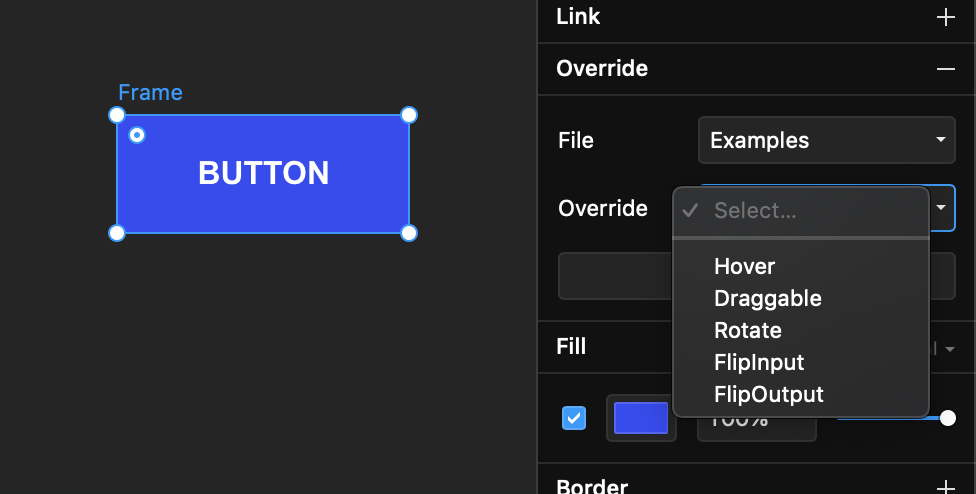
Step 2: With your button frame selected, hop over to the properties panel on the right and add an override. Go with the default ‘Example’ file, and for the override dropdown, choose the hover option.
步骤2:在选择按钮框的情况下,跳到右侧的属性面板并添加替代。 使用默认的“示例”文件,然后在“替代”下拉列表中选择“悬停”选项。
Step 3: If you click on the preview prototype option at the top right corner (play icon) you can interact with this button and see it’s current hover state, which is a default scaling effect taken from the example override file.
步骤3:如果单击右上角的预览原型选项(播放图标),则可以与此按钮进行交互,并查看其当前的悬停状态,这是从示例替代文件中获取的默认缩放效果。
Step 4: So far we’ve applied a hover state to your button design layer and applied an example hover override to it. Let’s look at the override code and modify it to meet our spec. From the Override properties panel, click on ‘Edit Code’. You should then see a code editor (don’t worry, we won’t be coding much to make this example work).
步骤4:到目前为止,我们已经将悬停状态应用于按钮设计层,并对其进行了示例悬停覆盖。 让我们看一下覆盖代码并对其进行修改以满足我们的规范。 在“替代属性”面板中,单击“编辑代码”。 然后,您应该看到一个代码编辑器(不用担心,为了使此示例正常工作,我们不会进行太多编码)。
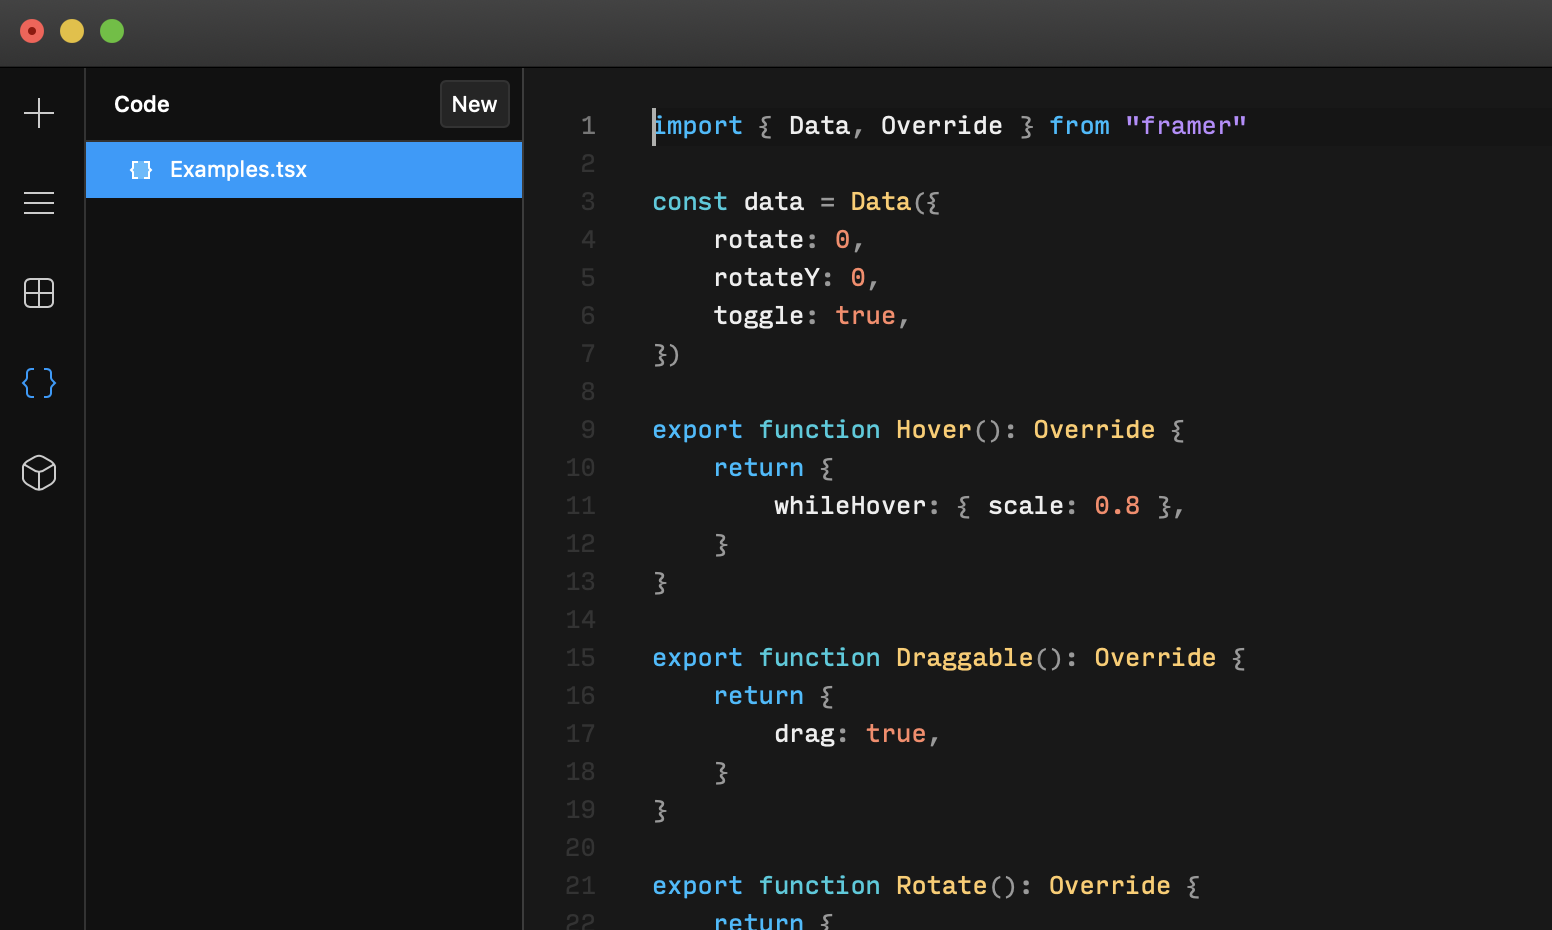
Step 5: What we need to do now is to modify the “Hover() function” starting on line 9 that looks like the code block below. Instead of the “whileHover: { scale: 0.8 }”, which monitors a mouse hover to the button layer and when it’s being hovered it scales the layer to 80% of its original size, we want to modify this to “whileHover: { opacity: 0.7 }” as shown below:
步骤5:现在,我们需要做的是从第9行开始修改“ Hover()函数” ,该代码类似于下面的代码块。 而不是监视鼠标悬停在按钮层上的“ whileHover:{scale:0.8}” ,而是当鼠标悬停在其上时,它将图层缩放到其原始大小的80%,我们希望将其修改为“ whileHover:{opacity :0.7}” ,如下所示:
export function Hover(): Override { return { whileHover: { opacity: 0.7 }, }}Result: The override now should adjust the opacity of the layer to 70% of the original opacity to simulate the hover effect we want.
结果:现在,覆盖将应将图层的不透明度调整为原始不透明度的70%,以模拟所需的悬停效果。
优点: (Pros:)
The override + code components (not covered in this post) are flexible and powerful methods to build high-fidelity prototypes. You can prototype anything that’s feasible from a technical perspective.
覆盖+代码组件(本文中未介绍)是构建高保真原型的灵活强大的方法。 您可以从技术角度为可行的任何事物制作原型。
The override on top of the design layer is a good half step to leverage some of the code-level prototyping features but not completely jumping into the full code setup.
设计层顶部的覆盖是利用一些代码级原型设计功能的好半步,但并不能完全进入完整的代码设置。
缺点: (Cons:)
The coding part always have a bit of a learning curve for designers regardless of how elementary. While Framer is a powerful tool, it requires a good amount of time invested to learn the tool if the designer is new to coding.
无论基础如何,编码部分始终对设计人员有一些学习曲线。 虽然Framer是功能强大的工具,但如果设计人员不熟悉编码,则需要花费大量时间来学习该工具。
草图 (Sketch)
Native prototyping feature was introduced since Sketch 49. However, the feature only supports artboard linking on click and lacks hover interaction. Therefore, to prototype hover animation we need to turn to Sketch plugins. There are a few animation plugins available. For this example, we will use the Anima plugin.
自Sketch 49起引入了本机原型功能。但是,该功能仅支持单击时的画板链接,并且缺少悬停交互。 因此,要使悬停动画原型化,我们需要使用Sketch插件。 有一些可用的动画插件。 在此示例中,我们将使用Anima插件 。
Step 1: You need to set up an artboard with the default button style.
步骤1:您需要使用默认按钮样式设置画板。
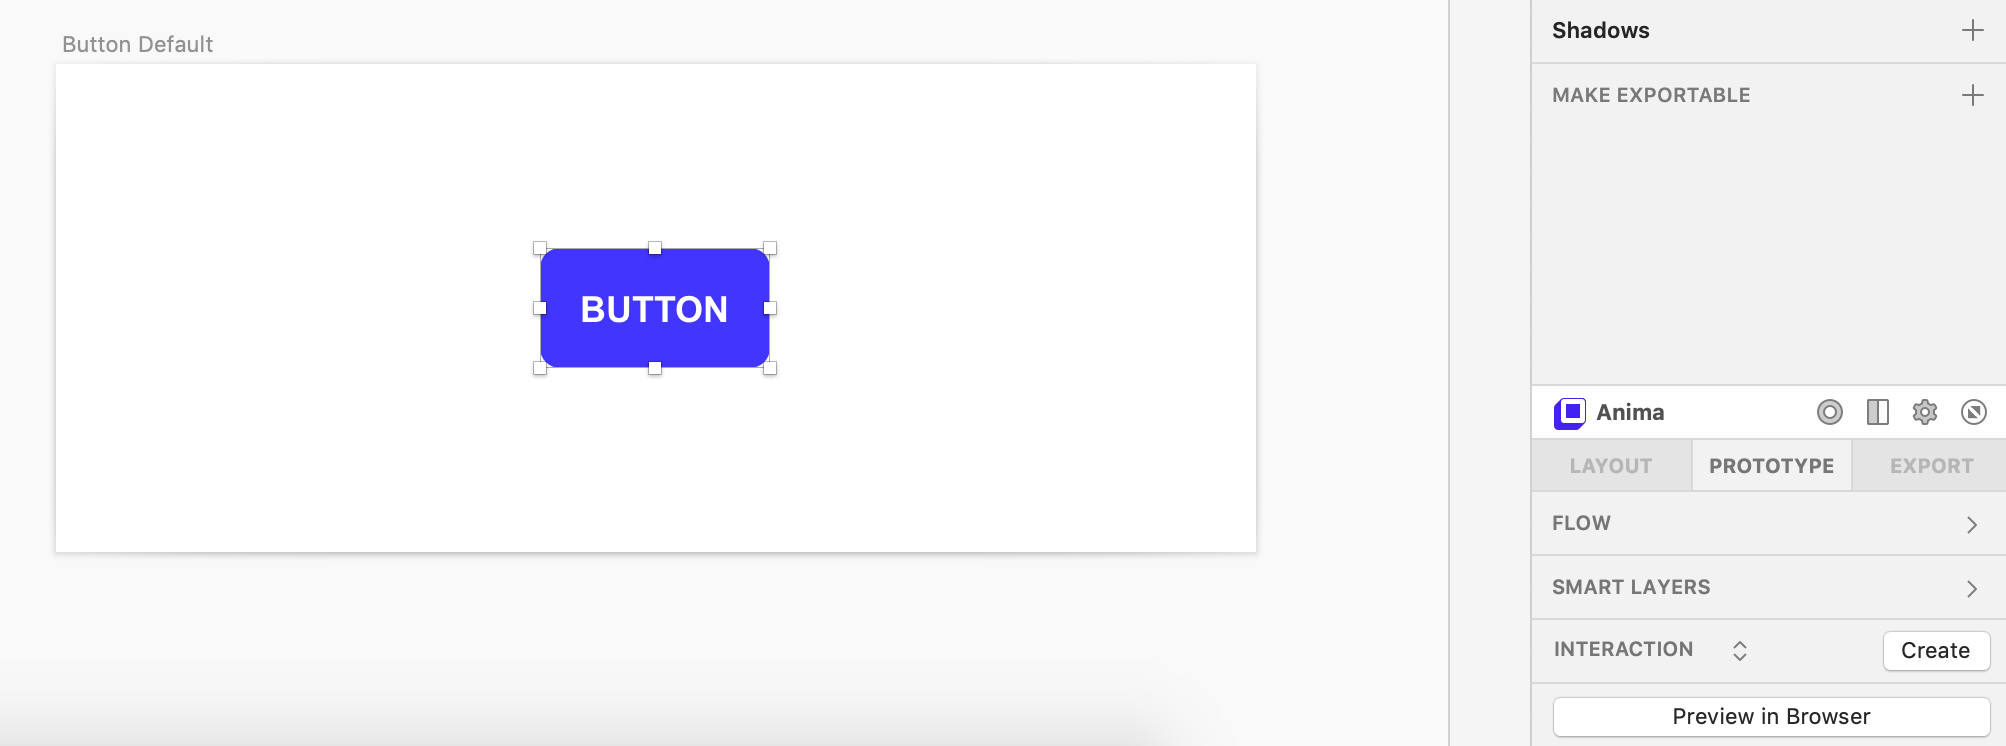
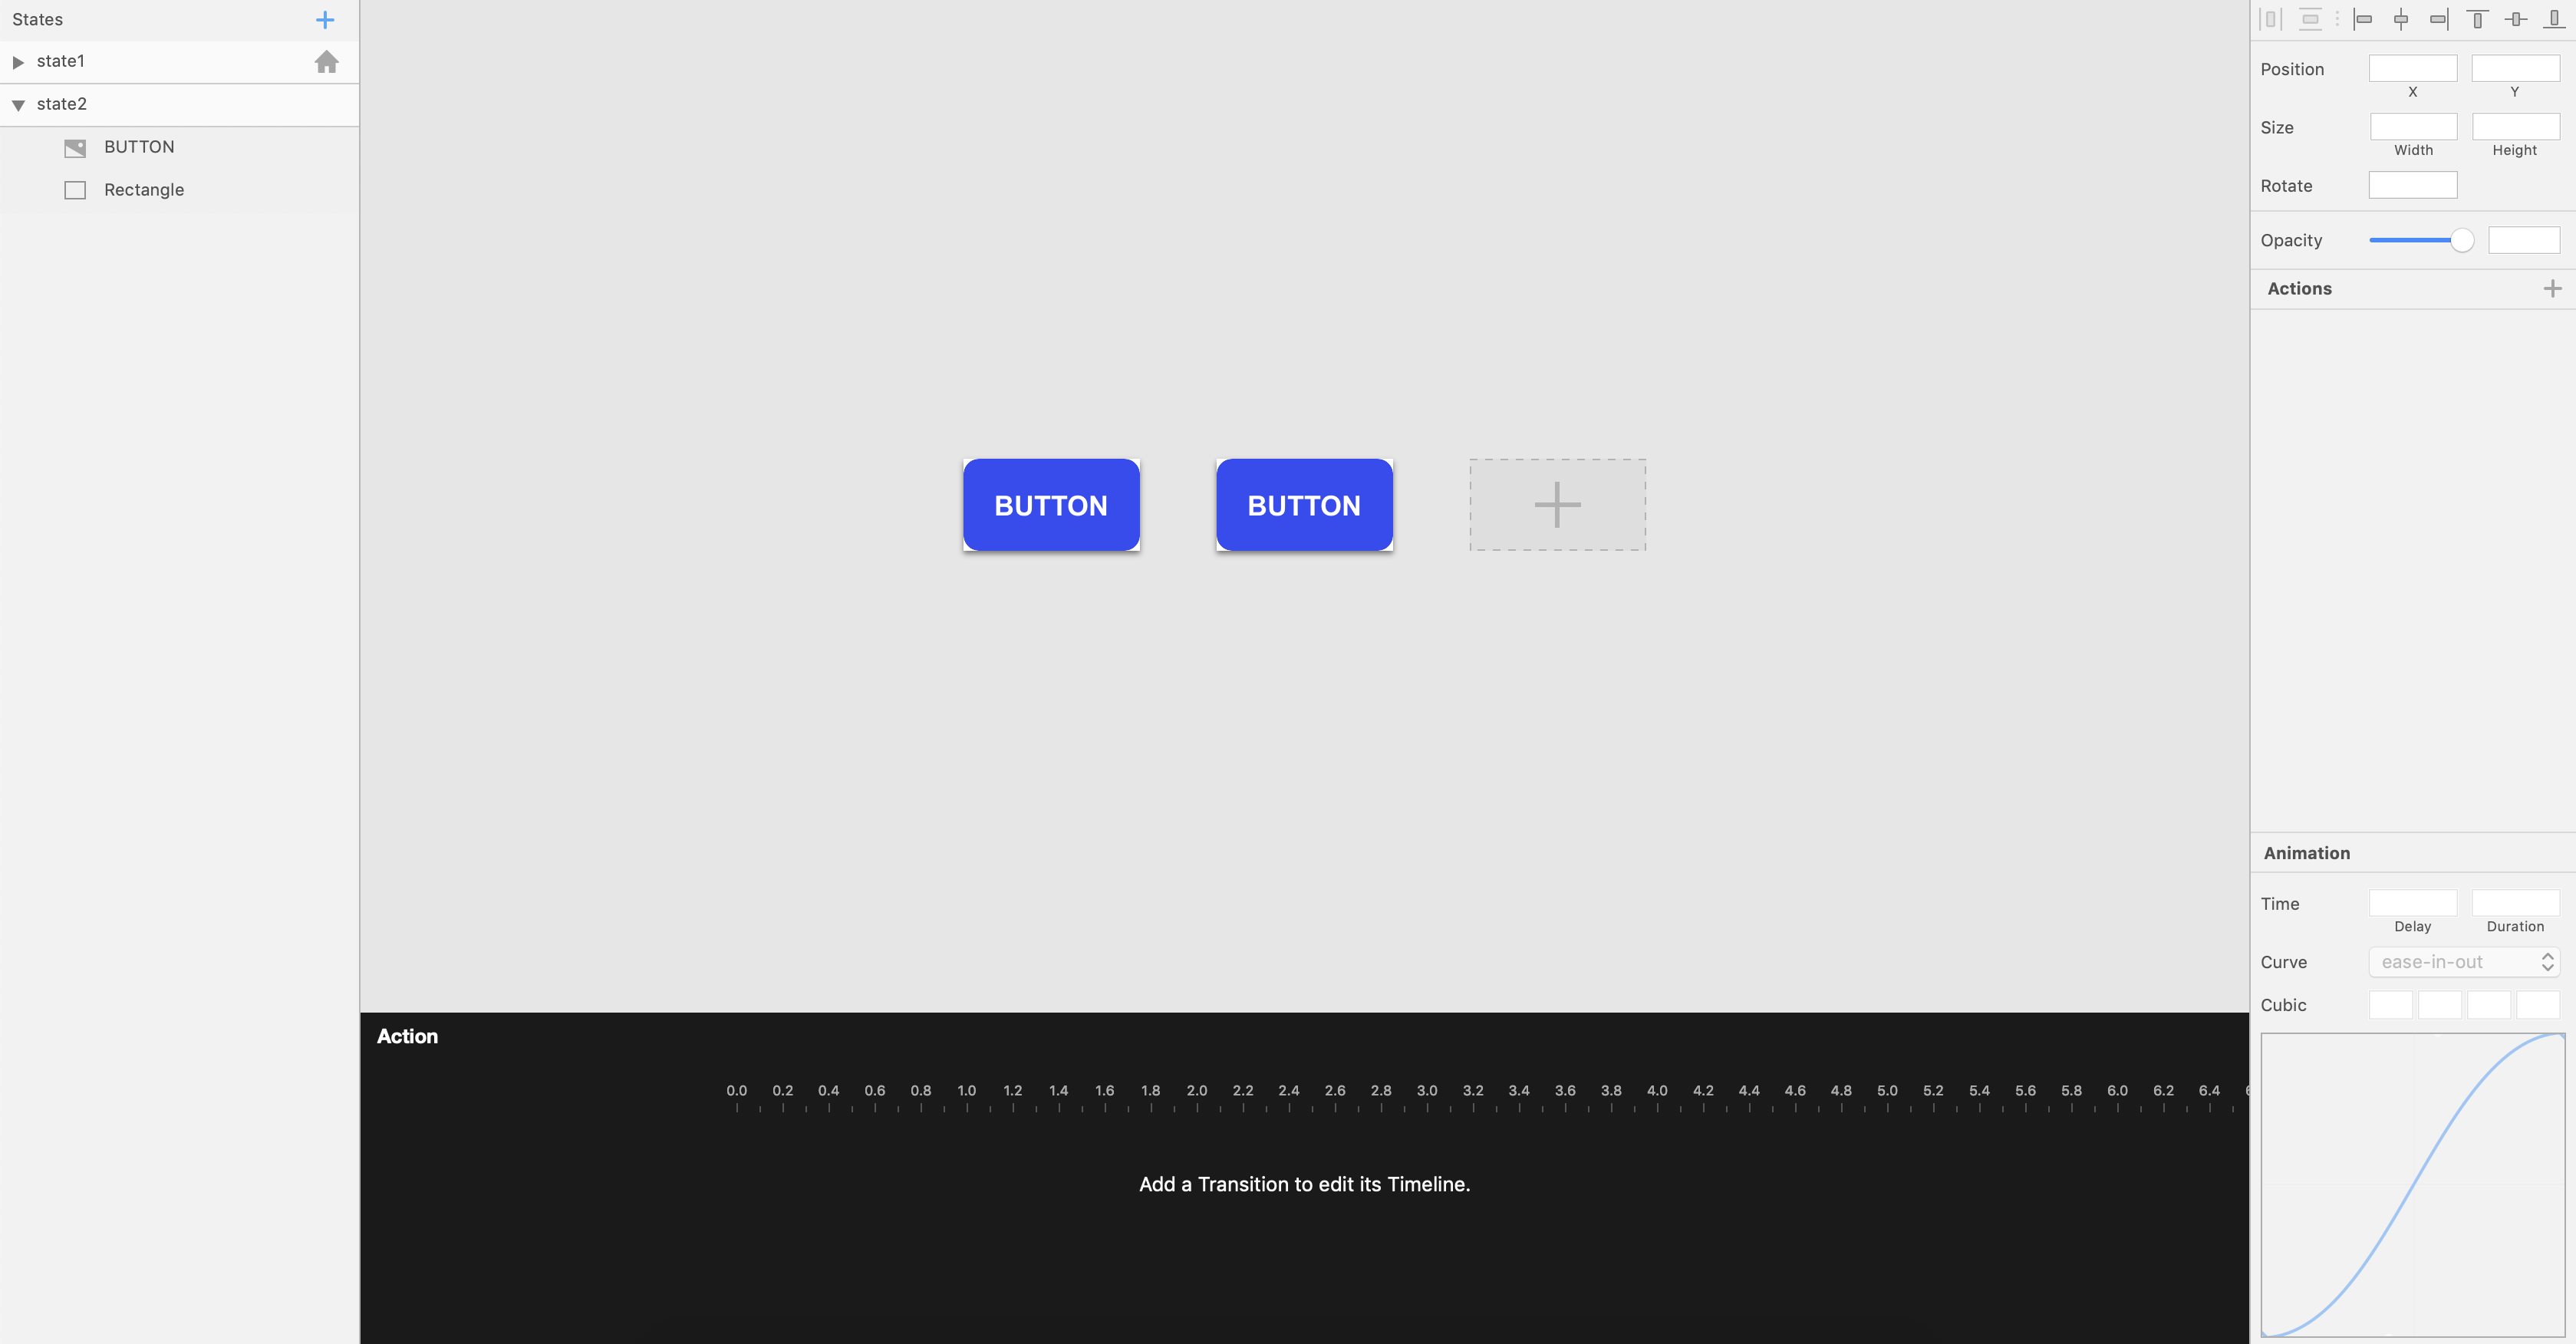
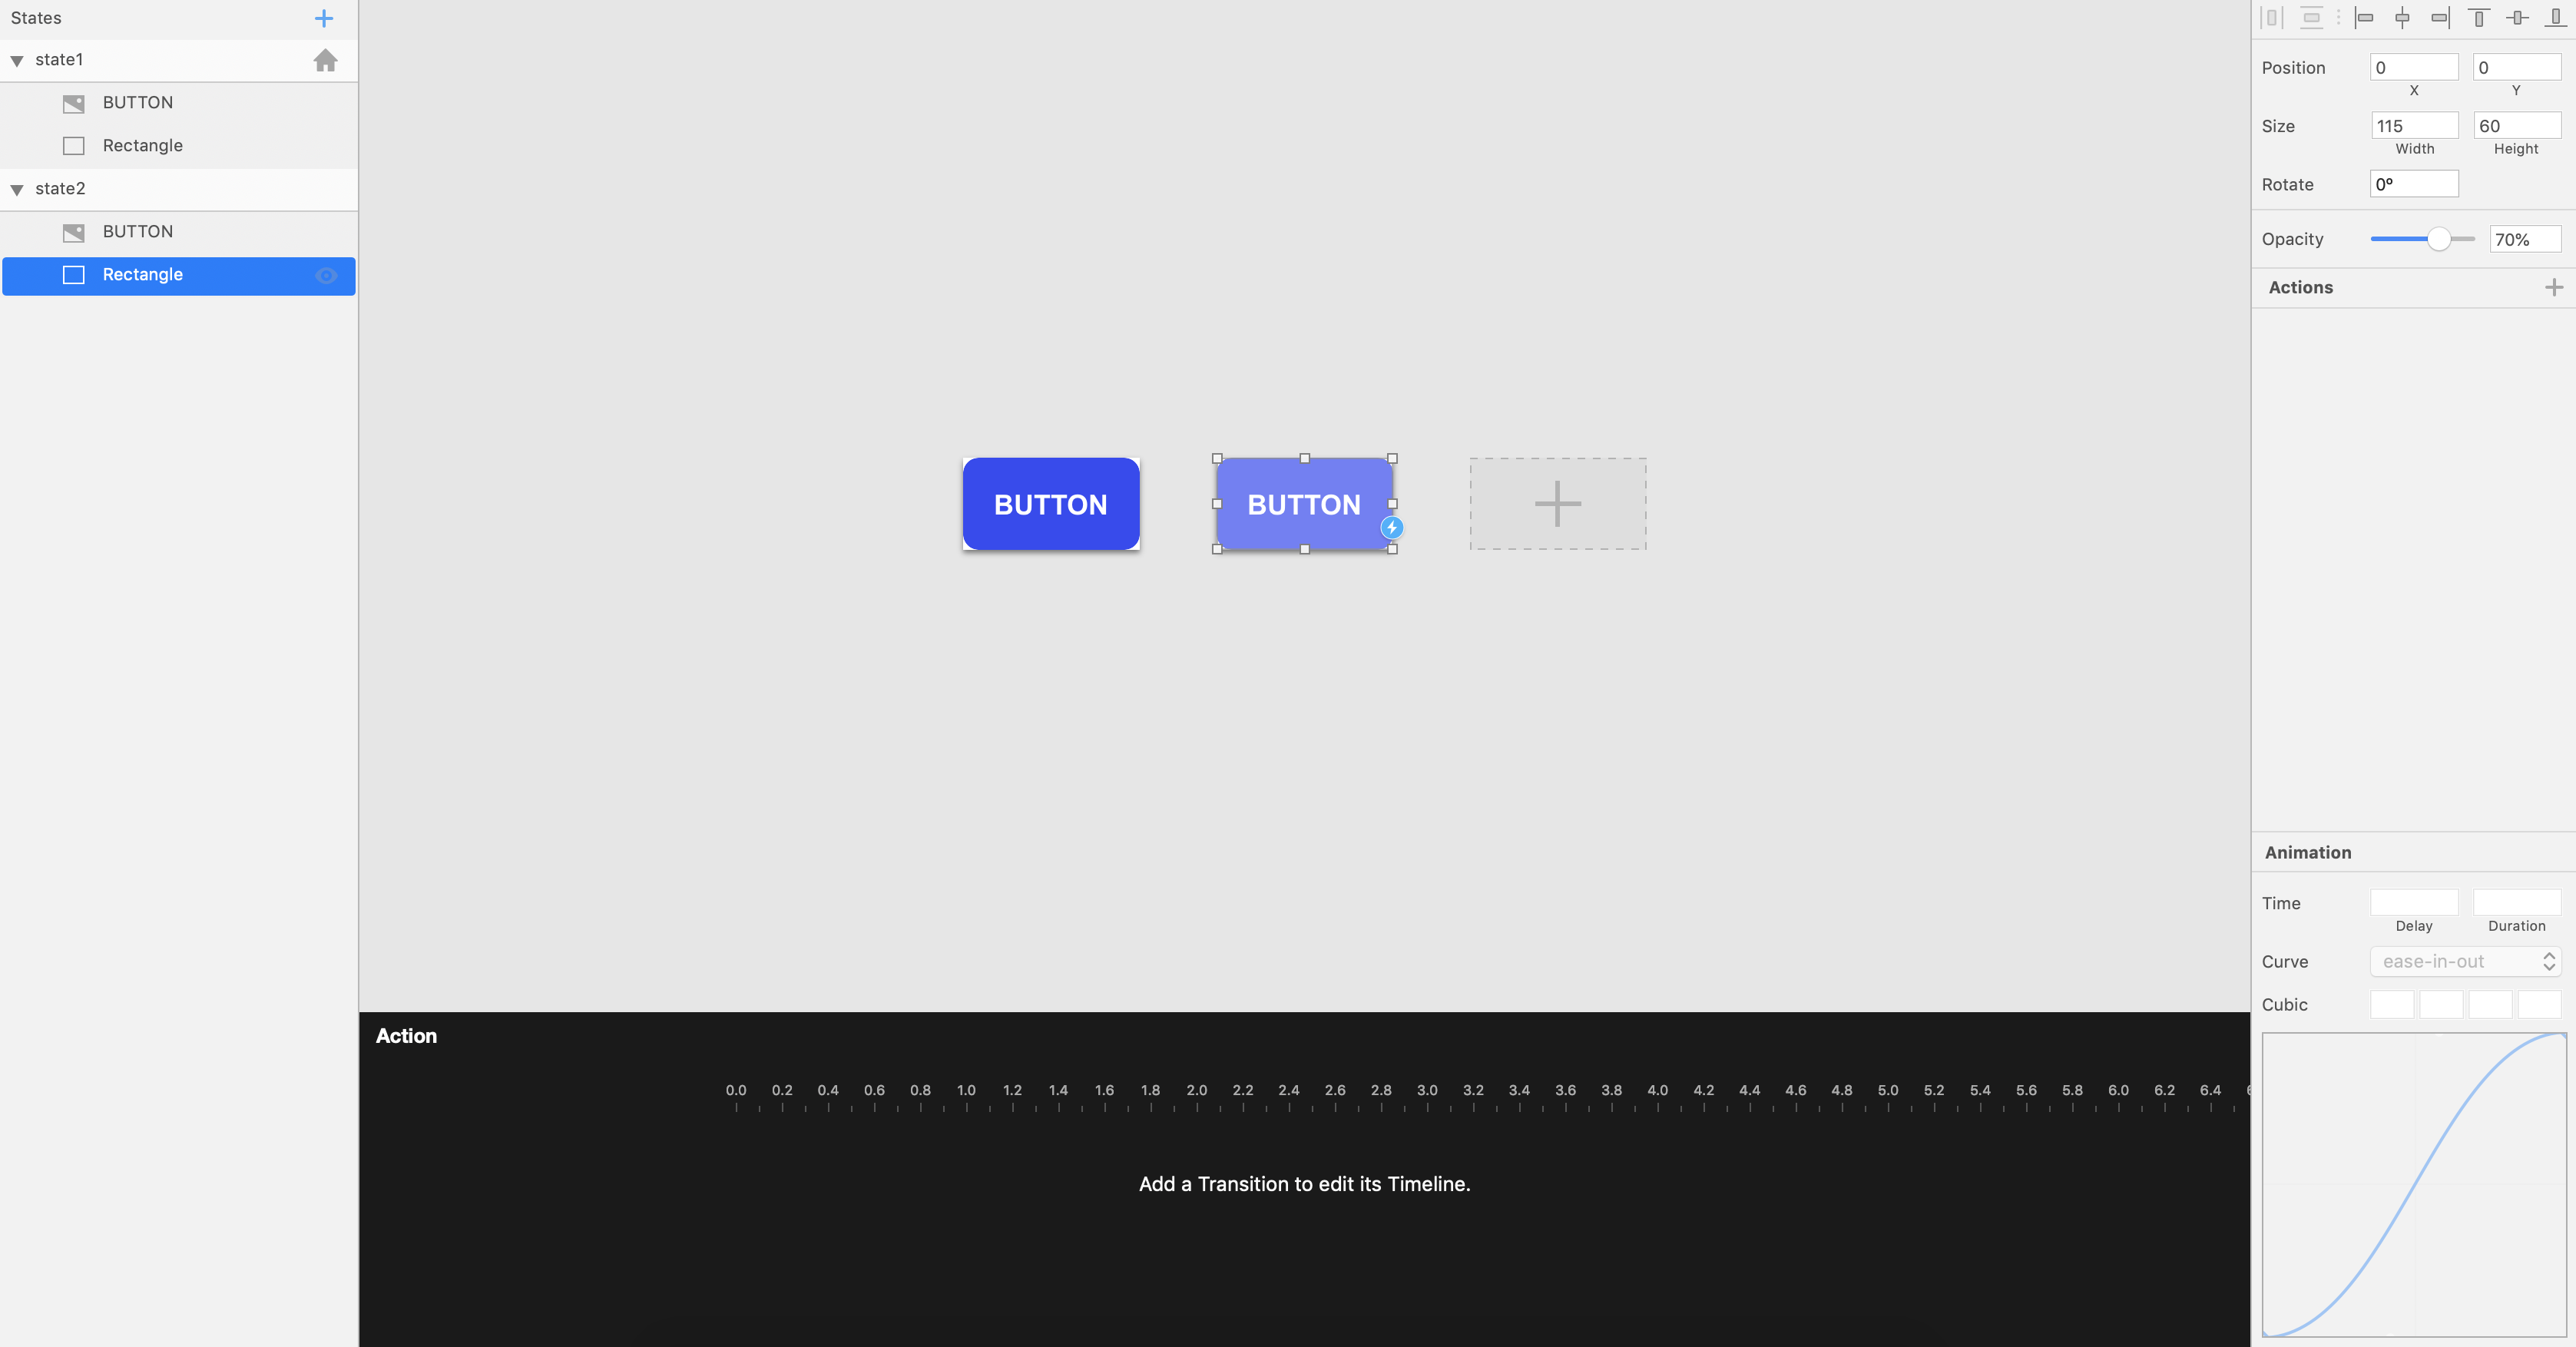
Step 2: Assuming you have the plugin installed and activated. On the bottom right panel, you should see the Anima plugin section. We’ll use the interaction feature under the prototype tab. Select the button background and hit that ‘create’ button.
步骤2:假设您已安装并激活插件。 在右下方的面板上,您应该看到Anima插件部分。 我们将在原型标签下使用交互功能。 选择按钮背景,然后点击“ 创建 ”按钮。
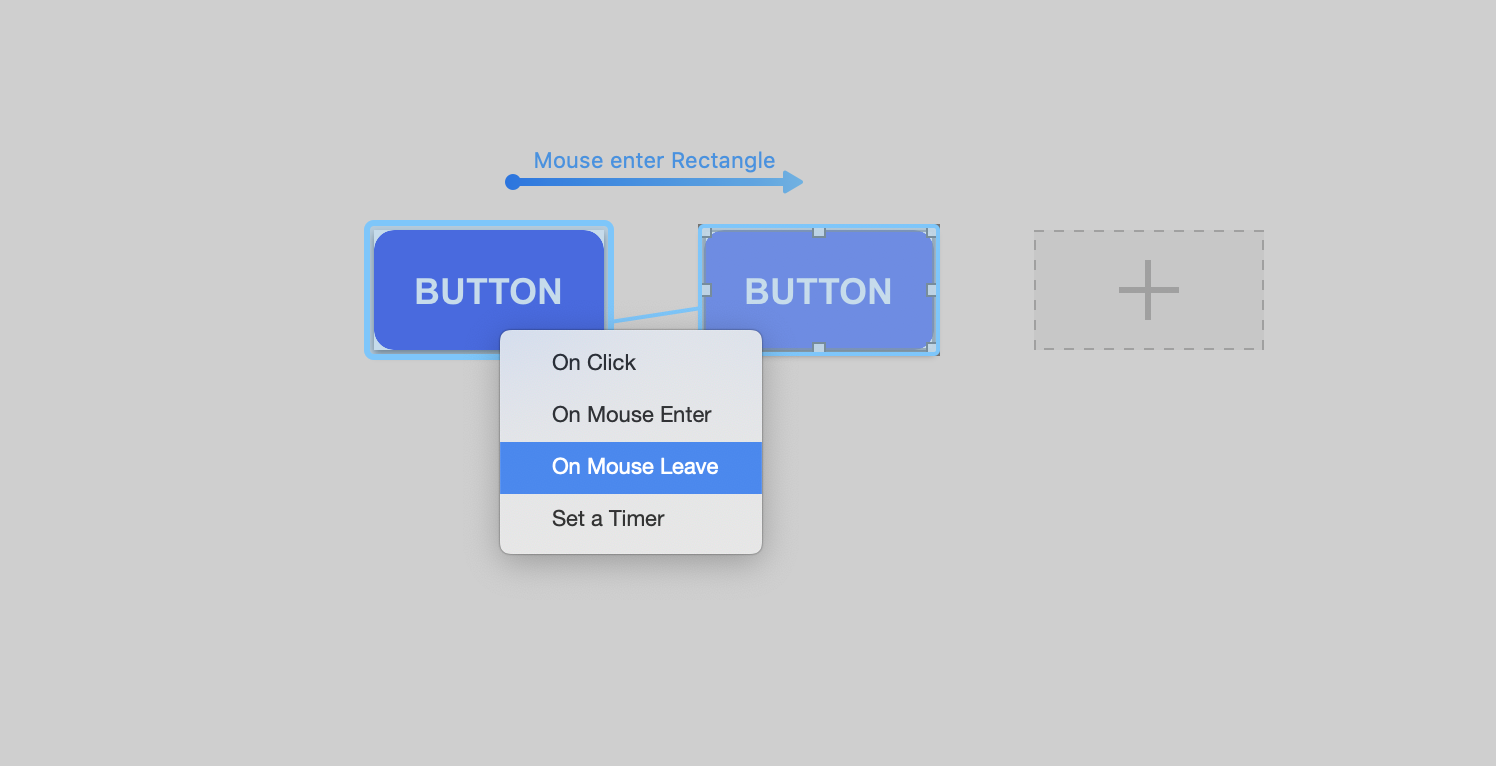
Step 3: You will then be taken to the Anima editor, where a new state of the button (this is where you specify what the hover state is) will be created for you. To build the minimal hover state prototype:
步骤3:然后将您带到Anima编辑器,在其中将为您创建按钮的新状态(这是您指定悬停状态的位置)。 要构建最小悬浮状态原型:
- Select the default/state1 button background layer 选择默认/ state1按钮背景层
- A blue lightning bolt icon will be revealed. Click on that icon and connect the line to state2 将会显示一个蓝色的闪电图标。 单击该图标,然后将线路连接到state2
Choose the on ‘On Mouse Enter’ option. This is to set what interaction should trigger the state transition
选择“在鼠标输入时”选项。 这是设置什么交互应该触发状态转换
Select the state2 button background and adjust the opacity to 70% to set the hover style
选择state2按钮背景并将不透明度调整为70%以设置悬停样式
Repeat similar steps to connect the state2 button back to state1 ‘On Mouse Leave’
重复类似的步骤,将state2按钮连接回state1' 鼠标离开时'
Click on ‘Back to Sketch” on the very top left of your screen to exit the editor
点击屏幕左上角的“ 返回草图 ”以退出编辑器
Result: Back to the sketch interface, at the bottom right you should see the Anima section with a ‘Preview in Browser’ button. Click on that will spin up a preview browser tab that lets you play with the button hover state prototype.
结果:返回草图界面,在右下角,您应该看到带有“在浏览器中预览”按钮的Anima部分。 单击该按钮将启动预览浏览器选项卡,使您可以使用按钮悬停状态原型。
优点: (Pros:)
If you are designing with Sketch then the ability to prototype within the same environment is helpful.
如果您使用Sketch进行设计,那么在同一环境中进行原型设计的功能将很有帮助。
缺点: (Cons:)
The prototyping features out of the box may not support exactly what you are trying to simulate. You’ll need to lean on third-party plugins, which has various complexity and learning curve.
开箱即用的原型功能可能不完全支持您尝试模拟的功能。 您需要依靠第三方插件,该插件具有各种复杂性和学习曲线。
菲格玛 (Figma)
Figma recently released more prototyping features that allow designers to build more advanced prototypes within the design environment. The new feature makes it fairly easy to build our example so let’s walk through that.
Figma最近发布了更多原型设计功能 ,使设计人员可以在设计环境中构建更高级的原型。 新功能使构建示例变得相当容易,因此让我们逐步进行说明。
Step 1: Set up two frames with each button state design layers.
步骤1 :为每个按钮状态设计层设置两个框架。
Step 2: With the default button background layer selected, toggle to the prototype tab located within the right panel.
步骤2:在选择默认按钮背景层的情况下,切换到右侧面板中的prototype选项卡。
Step 3: Click on the dropdown to select the ‘While Hovering’ option, second dropdown to ‘Swap with’, set the last dropdown to the name of your second frame.
步骤3:点击下拉菜单,选择“悬停”选项,第二个下拉菜单选择“交换方式”,将最后一个下拉菜单设置为第二帧的名称。
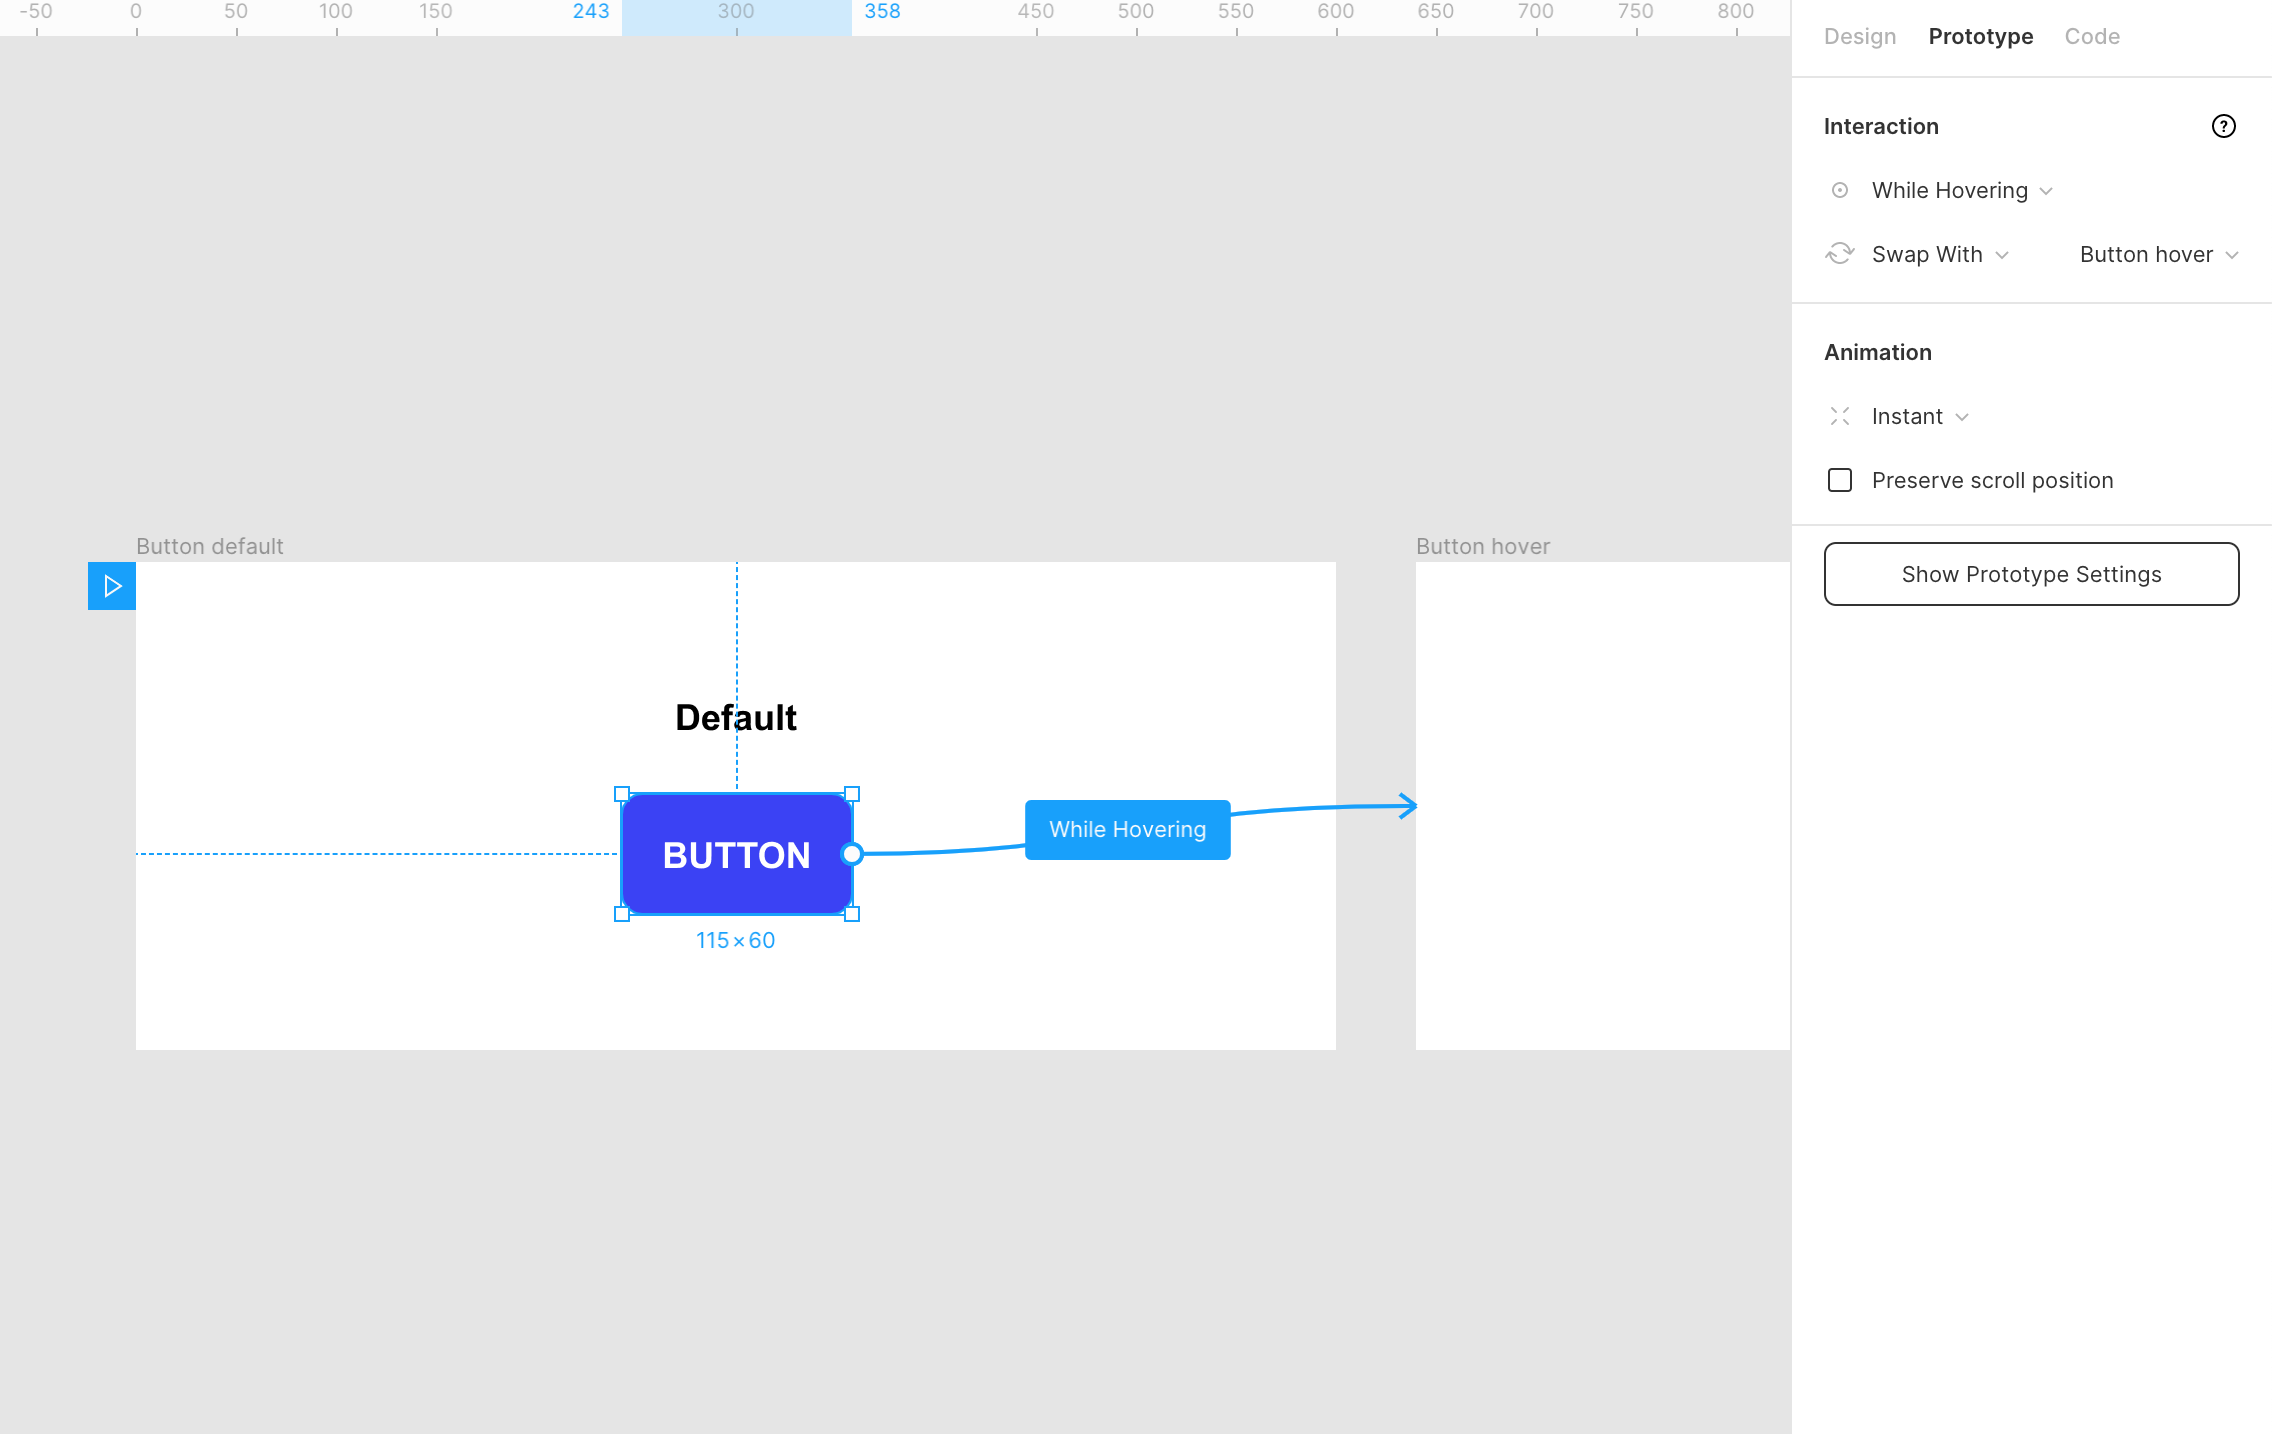
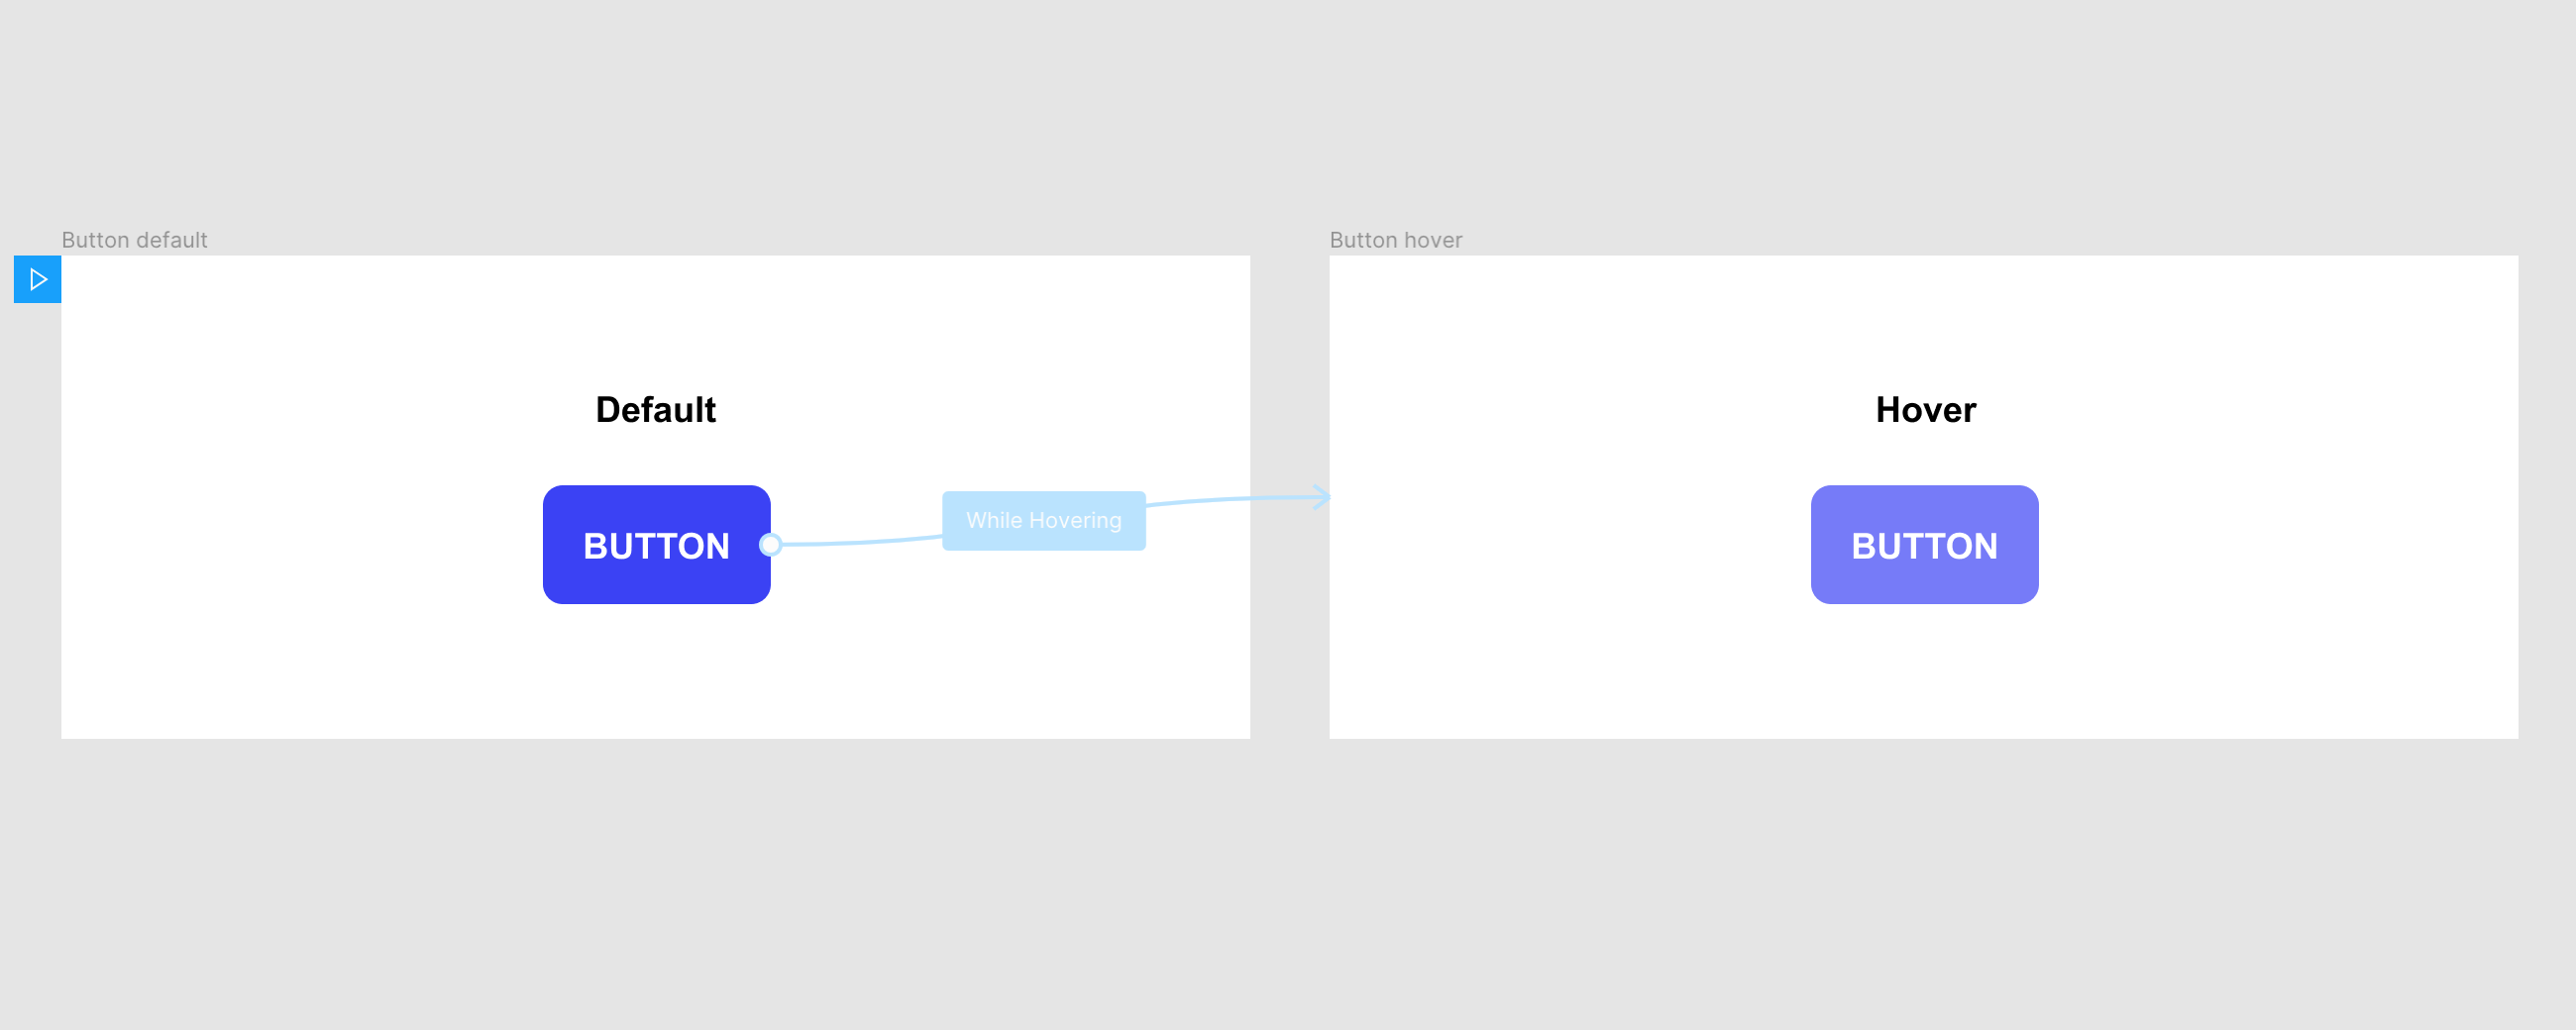
Result: You should now see an arrow connecting the default button background to the second frame. Click on the present (play icon) located at the top right corner will allow you to play with the hover prototype.
结果 :您现在应该看到将默认按钮背景连接到第二帧的箭头。 单击右上角的礼物(播放图标),将使您可以将鼠标悬停在原型上。

优点: (Pros:)
With the new Smart Animate feature, prototyping a hover interaction is fairly easy once you have the before and after states created.
使用新的Smart Animate功能,一旦创建了前后状态,就可以轻松进行悬停交互的原型制作。
缺点: (Cons:)
It lacks support for setting custom animation sequences. If you need to animate multiple items in the same interaction with various speed then that is currently not possible.
它不支持设置自定义动画序列。 如果您需要以不同的速度在同一交互中为多个项目设置动画,那么当前是不可能的。
There are more tools out there to help with UX prototyping and there isn’t a perfect tool for every job. If you are serious about learning how to prototype well, finding the right tool(s) for the job is critical. Small exercises like the hover examples in this post can help you wrap your head around the strength and weaknesses of a tool.
那里有更多工具可用于UX原型设计,并且并不是每一项工作都完美的工具。 如果您认真学习如何良好地制作原型,那么找到适合工作的正确工具至关重要。 诸如本文中的悬停示例之类的小练习可以帮助您将注意力集中在工具的优点和缺点上。
Thanks for taking the time to go through each of the examples. Hopefully, you now have a high-level idea of how to use each of the tools mentioned and you will have some baseline knowledge when you need to choose a tool to prototype your designs in the future.
感谢您抽出宝贵的时间阅读每个示例。 希望您现在对如何使用提到的每个工具有一个高级的了解,并且当您将来需要选择一种工具来对设计进行原型设计时,您将具有一些基础知识。
翻译自: https://uxdesign.cc/prototype-a-hover-state-4-ways-85851436ffae
rp原型中鼠标悬停显示图片