最新的目标检测的方法
I will start with a short introduction of different approaches to object detection. After both traditional and newer approaches are presented, you can read about the most important parts of CenterNet and TTFNet. Many ideas in both models are similar, therefore they will be introduced together. We implemented a package inspired by both networks. Please check our GitHub if you are interested.
我将从简短介绍不同的对象检测方法开始。 在介绍了传统方法和更新方法之后,您可以阅读CenterNet和TTFNet的最重要部分。 两种模型中的许多想法都相似,因此将一起介绍。 我们实施了一个受两个网络启发的软件包。 如果您有兴趣,请检查我们的GitHub 。
Basic knowledge of deep learning and convolutional neural networks (CNNs) is required.
需要深度学习和卷积神经网络(CNN)的基础知识。
传统方法 (Traditional Approaches)
As often in computer science, when we have a difficult problem without a solution, we try to change it to a problem whose solution we know or which is more simple. Good examples are so-called two-stage detection models. In this case, the more simple problem is an image classification or tagging. (Placing given image to a category or assigning tags to given image) Simply put, we can divide the image into multiple regions and then classify those, right? Yes … but it will take a lot of time. Therefore you need to be clever about it. An example of algorithms which uses this approach is R-CNN (2014). Which later evolved into Fast R-CNN (2015) and even Faster R-CNN (2016).
与计算机科学一样,当我们遇到没有解决方案的难题时,我们尝试将其更改为我们知道的解决方案或更简单的问题。 所谓的两阶段检测模型就是很好的例子。 在这种情况下,更简单的问题是图像分类或标记。 (将给定图像放置到类别中或将标签分配给给定图像)简单地说,我们可以将图像划分为多个区域,然后对它们进行分类,对吗? 是的,但是需要很多时间。 因此,您需要对此保持聪明。 使用此方法的算法示例是R-CNN (2014)。 后来演变为Fast R-CNN (2015)甚至Faster R-CNN (2016)。
Even though performance of those models is quite good, researchers were obviously asking themselves if this process can be made simple and therefore more efficient. In one stage, without the region proposals. One possible answer to this question is YOLO — You Only Look Once (2015). Which is now in the version 4 (2020). Or SSD — Single Shot multibox Detector (2015). Finally, RetinaNet (2017) should be mentioned as well, especially because it was used to introduced a focal loss for object detection, which is now used very often.
尽管这些模型的性能相当不错,但研究人员显然在问自己是否可以简化此过程,从而提高效率。 在一个阶段,没有区域提案。 这个问题的一个可能答案是YOLO-您只看一次 (2015)。 现在在版本4 (2020)中。 或SSD-单发多盒检测器 (2015)。 最后,还应提及RetinaNet(2017),特别是因为它被用来引入用于对象检测的焦点损失,而这种损失现在已被广泛使用。
新方法 (New Ways)
In recent years, another idea has been gaining popularity. The object can be transformed to a set of points. And the detection task can be thought of as a keypoint estimation problem. This approach is introduced in CornerNet: Detecting Objects as Paired Keypoints. As the name suggests, an object is represented as a pair of keypoints, the top-left corner and the bottom-right corner.
近年来,另一个想法已经流行起来。 可以将对象转换为一组点。 检测任务可以看作是关键点估计问题。 此方法在CornerNet:将对象检测为配对的关键点中引入。 顾名思义,一个对象表示为一对关键点,即左上角和右下角。
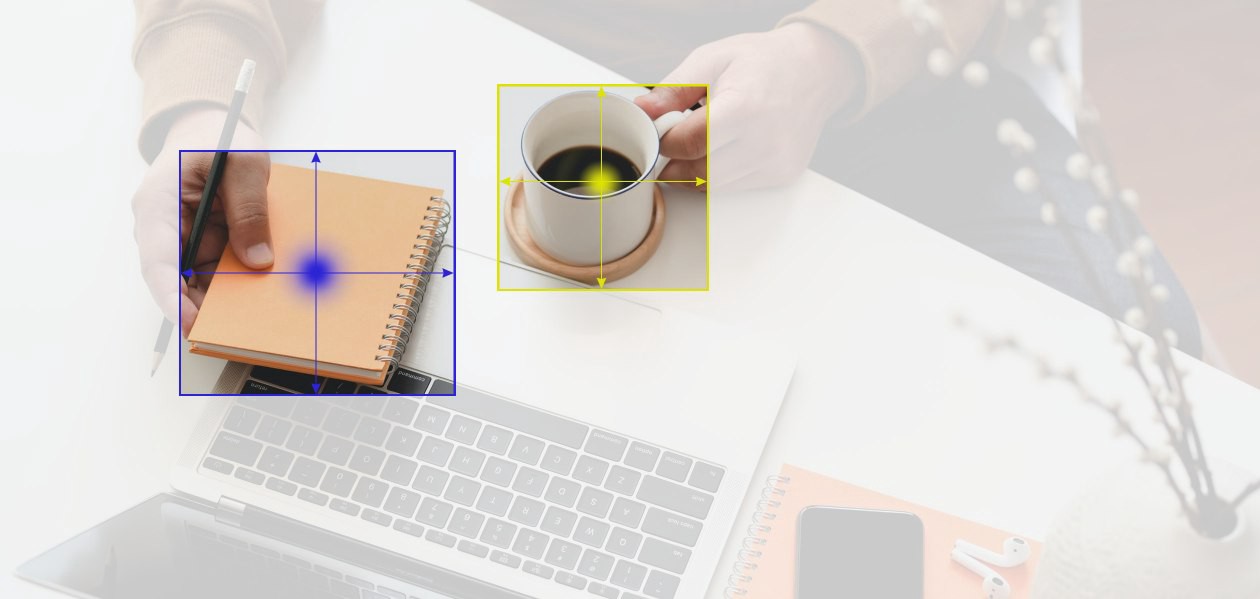
Similar idea is explored in Objects as Points paper, introducing CenterNet. There, we detect the center point of a bounding box using a heat map. Other properties such as size of the bounding box are predicted directly using regression.
在介绍CenterNet的《 对象作为点》一书中也探讨了类似的想法。 在那里,我们使用热图检测边界框的中心点。 其他属性(例如边界框的大小)可使用回归直接预测。
Weakness of this approach is a slower training. To address this issue, TTFNet (Training-Time-Friendly Network) was proposed. It follows the same basic ideas, therefore we decided to implement ideas from both networks in one package.
这种方法的缺点是训练较慢。 为了解决这个问题,提出了TTFNet (培训时间友好型网络)。 它遵循相同的基本思想,因此我们决定在一个软件包中同时实现两个网络的思想。
神经网络布局 (Neural Network Layout)
Let’s dive in! I will start from top, introducing you to the network layout. Then, important individual parts will be discussed, mainly the heatmaps and different loss functions.
让我们潜入吧! 我将从头开始,向您介绍网络布局。 然后,将讨论重要的各个部分,主要是热图和不同的损失函数。
We can use either some network designed specifically for this kind of task. For example the Hourglass network. Or, as we have decided to do, take one of the standard image classification CNNs and modify it to our needs. We have chosen to test ResNet (18, 50) and EfficientNet (b0, b1, b2).
我们可以使用专门为此类任务设计的某些网络。 例如, 沙漏网络 。 或者,按照我们的决定,选择一种标准的图像分类CNN,并根据需要进行修改。 我们选择测试ResNet(18,50)和EfficientNet(b0,b1,b2)。
As in all standard transfer learning tasks, we discarded the top dense layer. But the layer left at the top does not even remotely fit the output we need. Therefore, some upsampling is necessary. In addition to that, connections from lower layers improves the performance. When we have a layer of a correct size at the end of our network, we can “split” it into the desired number of heads.
与所有标准的转移学习任务一样,我们丢弃了最上面的密集层。 但是,最左边的图层甚至无法满足我们所需的输出。 因此,需要进行一些上采样。 除此之外,来自较低层的连接还可以提高性能。 当我们在网络的末端拥有正确大小的图层时,可以将其“拆分”为所需数量的磁头。
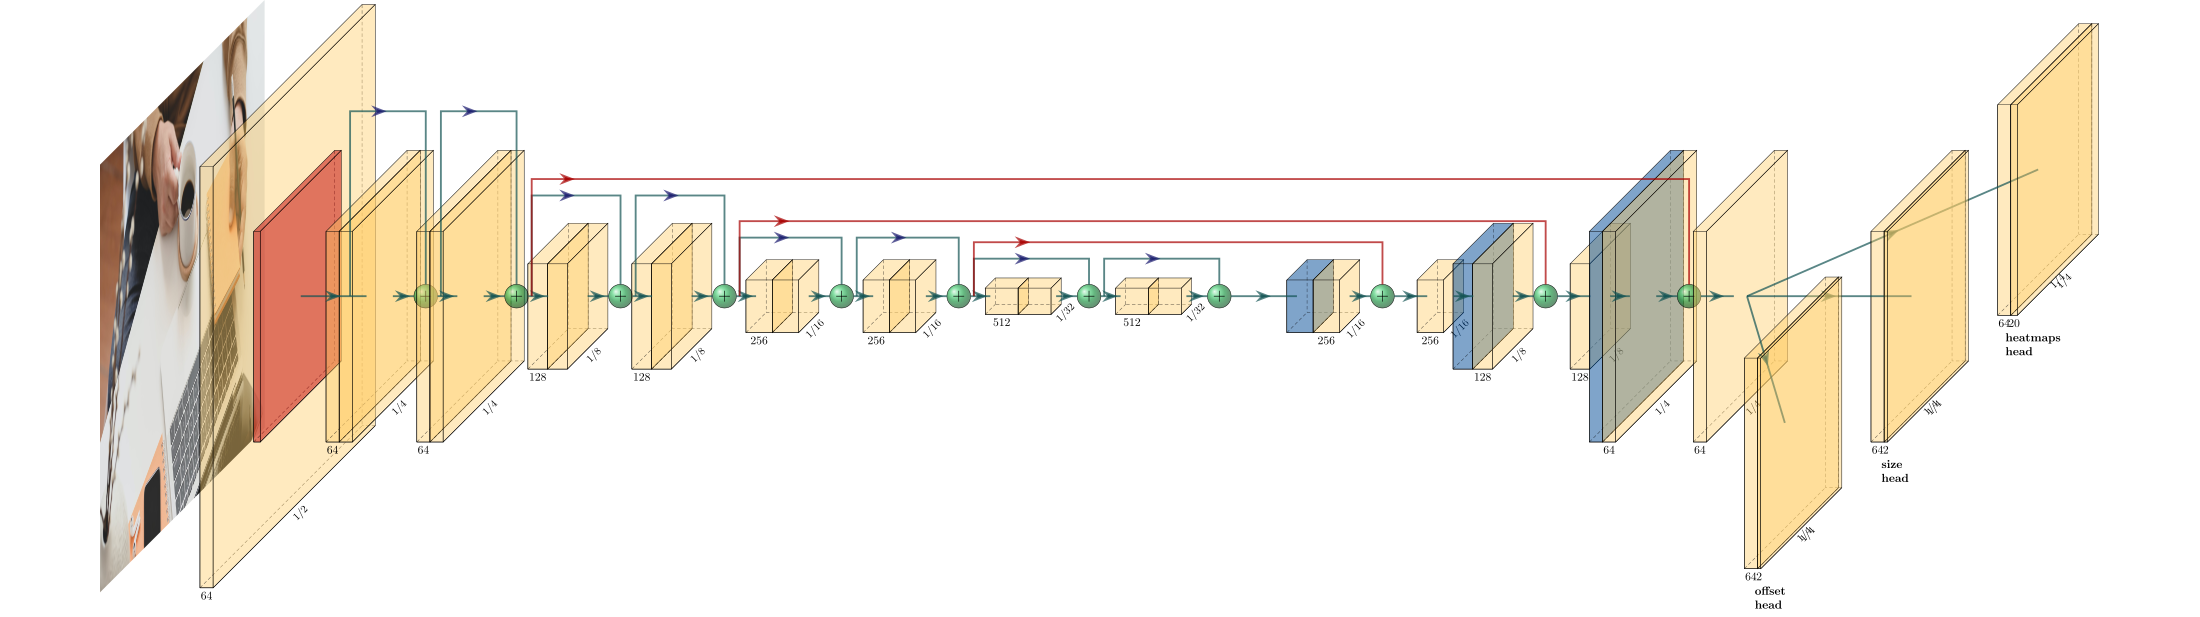
In order to make the network faster, the heatmap side is just 1/4 of the input image. We have one heatmap per every class. Then, there are two other heads in CenterNet (for basic object detection) and one in TTFNet.
为了使网络更快,热图面仅是输入图像的1/4。 每个班级都有一个热图。 然后,CenterNet中有另外两个主管(用于基本对象检测),TTFNet中有一个主管。
For CenterNet, there is
对于CenterNet ,有
a size head, containing width and height of a bounding box
大小头,包含边框的宽度和高度
offset head, containing x and y offset of the center which originated in using the down sampled heatmap.
偏移头,包含使用下采样热图而产生的中心的x和y偏移 。
Both have only two filters — there could be only single object at any given point of the heatmap. If you are interested in other properties of an object, more heads can be added.
两者都只有两个过滤器-热图的任何给定点可能只有一个对象。 如果您对对象的其他属性感兴趣,则可以添加更多的标头。
In TTFNet, there is only one additional head with four filters to calculate the size — distances to the sides of an object.
在TTFNet中 ,只有一个带有四个过滤器的附加头可以计算尺寸- 到物体侧面的距离 。
热图 (Heatmaps)
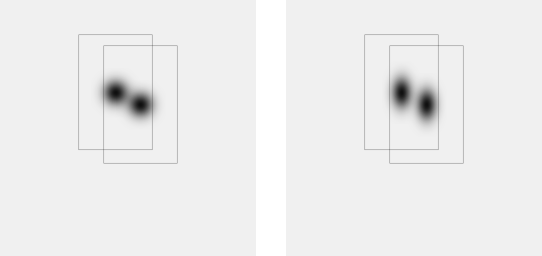
So, what does a heatmap look like? It is a matrix filled with values from 0.0 to 1.0. Peaks on such a map indicates the presence of of some object.
那么,热图是什么样的? 它是一个填充了0.0到1.0值的矩阵。 这样的地图上的峰值表明存在某些物体。
Bellow, you see some generated training heatmaps. There is just one point with exactly 1.0. Around this point, the probabilities are slowly vanishing.
在下面,您会看到一些生成的训练热图。 准确地只有1.0分。 在这一点上,概率正在逐渐消失。
可变形卷积 (Deformable Convolutions)
The upsampling part of the network can be done in multiple ways. We have shown you the simple approach with concatenations, upsampling and standard convolutional layers. To improve the performance, deformable convolutions are used.
网络的上采样部分可以通过多种方式完成。 我们为您展示了具有级联,上采样和标准卷积层的简单方法。 为了提高性能,使用了可变形卷积。
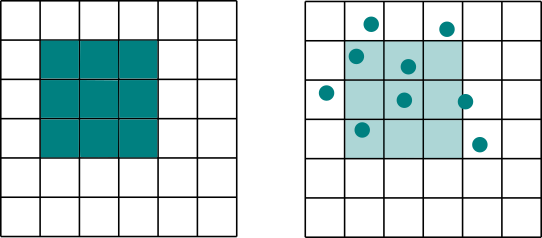
There is not doubt that convolutional neural networks brought a great revolution to deep learning. They enabled us to extract feature which would be really hard to get from fully connected layers. And together with another layout improvements, out networks could become really deep. Nevertheless, the basic idea is still the same. Especially, the shape of the filters is always rectangular. Deformable Convolutions are trying to improve on that. They learn an offset to the standard grid and performs the convolutions with this “deformed” kernel.
毫无疑问,卷积神经网络为深度学习带来了巨大的革命。 它们使我们能够提取很难从完全连接的图层获得的功能。 加上其他布局改进,外出网络可能会变得更深。 但是,基本思想仍然相同。 特别地,过滤器的形状总是矩形。 可变形卷积正在尝试对此进行改进。 他们学习到标准网格的偏移量,并使用此“变形”内核进行卷积。
Unfortunately, deformable convolutional layers are not yet implemented in TensorFlow nor TensorFlow Addons (TFA). We are using a fork of TFA with support for Deformable Conv2d and hoping it will be merged soon. (See pull request 1129.)
不幸的是,可变形卷积层尚未在TensorFlow或TensorFlow插件 (TFA)中实现。 我们正在使用支持可变形Conv2d 的TFA分支,并希望它将很快合并。 (请参阅拉取请求1129。 )
损失函数 (Loss Functions)
Now, when we have the network layout and how the outputs look like, only one crucial thing is missing. Loss Functions.
现在,当我们有了网络布局以及输出的外观时,仅缺少一件关键的事情。 损失函数。
焦点损失 (Focal Loss)
There is one problem with heatmaps — they are very sparse. Mostly there are no detection (zeros), only very occasionally we see an object (one, decreasing values in the surrounding). Standard metrics do not work very well in this setting. Fortunately, there is a solution — a focal loss. It is used in both CenteNet and TTFNet.
热图存在一个问题-它们非常稀疏。 大多数情况下,没有检测到(零),只有极少数情况下我们看到一个对象(一个,减少了周围的值)。 标准指标在此设置下效果不佳。 幸运的是,有一个解决方案- 焦点损失 。 CenteNet和TTFNet都使用它。
基于联合交叉口(IoU)的损失 (Loss Based on Intersection Over Union (IoU))
To optimize bounding box size, CenterNet uses L1 loss. It is a simple sum of differences between true and predicted bounding box coordinates. It seems reasonable, but on the other hand, we do not use it for evaluation very often. We use IoU metric — Intersection over Union. So when we are interested in improving this metrics, why not use it for optimization as well? We can turn it to a loss by subtracting the IoU value from 1. Or not?
为了优化边界框的大小,CenterNet使用L1损耗。 它是真实边界框坐标和预测边界框坐标之间差异的简单总和。 这似乎是合理的,但另一方面,我们并不经常将其用于评估。 我们使用IoU度量标准-联合上的交集。 因此,当我们有兴趣改进此指标时,为什么不也将其用于优化呢? 通过从1中减去IoU值,我们可以将其变为损失。
Unfortunately, the IoU is 0 if the is no intersection. Therefore the loss is always 1 in such case. Two loss functions based on IoU were proposed. Generalized Intersection over Union loss, used in TTFNet, addresses this problem. Distance-IoU Loss focuses also on adding a distance information into the function, in other words, how far from the center of the bounding box we are.
不幸的是,如果没有交集,则IoU为0。 因此,在这种情况下,损失始终为1。 提出了两种基于IoU的损失函数。 TTFNet中使用的关于工会损失的广义交叉口解决了这个问题。 Distance-IoU Loss还着重于在函数中添加距离信息,换句话说,就是距离边界框中心有多远。
最后的想法 (Final Thoughts)
You can find our implementation on GitHub. I would like to thank Michal Lukac for working with me on this project, Ximilar for allowing us to opensource it. If you want to try the model without any coding, please check this blog post about object detection in Ximilar App.
您可以在GitHub上找到我们的实现。 我要感谢Michal Lukac在这个项目上与我合作, Ximilar允许我们将其开源。 如果您想在没有任何编码的情况下尝试模型,请查看有关Ximilar App中对象检测的博客文章 。
翻译自: https://towardsdatascience.com/new-approaches-to-object-detection-f5cbc925e00e
最新的目标检测的方法