View UI (iview)动态表单 使用教程_view ui 表格动态列-程序员宅基地
View UI,即原先的 iView,从 2019 年 10 月起正式更名为 View UI,并使用全新的 Logo
本文介绍 View UI (iview)动态表单的使用。在项目开发中,有些数据的数量是动态的,不确定的,可能是1条,也可能是多条。如人的证件,工作经历,项目经验等。在做这些数据的添加时就要使用动态表单
1、使用介绍
首先将 iview 官方的动态表单的代码全部复制出来,粘贴到项目里,看一下运行效果
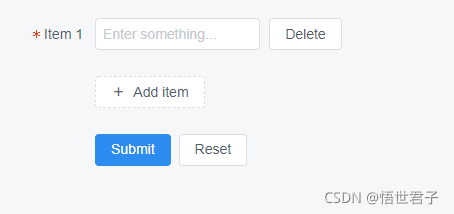
代码如下
<template>
    <Form ref="formDynamic" :model="formDynamic" :label-width="80" style="width: 300px">
        <FormItem
                v-for="(item, index) in formDynamic.items"
                v-if="item.status"
                :key="index"
                :label="'Item ' + item.index"
                :prop="'items.' + index + '.value'"
                :rules="{required: true, message: 'Item ' + item.index +' can not be empty', trigger: 'blur'}">
            <Row>
                <Col span="18">
                    <Input type="text" v-model="item.value" placeholder="Enter something..."></Input>
                </Col>
                <Col span="4" offset="1">
                    <Button @click="handleRemove(index)">Delete</Button>
                </Col>
            </Row>
        </FormItem>
        <FormItem>
            <Row>
                <Col span="12">
                    <Button type="dashed" long @click="handleAdd" icon="md-add">Add item</Button>
                </Col>
            </Row>
        </FormItem>
        <FormItem>
            <Button type="primary" @click="handleSubmit('formDynamic')">Submit</Button>
            <Button @click="handleReset('formDynamic')" style="margin-left: 8px">Reset</Button>
        </FormItem>
    </Form>
</template>
<script>
    export default {
        data () {
            return {
                index: 1,
                formDynamic: {
                    items: [
                        {
                            value: '',
                            index: 1,
                            status: 1
                        }
                    ]
                }
            }
        },
        methods: {
            handleSubmit (name) {
                this.$refs[name].validate((valid) => {
                    if (valid) {
                        this.$Message.success('Success!');
                    } else {
                        this.$Message.error('Fail!');
                    }
                })
            },
            handleReset (name) {
                this.$refs[name].resetFields();
            },
            handleAdd () {
                this.index++;
                this.formDynamic.items.push({
                    value: '',
                    index: this.index,
                    status: 1
                });
            },
            handleRemove (index) {
                this.formDynamic.items[index].status = 0;
            }
        }
    }
</script>
代码讲解
这里核心的内容是vue data中定义的 formDynamic 这个对象,这个对象的 items 数组表示动态表单里的内容,如果items中有1个对象,则表示默认页面上会有1个输入框,示例代码就是默认1个输入框
items中的内容示例给了3个,value表示输入框的值,读者可根据自己的需求添加页面元素,并在data中进行添加元素对应的值;index是每一项的序号,示例是从1开始,如果项目不需要可以去掉这个index;status 是显示的控制,通过分析添加和删除的代码示例,可以知道status= 1是显示,status=0是不显示,示例给出的删除只是删除了页面显示,实际 items数组里的数据并没有删除,因此读者在开发时要在删除的方法 handleRemove 中,删除对应在items数组中的值
2、扩展
在实际开发中,可能出现同一form表单中有多个动态表单的情况,这里需要注意一点,就是 vue 的 for 循环的 key 的问题
先看代码
<template>
    <Form ref="formDynamic" :model="formDynamic" :label-width="80" style="width: 300px">
        <FormItem
                v-for="(item, index) in formDynamic.items"
                v-if="item.status"
                :key="index"
                :label="'Item ' + item.index"
                :prop="'items.' + index + '.value'"
                :rules="{required: true, message: 'Item ' + item.index +' can not be empty', trigger: 'blur'}">
            <Row>
                <Col span="18">
                    <Input type="text" v-model="item.value" placeholder="Enter something..."></Input>
                </Col>
                <Col span="4" offset="1">
                    <Button @click="handleRemove(index)">Delete</Button>
                </Col>
            </Row>
        </FormItem>
        <FormItem>
            <Row>
                <Col span="12">
                    <Button type="dashed" long @click="handleAdd" icon="md-add">Add item</Button>
                </Col>
            </Row>
        </FormItem>

        <FormItem
                v-for="(item, index) in formDynamic.items2"
                v-if="item.status"
                :key="index"
                :label="'Item ' + item.index"
                :prop="'items2.' + index + '.value'"
                :rules="{required: true, message: 'Item ' + item.index +' can not be empty', trigger: 'blur'}">
            <Row>
                <Col span="18">
                    <Input type="text" v-model="item.value" placeholder="Enter something..."></Input>
                </Col>
                <Col span="4" offset="1">
                    <Button @click="handleRemove2(index)">Delete</Button>
                </Col>
            </Row>
        </FormItem>
        <FormItem>
            <Row>
                <Col span="12">
                    <Button type="dashed" long @click="handleAdd2" icon="md-add">Add item</Button>
                </Col>
            </Row>
        </FormItem>

        <FormItem>
            <Button type="primary" @click="handleSubmit('formDynamic')">Submit</Button>
            <Button @click="handleReset('formDynamic')" style="margin-left: 8px">Reset</Button>
        </FormItem>
    </Form>
</template>
<script>
    export default {
        data () {
            return {
                index: 1,
                index2: 1,
                formDynamic: {
                    items: [
                        {
                            value: '',
                            index: 1,
                            status: 1
                        }
                    ],
                    items2: [
                        {
                            value: '',
                            index: 1,
                            status: 1
                        }
                    ]
                }
            }
        },
        methods: {
            handleSubmit (name) {
                this.$refs[name].validate((valid) => {
                    if (valid) {
                        this.$Message.success('Success!');
                    } else {
                        this.$Message.error('Fail!');
                    }
                })
            },
            handleReset (name) {
                this.$refs[name].resetFields();
            },
            handleAdd () {
                this.index++;
                this.formDynamic.items.push({
                    value: '',
                    index: this.index,
                    status: 1
                });
            },
            handleRemove (index) {
                this.formDynamic.items[index].status = 0;
            },
            handleAdd2 () {
                this.index2++;
                this.formDynamic.items2.push({
                    value: '',
                    index: this.index2,
                    status: 1
                });
            },
            handleRemove2 (index) {
                this.formDynamic.items2[index].status = 0;
            }
        }
    }
</script>
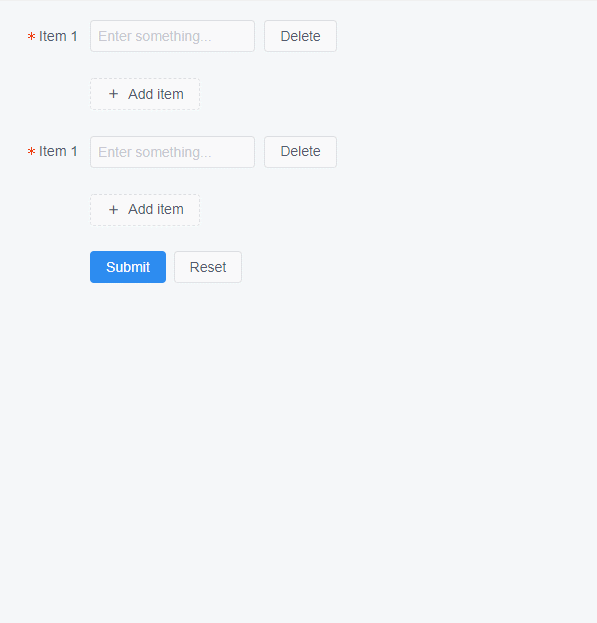
这里笔者添加了items2这个数组,并添加了它的添加和删除的方法
运行效果如下
这里在功能上没有问题,但是打开浏览器的开发者工具就会看到有1个警告
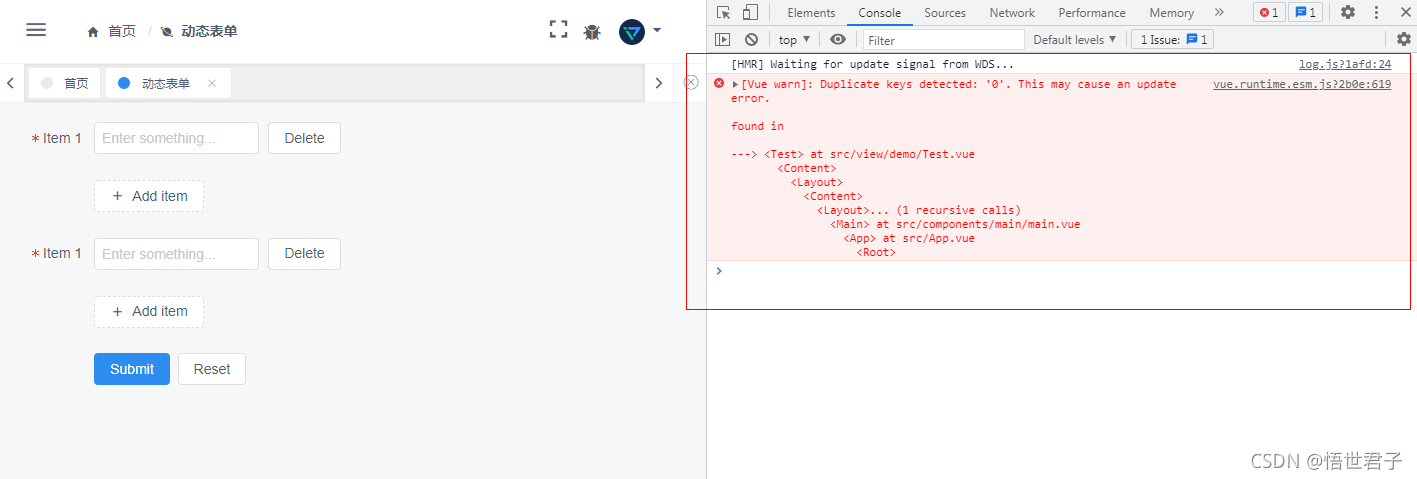
为什么会产生这个警告呢?原因是这样的,items 和 items2 在 v-for 进行遍历时,都使用 index 作为 key,而 index 都是0,所有产生了这个警告
那么如何解决呢?其实很简单,只要不使用相同的 key 就行了,这里可以自定义一个id,用id来作为 key,代码实现如下
<template>
    <Form ref="formDynamic" :model="formDynamic" :label-width="80" style="width: 300px">
        <FormItem
                v-for="(item, index) in formDynamic.items"
                v-if="item.status"
                :key="index"
                :label="'Item ' + item.index"
                :prop="'items.' + index + '.value'"
                :rules="{required: true, message: 'Item ' + item.index +' can not be empty', trigger: 'blur'}">
            <Row>
                <Col span="18">
                    <Input type="text" v-model="item.value" placeholder="Enter something..."></Input>
                </Col>
                <Col span="4" offset="1">
                    <Button @click="handleRemove(index)">Delete</Button>
                </Col>
            </Row>
        </FormItem>
        <FormItem>
            <Row>
                <Col span="12">
                    <Button type="dashed" long @click="handleAdd" icon="md-add">Add item</Button>
                </Col>
            </Row>
        </FormItem>

        <FormItem
                v-for="(item, index) in formDynamic.items2"
                v-if="item.status"
                :key="item.id"
                :label="'Item ' + item.index"
                :prop="'items2.' + index + '.value'"
                :rules="{required: true, message: 'Item ' + item.index +' can not be empty', trigger: 'blur'}">
            <Row>
                <Col span="18">
                    <Input type="text" v-model="item.value" placeholder="Enter something..."></Input>
                </Col>
                <Col span="4" offset="1">
                    <Button @click="handleRemove2(index)">Delete</Button>
                </Col>
            </Row>
        </FormItem>
        <FormItem>
            <Row>
                <Col span="12">
                    <Button type="dashed" long @click="handleAdd2" icon="md-add">Add item</Button>
                </Col>
            </Row>
        </FormItem>

        <FormItem>
            <Button type="primary" @click="handleSubmit('formDynamic')">Submit</Button>
            <Button @click="handleReset('formDynamic')" style="margin-left: 8px">Reset</Button>
        </FormItem>
    </Form>
</template>
<script>
    export default {
        data () {
            return {
                index: 1,
                index2: 1,
                formDynamic: {
                    items: [
                        {
                            value: '',
                            index: 1,
                            status: 1
                        }
                    ],
                    items2: [
                        {
                            value: '',
                            index: 1,
                            status: 1,
                            id: 'items2_id_' + 1
                        }
                    ]
                }
            }
        },
        methods: {
            handleSubmit (name) {
                this.$refs[name].validate((valid) => {
                    if (valid) {
                        this.$Message.success('Success!');
                        console.log(JSON.stringify(this.formDynamic))
                    } else {
                        this.$Message.error('Fail!');
                    }
                })
            },
            handleReset (name) {
                this.$refs[name].resetFields();
            },
            handleAdd () {
                this.index++;
                this.formDynamic.items.push({
                    value: '',
                    index: this.index,
                    status: 1
                });
            },
            handleRemove (index) {
                this.formDynamic.items[index].status = 0;
            },
            handleAdd2 () {
                this.index2++;
                let id = 'items2_id_' + this.index2
                this.formDynamic.items2.push({
                    value: '',
                    index: this.index2,
                    status: 1,
                    id: id
                });
            },
            handleRemove2 (index) {
                this.formDynamic.items2[index].status = 0;
            }
        }
    }
</script>
上面代码笔者实现了自定义 id 的添加,以字符串 items2_id_ 为前缀,加上数字组成 id,读者可根据自己的业务进行自定义命名前缀,道理是相同的
运行效果如下
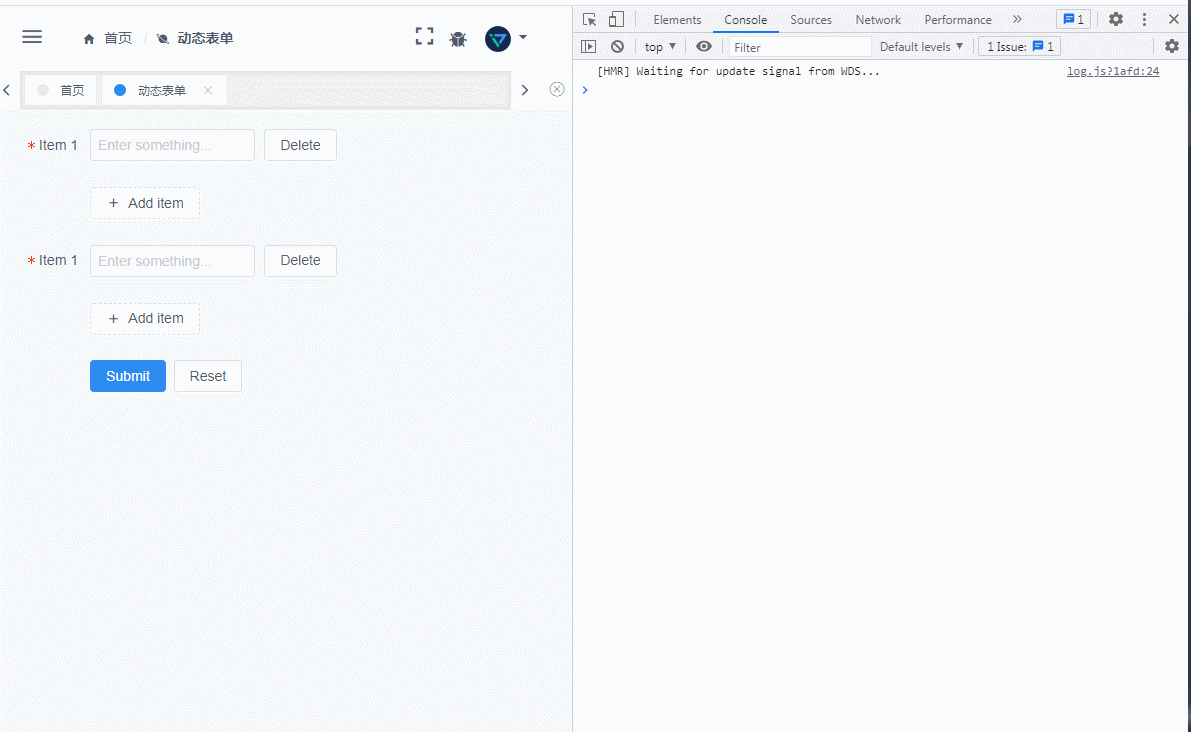
没有了警告
至此完
智能推荐
Delphi dbgrideh序号_dbgrideh增加序号和箭头-程序员宅基地
文章浏览阅读267次。数据库里面的数据没有序号的数据,在dbgrideh上新增一列自定义其字段,例如:id。在dbgrideh控件上的‘OnDrawColumnCell’事件下写下代码。在unidatesource的‘OnDataChange’事件下写下。if DataCol = 0 then //设置在第一列。在编码的开头定义i,为integer。_dbgrideh增加序号和箭头
samber/lo 库的使用方法: 处理切片-程序员宅基地
文章浏览阅读1.4k次,点赞27次,收藏26次。是一个 Go 语言库,提供了一些常用的集合操作函数,如 Filter、Map 和 FilterMap。这个库函数太多,因此我决定按照功能分别介绍,本文介绍的是 samber/lo 库中处理切片的函数。主要参考库的README。_samber/lo
verilog乘法器以及booth编码改进_改进booth编码-程序员宅基地
文章浏览阅读4.6k次,点赞7次,收藏28次。第一章 整数乘法器1.1 整数的概念整数在IEEE 的规定上有,短整数short integer , 中整数integer 和 长整数long integer ,它们之间的关系如下: 整数字节空间取值范围短整数一个字节-127 ~ 127中整数两个字节-32767~32767长整数和四个字节-2147483647~2147483647 在这里笔者以短整数..._改进booth编码
C语言课程笔记知识总结与感想_c语言知识点感想-程序员宅基地
文章浏览阅读1.3k次。 C数据类型。{常量与变量}第2章常量:整型常量: 有符号整型常量:默认int定义为有符号整数,无需使用signed. 无符号整型常量:不能表示成小于零的数。 长整型常量。 无符号长整型常量。 实型..._c语言知识点感想
1.1 基于B/S 结构的 Web 应用_b/s应用-程序员宅基地
文章浏览阅读1.5k次,点赞5次,收藏4次。选项,弹出首选项对话框,在左侧导航树中找到General->Content Types,在右侧Context Types树中展开Text,选择“Java Source File”节点,在下面的“Default encoding"输入框中输入“UTF-8",单击“Update”按钮,即可设置Java文件编码为UTF-8,如图1-9所示。而服务器端有两种,- -种是数据库服务器端,客户端通过数据库连接访问服务器端的数据,另一种是Socket服务器端,服务器端的程序通过Socket与客户端的程序通信。_b/s应用
使用 Docker 和 Traefik v1 搭建轻量代码仓库(Gogs)_gogs sqlite 性能-程序员宅基地
文章浏览阅读710次。本文使用「署名 4.0 国际 (CC BY 4.0)」许可协议,欢迎转载、或重新修改使用,但需要注明来源。 署名 4.0 国际 (CC BY 4.0)本文作者: 苏洋创建时间: 2020年02月04日统计字数: 12336字阅读时间: 25分钟阅读本文链接: https://soulteary.com/2020/02/04/gogs-git-server-with-docker-and-..._gogs sqlite 性能
随便推点
苍穹外卖day8(2)用户下单、微信支付
用户下单因为订单信息中包含了其他业务中的数据,在逻辑处理中涉及了多个其他业务,比如要判断地址簿、购物车数据是否为空(查询地址簿和购物车)订单表字段多,在插入数据的时候,要确保每个字段都有值向订单表插入数据后,也得向订单明细表插入数据:具体来说,就是遍历购物车数据,把购物车中的商品详细信息(菜品、套餐、数量、价格…)赋给订单详情表完成下单后要清空购物车订单支付需要商家号,跳过支付,模拟实现订单支付功能。
伯克利大模型排名-程序员宅基地
文章浏览阅读202次。网站: https://arena.lmsys.org/
【已解决】Python的坑:os.system()运行带有空格的长路径和双引号参数有bug_os.system怎么调试-程序员宅基地
文章浏览阅读4.7k次,点赞6次,收藏7次。当DOS命令行带有双引号路径、双引号参数时,os.system()运行的结果总是显示:“XXX(路径名)不是内部或外部命令,也不是可运行的程序或批处理文件。”_os.system怎么调试
基于FPGA的交通灯系统_vivado实例交通灯-程序员宅基地
文章浏览阅读3.6k次,点赞4次,收藏72次。基于FPGA的交通灯系统一、实验目的1.学习和掌握将实践中的要求抽象为逻辑需求关系的方法。2.掌握将小型数字系统划分为控制器和处理器的方法。3.掌握依据ASM图设计小型数字系统的方法4.掌握小型数字系统的调测方法5.掌握可编程器件及其开发软件的使用方法二、主要仪器设备及软件硬件:FPGA核心板(xc7a35tftg256_1)软件:vivado2018.3三、实验任务十字路口的交通灯管理系统。在主干道和小道的十字交叉路口,设置交通灯管理系统,管理车辆运行。小道路口设有传感器C(此处以按_vivado实例交通灯
MLP理解_mlp是什么意思-程序员宅基地
文章浏览阅读3.7w次,点赞97次,收藏245次。一直不理解MLP的作用,今天细看了下几篇博客,记录下自己心得:MLP实质MLP中文叫法是多层感知机,其实质就是神经网络。其提出主要是为了解决单层感知机无法解决的非线性问题。个人理解个人理解,MLP的forward结构可以简单看成:Output=Input×Weights+biases其中:Input:N×C1Weights:C1×C2biases:C2×1Output:N×C2Input一共N行,每行C1个Feature,MLP能够实现将C1维转换为C2维。这C2维中每一维都整合了原_mlp是什么意思
zabbix监控深信服_zabbix3 通过snmpv3监控linux主机-程序员宅基地
文章浏览阅读685次。一、zabbix 3 通过snmp v3监控linux主机原因是第三方系统,无法安装zabbix客户端,只能通过snmp 协议来监控深信服:在AC和SSL_×××等设备中,SNMP默认是开启的,而且默认密码为sinfors(早期版本)或sangfor,而在NGAF中,这个功能不是默认开启的,在“网络/高级网络配置”中,设置了团体名,也无法访问SNMP。后来,经过查询各种资料,得知在NGAF开启SN..._深信服 mib zabbix